Search Engine Optimization (SEO)
နိယာမ
i18n.site ရှာဖွေမှုအညွှန်းပြုလုပ်ခြင်းကို လွယ်ကူချောမွေ့စေရန်အတွက် စာမျက်နှာတစ်ခုတည်းကို ပြန်လည်စတင်ခြင်းမဟုတ်သော တည်ဆောက်မှုပုံစံကို လက်ခံရယူရန်အတွက် သီးခြားအငြိမ်စာမျက်နှာနှင့် sitemap.xml ကူးယူလေ့လာရန်အတွက် ထုတ်ပေးမည်ဖြစ်သည်။
ဝင်ရောက်ခွင့်တောင်းဆိုချက်၏ User-Agent ကို ရှာဖွေရေးအင်ဂျင်စာရေးကိရိယာမှ အသုံးပြုသောအခါ၊ တောင်းဆိုချက်အား 302 မှတစ်ဆင့် static page သို့ ပြန်ညွှန်းမည်ဖြစ်သည်။
တည်ငြိမ်သောစာမျက်နှာများတွင်၊ ဤစာမျက်နှာကဲ့သို့သော မတူညီသောဘာသာစကားဗားရှင်းများသို့ လင့်ခ်များကိုညွှန်ပြရန် link အသုံးပြုပါ :
<link rel=alternate hreflang=zh href="https://i18n.site/zh/.htm">
<link rel=alternate hreflang=en href="https://i18n.site/en/.htm">
Local nginx ဖွဲ့စည်းမှု
နမူနာအဖြစ် ဒီမိုပရောဂျက်ရှိ .i18n/htm/main.yml ဖွဲ့စည်းမှုပုံစံဖိုင်ကို ယူပါ။
host: i18n-demo.github.io
seo: true
out:
  - fs

pkg:
  i: i18n.site
  md: i18n.site

cdn:
  v:
  jsd:
ကျေးဇူးပြု၍ ဦးစွာ အထက်ပါ host: တန်ဖိုးကို သင့်ဒိုမိန်းအမည်ဖြစ်သည့် xxx.com ကဲ့သို့ ပြောင်းလဲပါ။
ထို့နောက် i18n.site -n static page ကို out/main/htm directory တွင်ထုတ်ပေးပါမည်။
.i18n/htm/dist.package.json နှင့် .i18n/htm/dist.yml ကိုဖန်တီးရန် main ၏ဖွဲ့စည်းပုံကို ဦးစွာရည်ညွှန်းခြင်းကဲ့သို့သော အခြားဖွဲ့စည်းပုံဖိုင်များကို သင်ဖွင့်နိုင်သည်။
ထို့နောက် static page ကို out/dist/htm သို့ထုတ်ပေးရန် i18n.site -n -c dist run ပါ။
nginx အောက်ပါ configuration ကိုရည်ညွှန်းပြီး သတ်မှတ်နိုင်ပါသည်။
map $http_user_agent $botLang {
  "~*baidu|yisou|sogou|360|byte" "/zh";
  "~*facebookexternalhit|slurp|bot|spider|curl" "/en";
  default "";
}

server {
  http2 on;
  listen 443 quic ;
  listen 443 ssl ;
  listen [::]:443 quic ;
  listen [::]:443 ssl ;

  add_header Alt-Svc 'h3=":443";ma=99999;persist=1';

  server_name doc.flashduty.com;

  ssl_certificate /root/.acme.sh/doc.flashduty.com_ecc/fullchain.cer;
  ssl_certificate_key /root/.acme.sh/doc.flashduty.com_ecc/doc.flashduty.com.key;

  root /mnt/doc.flashduty.com;

# ဆာဗာလုပ်သားစခရစ်များကို အချိန်အကြာကြီး သိမ်းဆည်းမထားပါနှင့်
  location = /S.js {
    add_header Cache-Control "max-age=600";
  }

# အခြားအငြိမ်အရင်းအမြစ်များအတွက် ပိုရှည်သော ကက်ရှ်အချိန်များကို သတ်မှတ်ပါ။
  location ~* \.(js|css|htm|html|md|avif|json|ico|xml|rss|gz|mp4|png|svg|txt|webmanifest)$ {
    add_header Cache-Control "max-age=999999";
  }

# crawler မှအသုံးပြုသည့် static file ကို ပင်မစာမျက်နှာထည့်သွင်းမှုအဖြစ် သတ်မှတ်ပါ။
  location = / {
    # $botLang သည် ဗလာမဟုတ်ပါက၊ သတ်မှတ်ထားသော ဘာသာစကားလမ်းကြောင်းအတိုင်း စာရေးကိရိယာဝင်ရောက်ခြင်းနှင့် ပြန်ညွှန်းခြင်းကို ဆိုလိုသည်။
    if ($botLang) {
        return 301 $botLang/flashduty.htm;
    }
    add_header Cache-Control "max-age=600";
    rewrite ^ /index.html break;
  }

# စာမျက်နှာတစ်ခုတည်း အပလီကေးရှင်း ဖွဲ့စည်းမှုပုံစံ
  location / {
    if ($botLang) {
      return 302 $botLang$request_uri.htm;
    }
    add_header Cache-Control "max-age=600";
    rewrite ^ /index.html break;
  }
}

server {
  server_name doc.flashduty.com;
  listen      80;
  listen      [::]:80 ;
  location    / {
    rewrite ^(.+) https://$host$1 permanent;
  }
  location /.well-known/acme-challenge/ {
    root /mnt/doc.flashduty.com/;
  }
}
ပုံသေဖိုင်များ အပ်လုဒ်တင်ခြင်းအတွက် အရာဝတ္ထုသိုလှောင်မှုကို စီစဉ်သတ်မှတ်ပါ။
Static ဖိုင်များကို စက်တွင်းတွင် ထုတ်ပေးနိုင်ပြီး၊ သို့သော် ပို၍အသုံးများသောနည်းလမ်းမှာ ၎င်းတို့ကို အရာဝတ္ထုသိုလှောင်မှုသို့ အပ်လုဒ်လုပ်ရန်ဖြစ်သည်။
အပေါ်က configure out Modify လုပ်ပါ :
out:
  - s3
ထို့နောက် ~/.config/i18n.site.yml တည်းဖြတ်ပြီး အောက်ပါ configuration ကို ပေါင်းထည့်ပါ :
site:
  i18n.site:
    s3:
      - endpoint: s3.eu-central-003.backblazeb2.com
        ak: # access key
        sk: # secret key
        bucket: # bucket name
        # region:
စီစဉ်ဖွဲ့စည်းမှုတွင်၊ ကျေးဇူးပြု၍ i18n.site host: in .i18n/htm/main.yml ၏တန်ဖိုးသို့ပြောင်းပါ၊ s3 အောက်ရှိ အရာဝတ္တုစတိုးဆိုင်များစွာကို ပြင်ဆင်သတ်မှတ်နိုင်ပြီး region အကွက်သည် စိတ်ကြိုက်ရွေးချယ်နိုင်သည် (ဤအကွက်ကို အရာဝတ္ထုဆိုင်များစွာက သတ်မှတ်ရန်မလိုအပ်ပါ)။
ထို့နောက် ပရောဂျက်ကို ပြန်လည်ထုတ်ဝေရန် i18n.site -n ကိုဖွင့်ပါ။
အကယ်၍ သင်သည် ~/.config/i18n.site.yml ပြုပြင်ပြီး ပြန်လည် အပ်လုဒ်လုပ်လိုပါက၊ ကျေးဇူးပြု၍ အပ်လုဒ် cache ကို ရှင်းလင်းရန် ပရောဂျက် root directory တွင် အောက်ပါ command ကို အသုံးပြုပါ :
rm -rf .i18n/data/seo .i18n/data/public
cloudflare ဖွဲ့စည်းမှု
ဒိုမိန်းအမည် cloudflare
ကူးပြောင်းခြင်းဆိုင်ရာ စည်းမျဉ်းများ
အောက်တွင်ပြထားသည့်အတိုင်း ပြောင်းလဲခြင်းစည်းမျဉ်းများကို ထည့်ပါ-
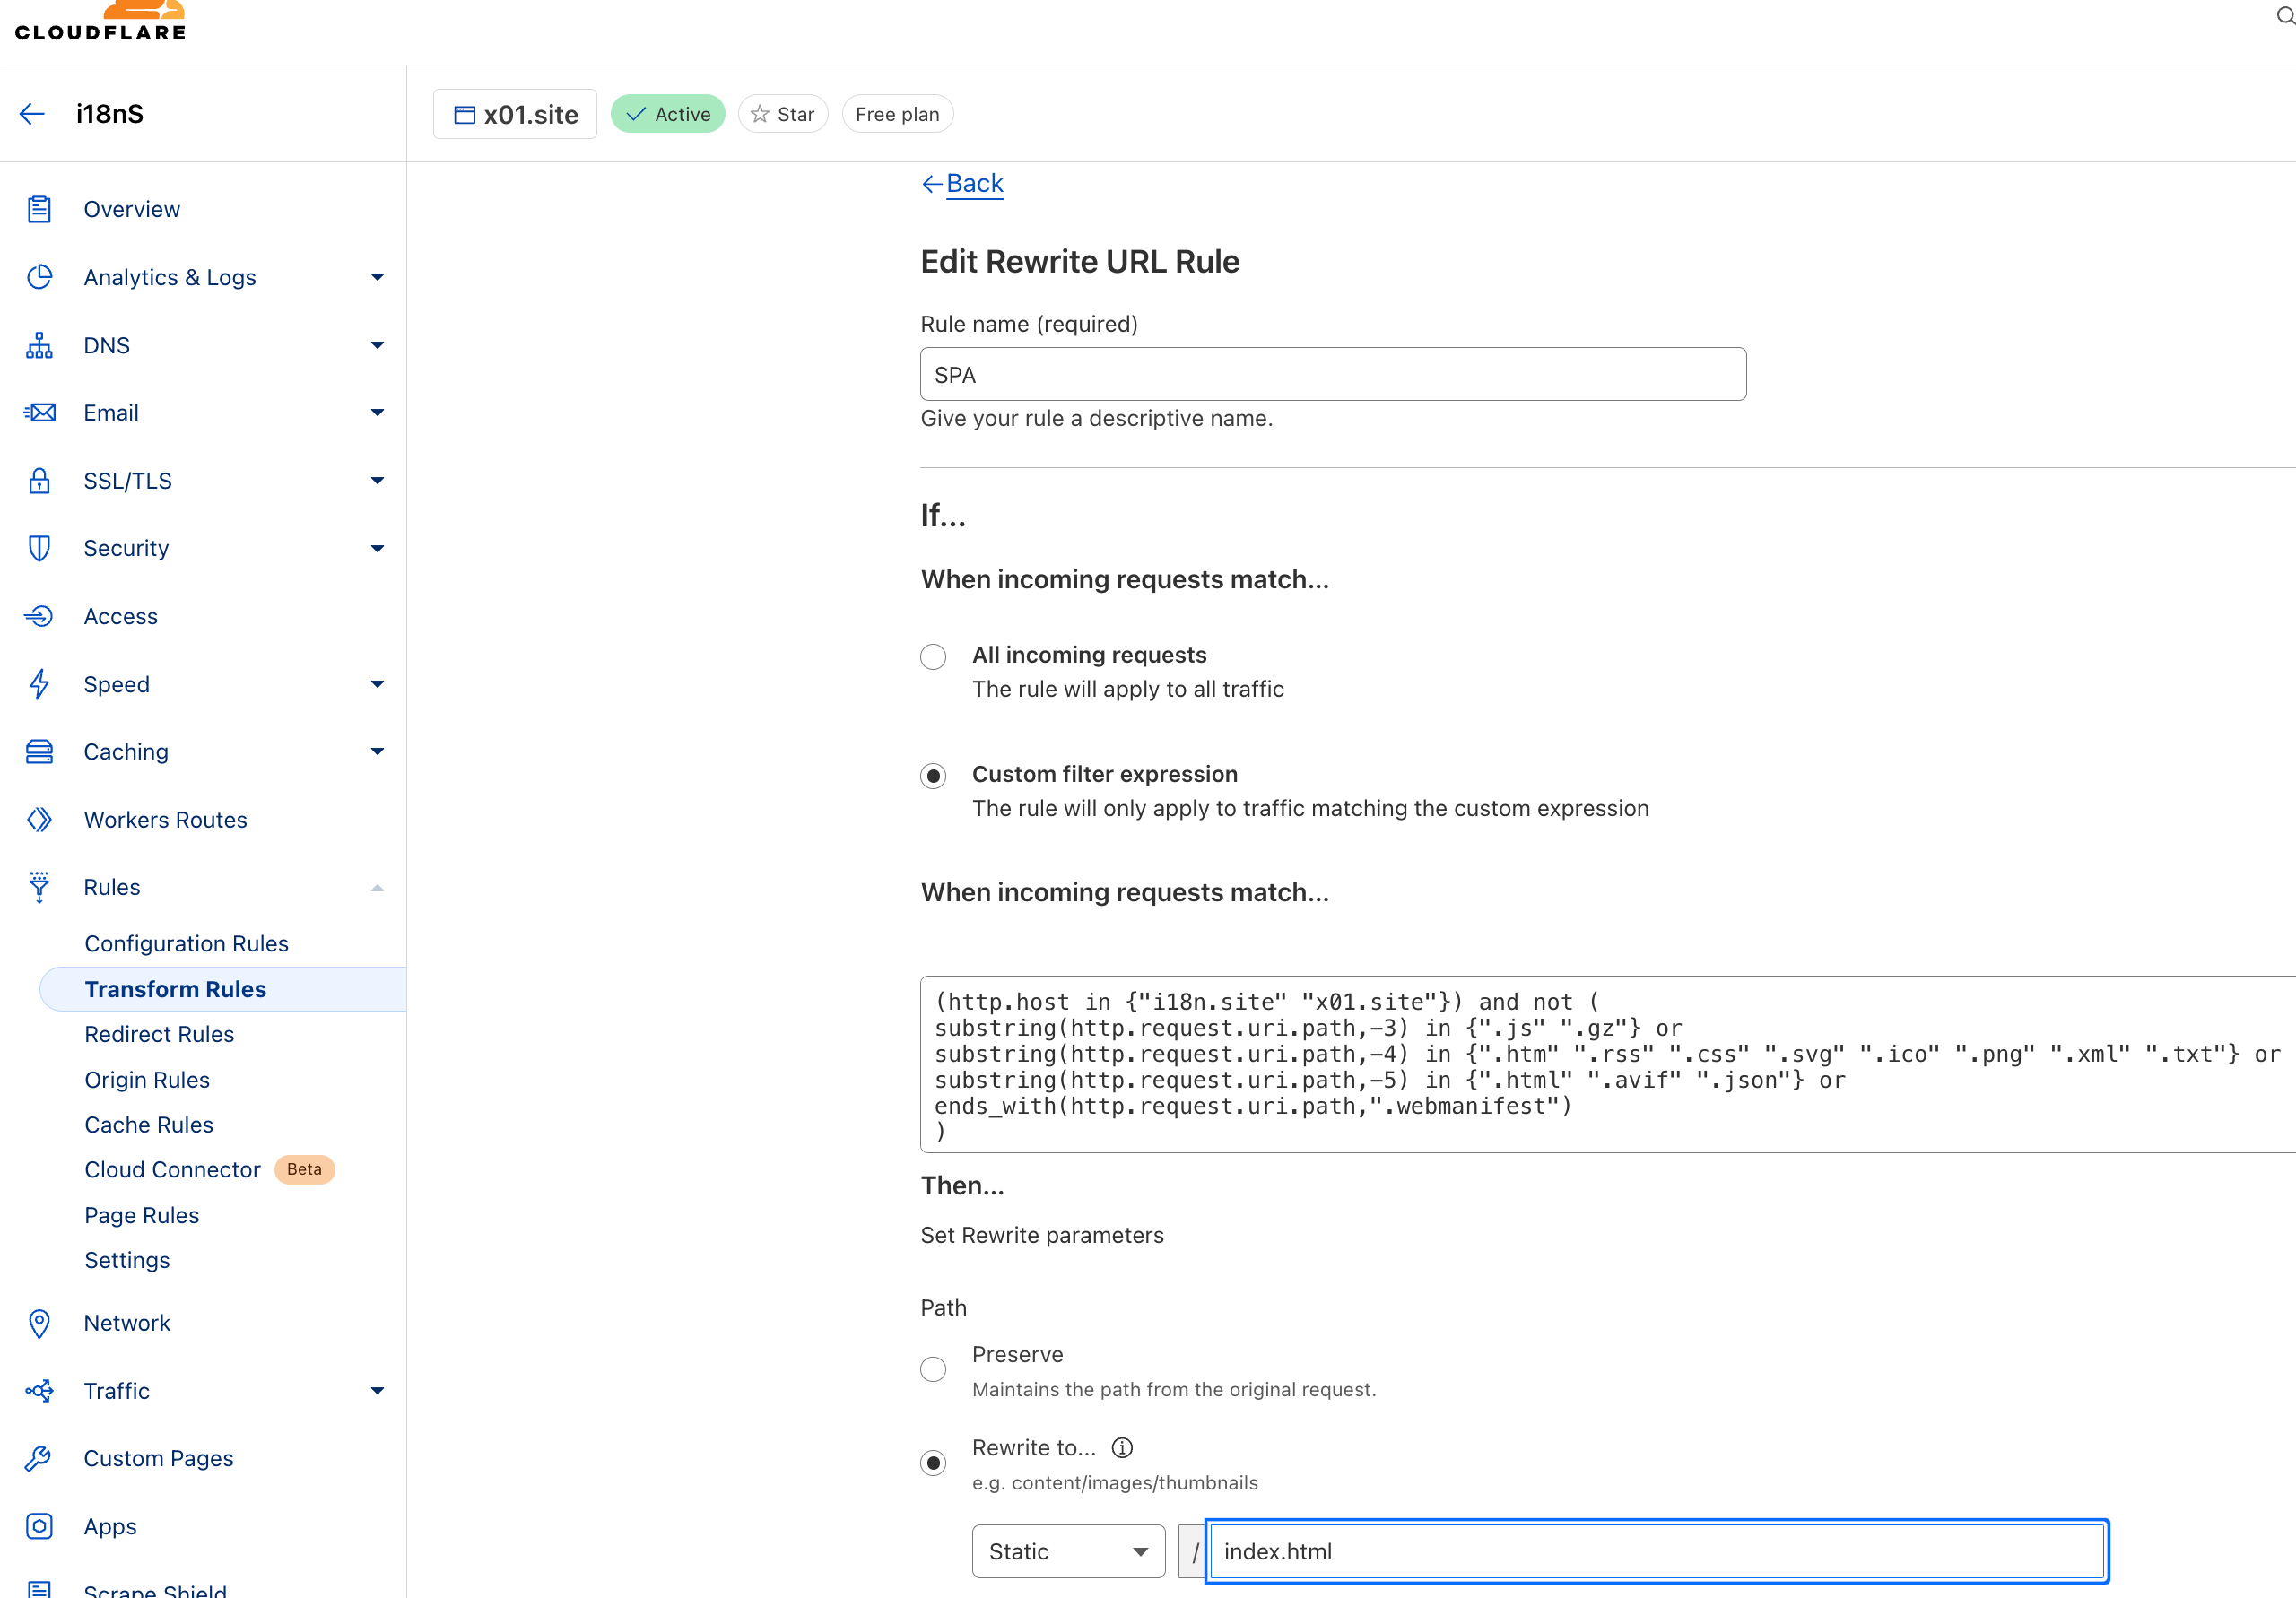
စည်းမျဉ်းကုဒ်မှာ အောက်ပါအတိုင်းဖြစ်သည်၊ ကျေးဇူးပြု၍ "i18n.site" ကုဒ်ကို သင့်ဒိုမိန်းအမည်သို့ ပြင်ဆင်ပါ။
(http.host in {"i18n.site"}) and not (
substring(http.request.uri.path,-3) in {".js" ".gz"} or
substring(http.request.uri.path,-4) in {".htm" ".rss" ".css" ".svg" ".ico" ".png" ".xml" ".txt"} or
substring(http.request.uri.path,-5) in {".html" ".avif" ".json"} or
ends_with(http.request.uri.path,".webmanifest")
)
caching စည်းမျဉ်းများ
အောက်ပါအတိုင်း cache စည်းမျဉ်းများကို ထည့်ပါ
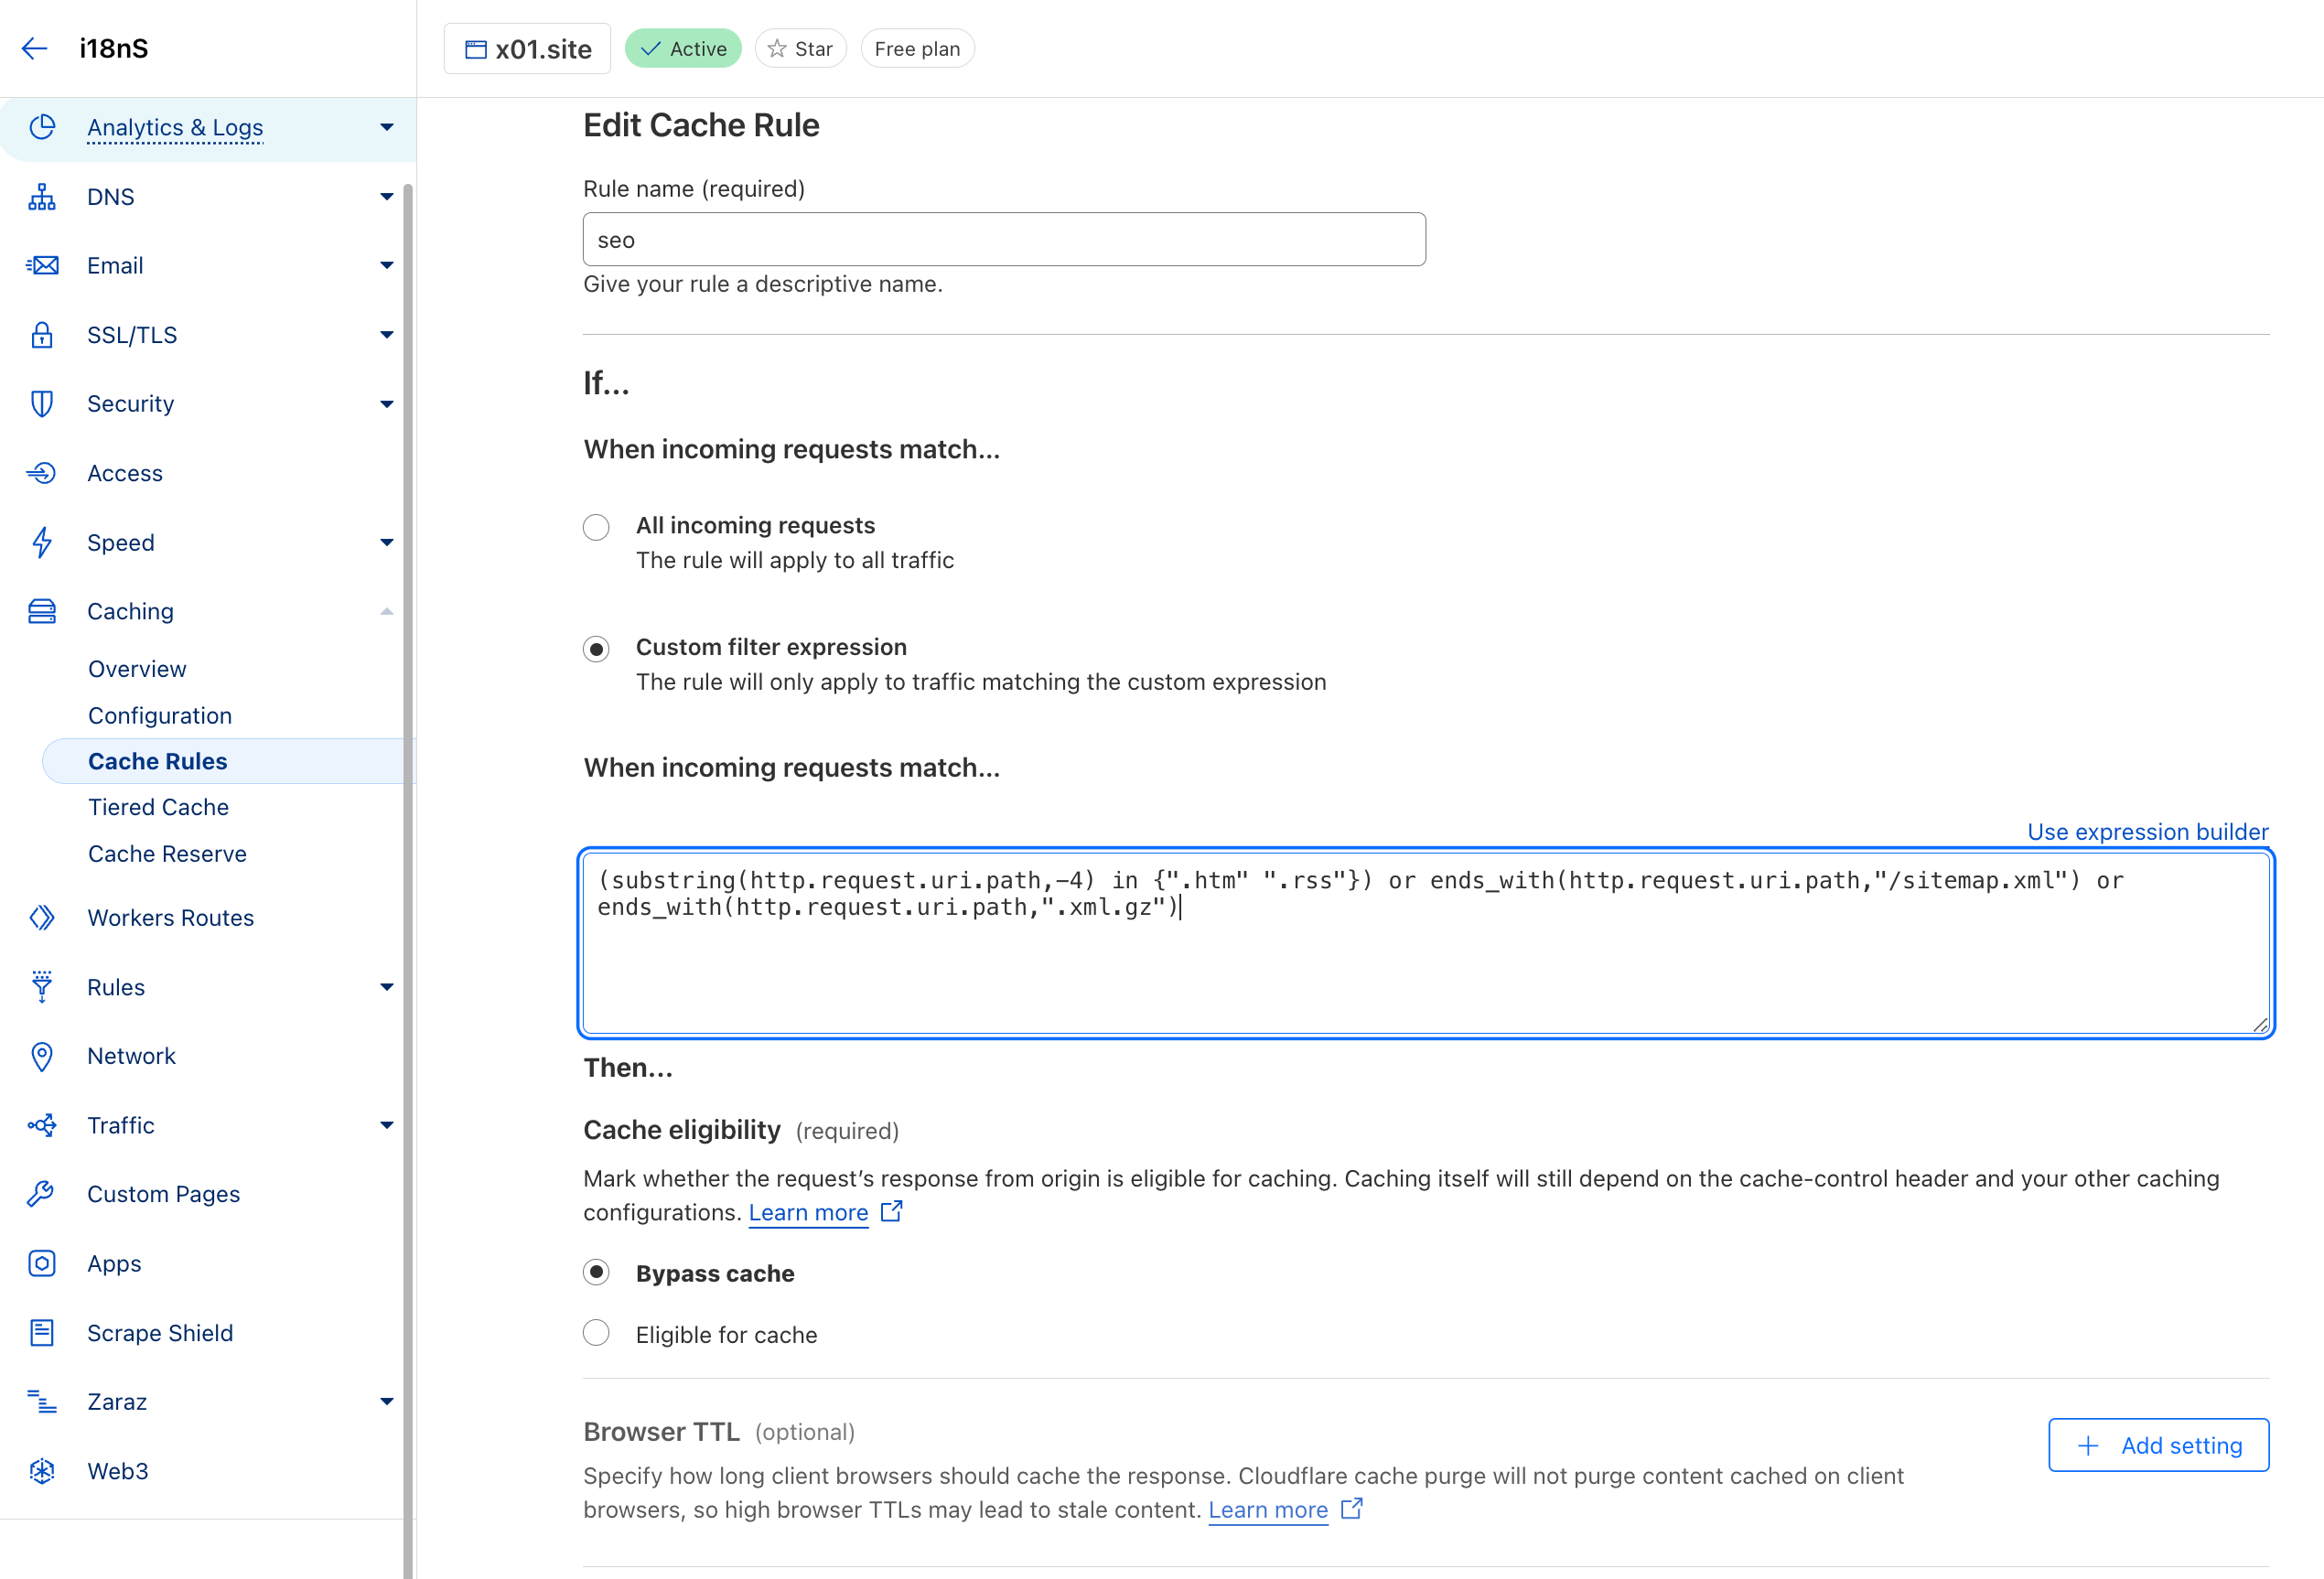
(substring(http.request.uri.path,-4) in {".htm" ".rss"}) or ends_with(http.request.uri.path,"/sitemap.xml") or ends_with(http.request.uri.path,".xml.gz")
စည်းမျဉ်းများကို ပြန်ညွှန်းသည်။
ပြန်ညွှန်းခြင်းဆိုင်ရာ စည်းမျဉ်းများကို အောက်ပါအတိုင်း သတ်မှတ်ပါ၊ ကျေးဇူးပြု၍ "i18n.site" ကုဒ်ကို သင့်ဒိုမိန်းအမည်သို့ ပြင်ဆင်ပါ။
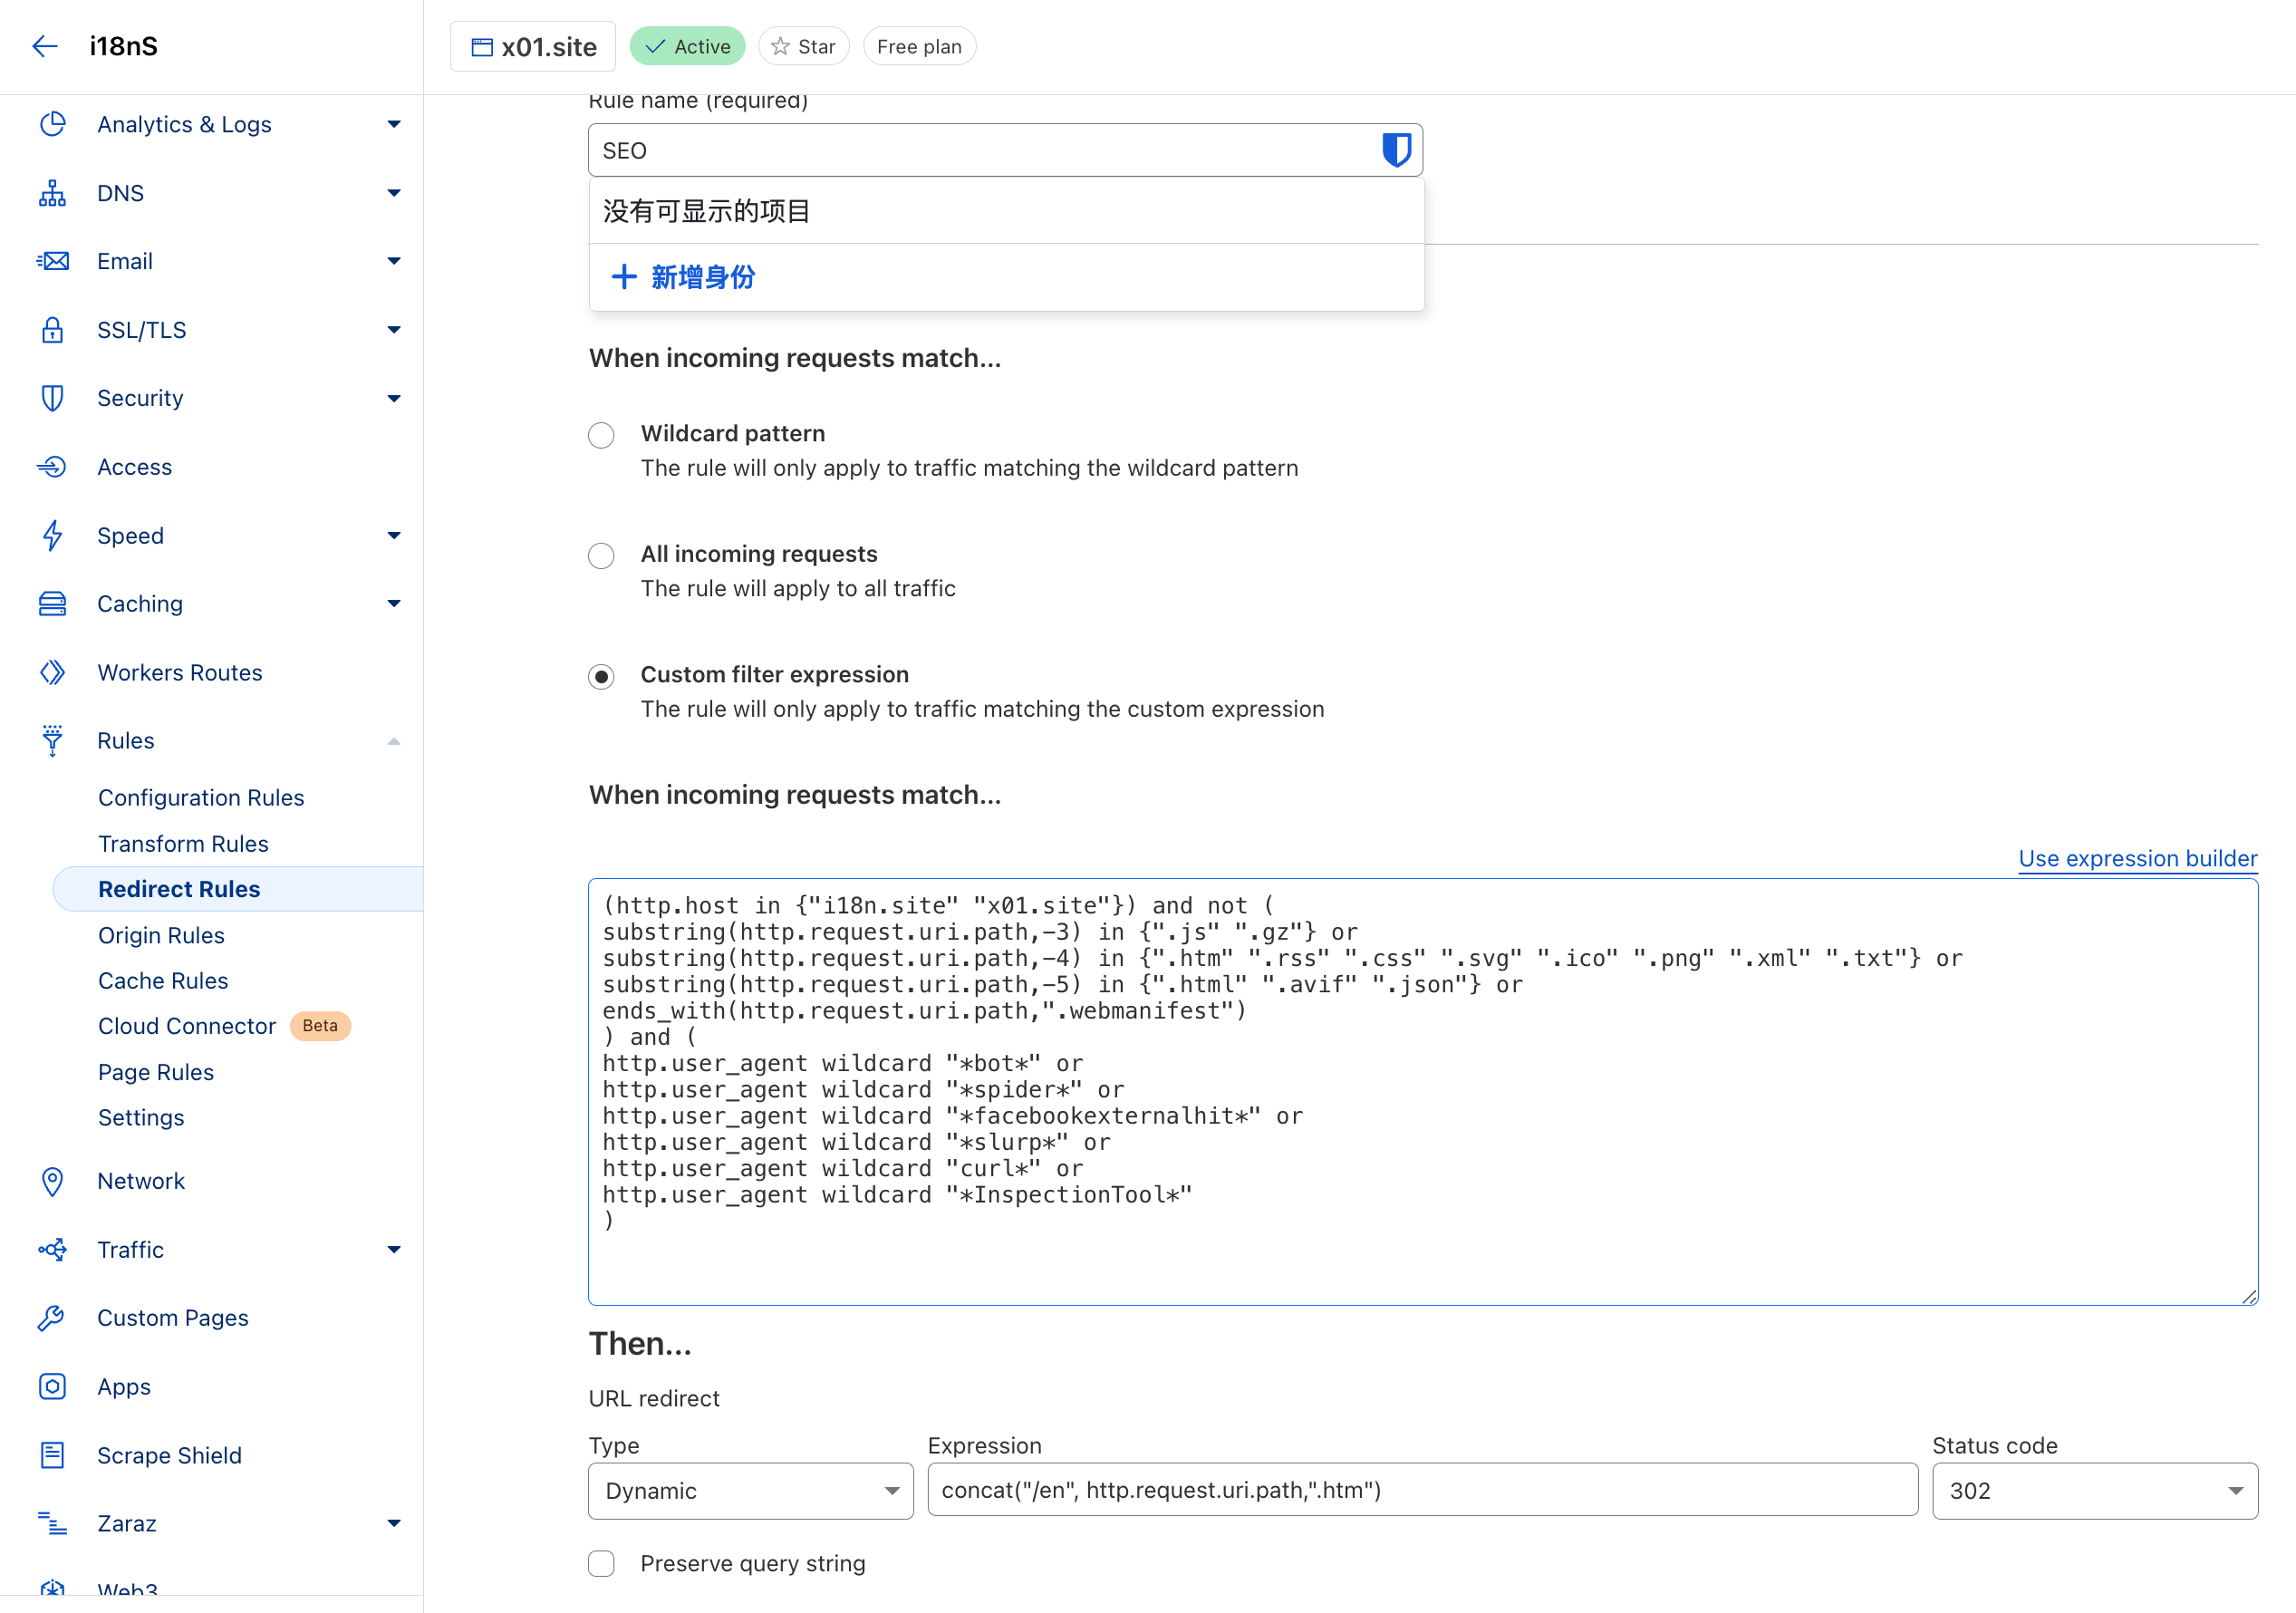
(http.host in {"i18n.site"}) and not (
substring(http.request.uri.path,-3) in {".js" ".gz"} or
substring(http.request.uri.path,-4) in {".htm" ".rss" ".css" ".svg" ".ico" ".png" ".xml" ".txt"} or
substring(http.request.uri.path,-5) in {".html" ".avif" ".json"} or
ends_with(http.request.uri.path,".webmanifest")
) and (
http.user_agent wildcard "*bot*" or
http.user_agent wildcard "*spider*" or
http.user_agent wildcard "*facebookexternalhit*" or
http.user_agent wildcard "*slurp*" or
http.user_agent wildcard "curl*" or
http.user_agent wildcard "*InspectionTool*"
)
URL redirect သွက်လက်သောလမ်းကြောင်းပြန်ညွှန်မှုကို ရွေးချယ်ပါ၊ ကျေးဇူးပြု၍ လမ်းကြောင်း 1 ကို သင်ရှာဖွေရေးအင်ဂျင်များထည့်သွင်းလိုသည့် မူရင်းဘာသာစကားသို့ ပြန်ညွှန်းလမ်းကြောင်း concat("/en",http.request.uri.path,".htm") တွင် /en ပြင်ဆင်ပါ။
Baidu Intelligent Cloud ဖွဲ့စည်းမှု
တရုတ်ပြည်မကြီးသို့ ဝန်ဆောင်မှုများ ပေးဆောင်ရန် လိုအပ်ပါက Baidu Smart Cloud ကို အသုံးပြုနိုင်ပါသည်။
ဒေတာကို Baidu Object Storage သို့ အပ်လုဒ်လုပ်ပြီး Baidu Content Distribution Network သို့ ချိတ်ဆက်ထားသည်။
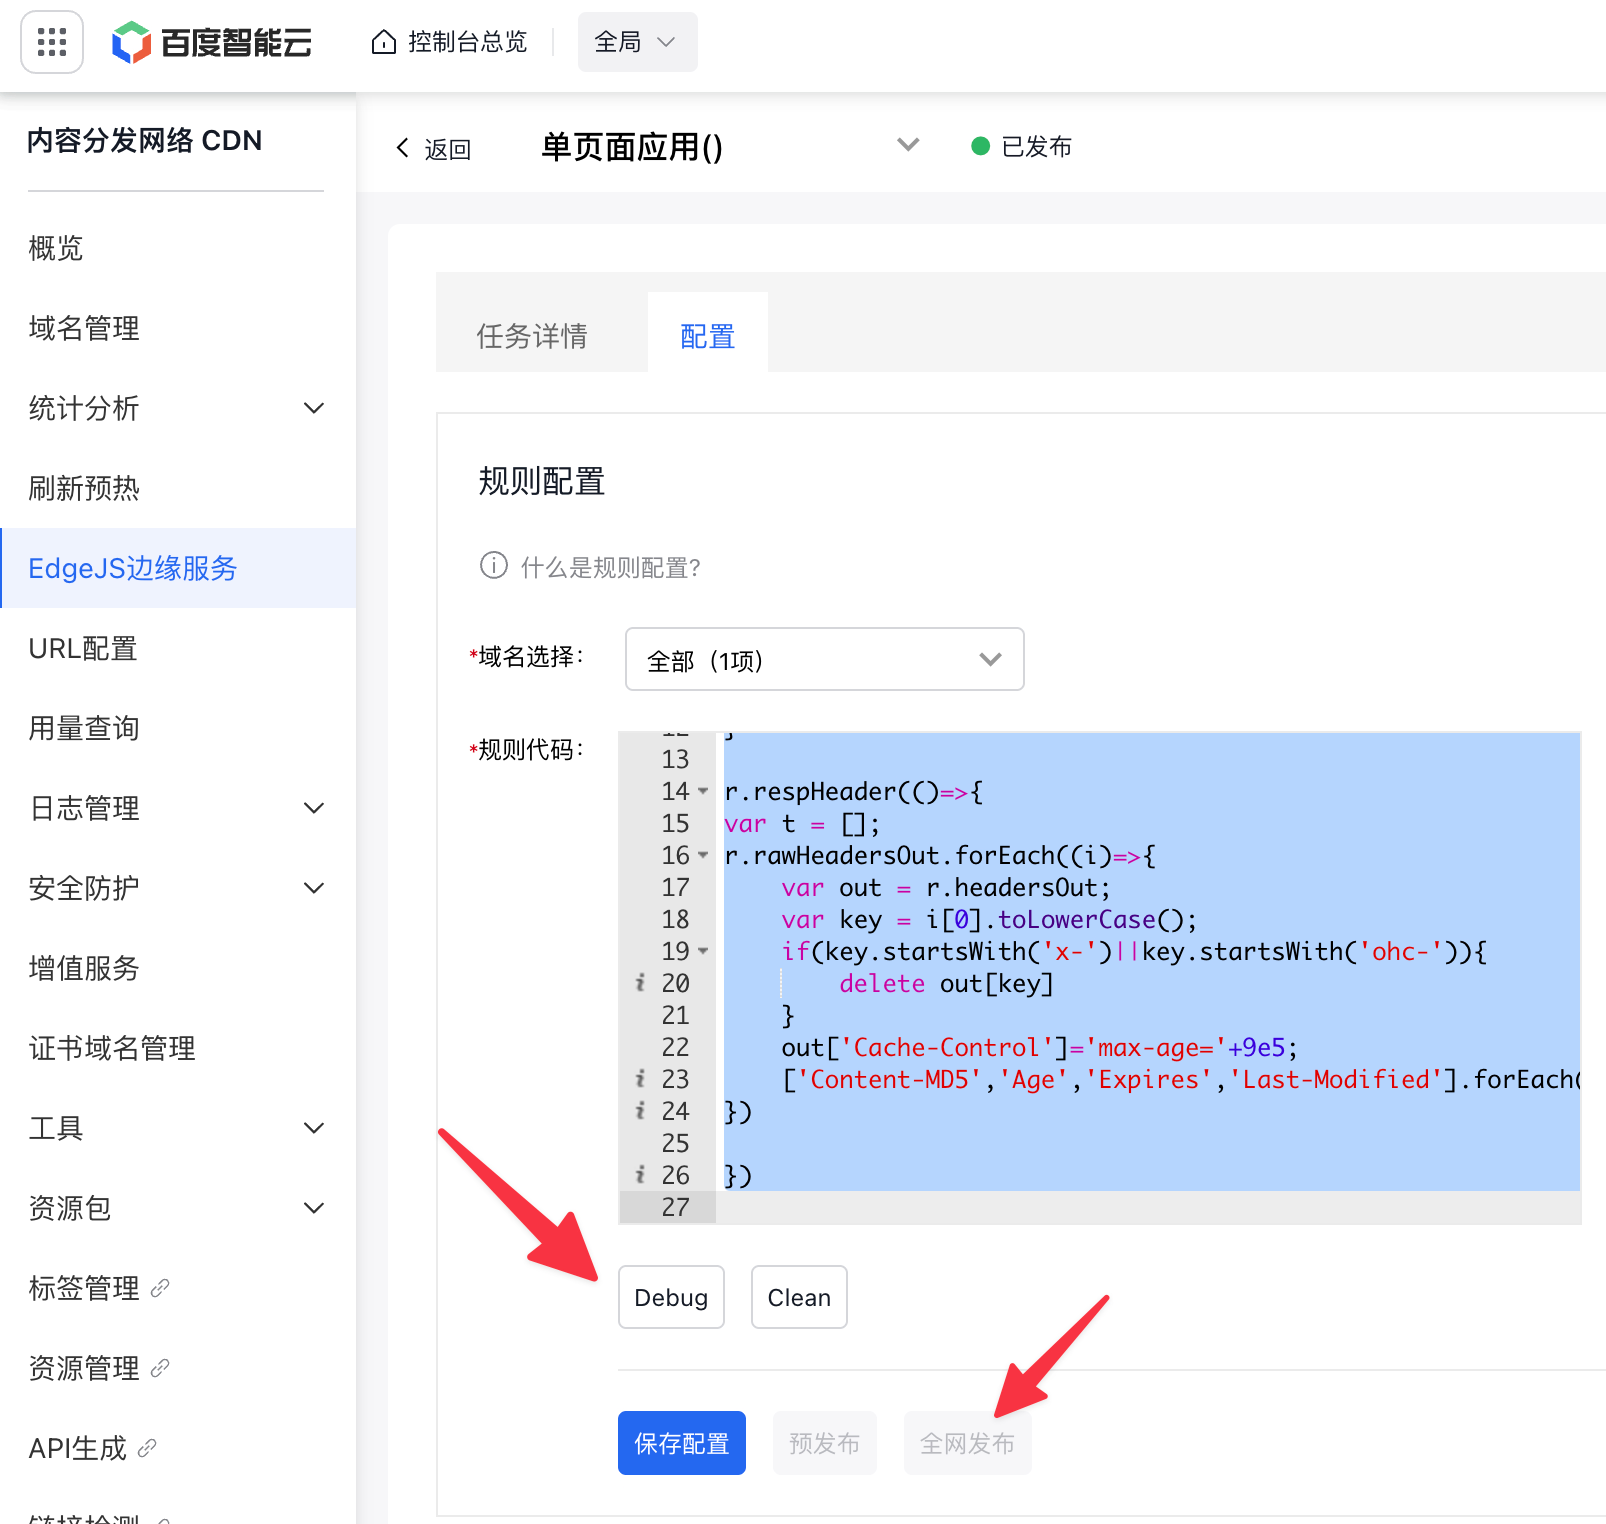
ထို့နောက် အောက်ပါအတိုင်း EdgeJS edge service တွင် script ကိုဖန်တီးပါ။
const uri = r.uri, p = uri.lastIndexOf(".");
if (
  p < 0 ||
  !"|js|css|htm|html|md|avif|json|ico|xml|rss|gz|mp4|png|svg|txt|webmanifest|".includes(
    "|" + uri.slice(p + 1) + "|",
  )
) {
  const ua = r.headersIn["User-Agent"].toLowerCase()
  if (/facebookexternalhit|slurp|bot|spider|curl/.test(ua)) {
    r.return(
      302,
      (/baidu|yisou|sogou|360|byte/.test(ua) ? "/zh" : "/en") + r.uri + ".htm",
    )
  } else {
    r.uri = "/index.html"
  }
}

r.respHeader(() => {
  const t = [], out = r.headersOut;
  ["Content-MD5", "Age", "Expires", "Last-Modified"].forEach(
    i => delete out[i]
  )
  r.rawHeadersOut.forEach(i => {
    const key = i[0].toLowerCase()
    if (key.startsWith("x-") || key.startsWith("ohc-")) {
      delete out[key]
    }
  })
  out["Cache-Control"] = "max-age=" + 9e5
  // တုံ့ပြန်မှု ခေါင်းစီးများကို out.XXX = 'MSG' ကဲ့သို့သော အမှားရှာအထွက်ထွက်အဖြစ် သတ်မှတ်နိုင်သည်။
})
Debug နှိပ်ပါ၊ ထို့နောက် ကွန်ရက်တစ်ခုလုံးသို့ Publish ကိုနှိပ်ပါ။
အဆင့်မြင့်အသုံးပြုမှု- ဒေသဆိုင်ရာဖြေရှင်းချက်အပေါ်အခြေခံ၍ အသွားအလာဖြန့်ဝေပါ။
သင်သည် တရုတ်ပြည်မကြီးတွင် ဝန်ဆောင်မှုများ ပေးဆောင်လိုပြီး cloudflare နိုင်ငံတကာ ၀င်ထွက်မှုကို လိုချင်ပါက၊ ဒေသဆိုင်ရာ ဆုံးဖြတ်ချက်ဖြင့် DNS သင် အသုံးပြုနိုင်သည်။
ဥပမာအားဖြင့်၊ Huawei Cloud DNS တရုတ်ပြည်မကြီး၏အသွားအလာကို Baidu Smart Cloud မှတစ်ဆင့် ဖြတ်သန်းနိုင်ပြီး နိုင်ငံတကာအသွားအလာ cloudflare ကိုဖြတ်သန်းနိုင်သည်။
cloudflare ၏ဖွဲ့စည်းပုံတွင် အမှားအယွင်းများစွာရှိသည်။ ဤသည်မှာ သတိပြုရန်အချက်အချို့ဖြစ်သည် :
ဒိုမိန်းအမည်ကို အခြား DNS တွင် လက်ခံထားသည်၊ အသုံးပြုနည်း cloudflare
ပင်မဒိုမိန်းအမည်ကို ဤဒိုမိန်းအမည်နှင့် ချိတ်ဆက်ရန် ပထမဆုံး cloudflare နှင့် SSL/TLS → စိတ်ကြိုက်ဒိုမိန်းအမည်ကို အသုံးပြုပါ။
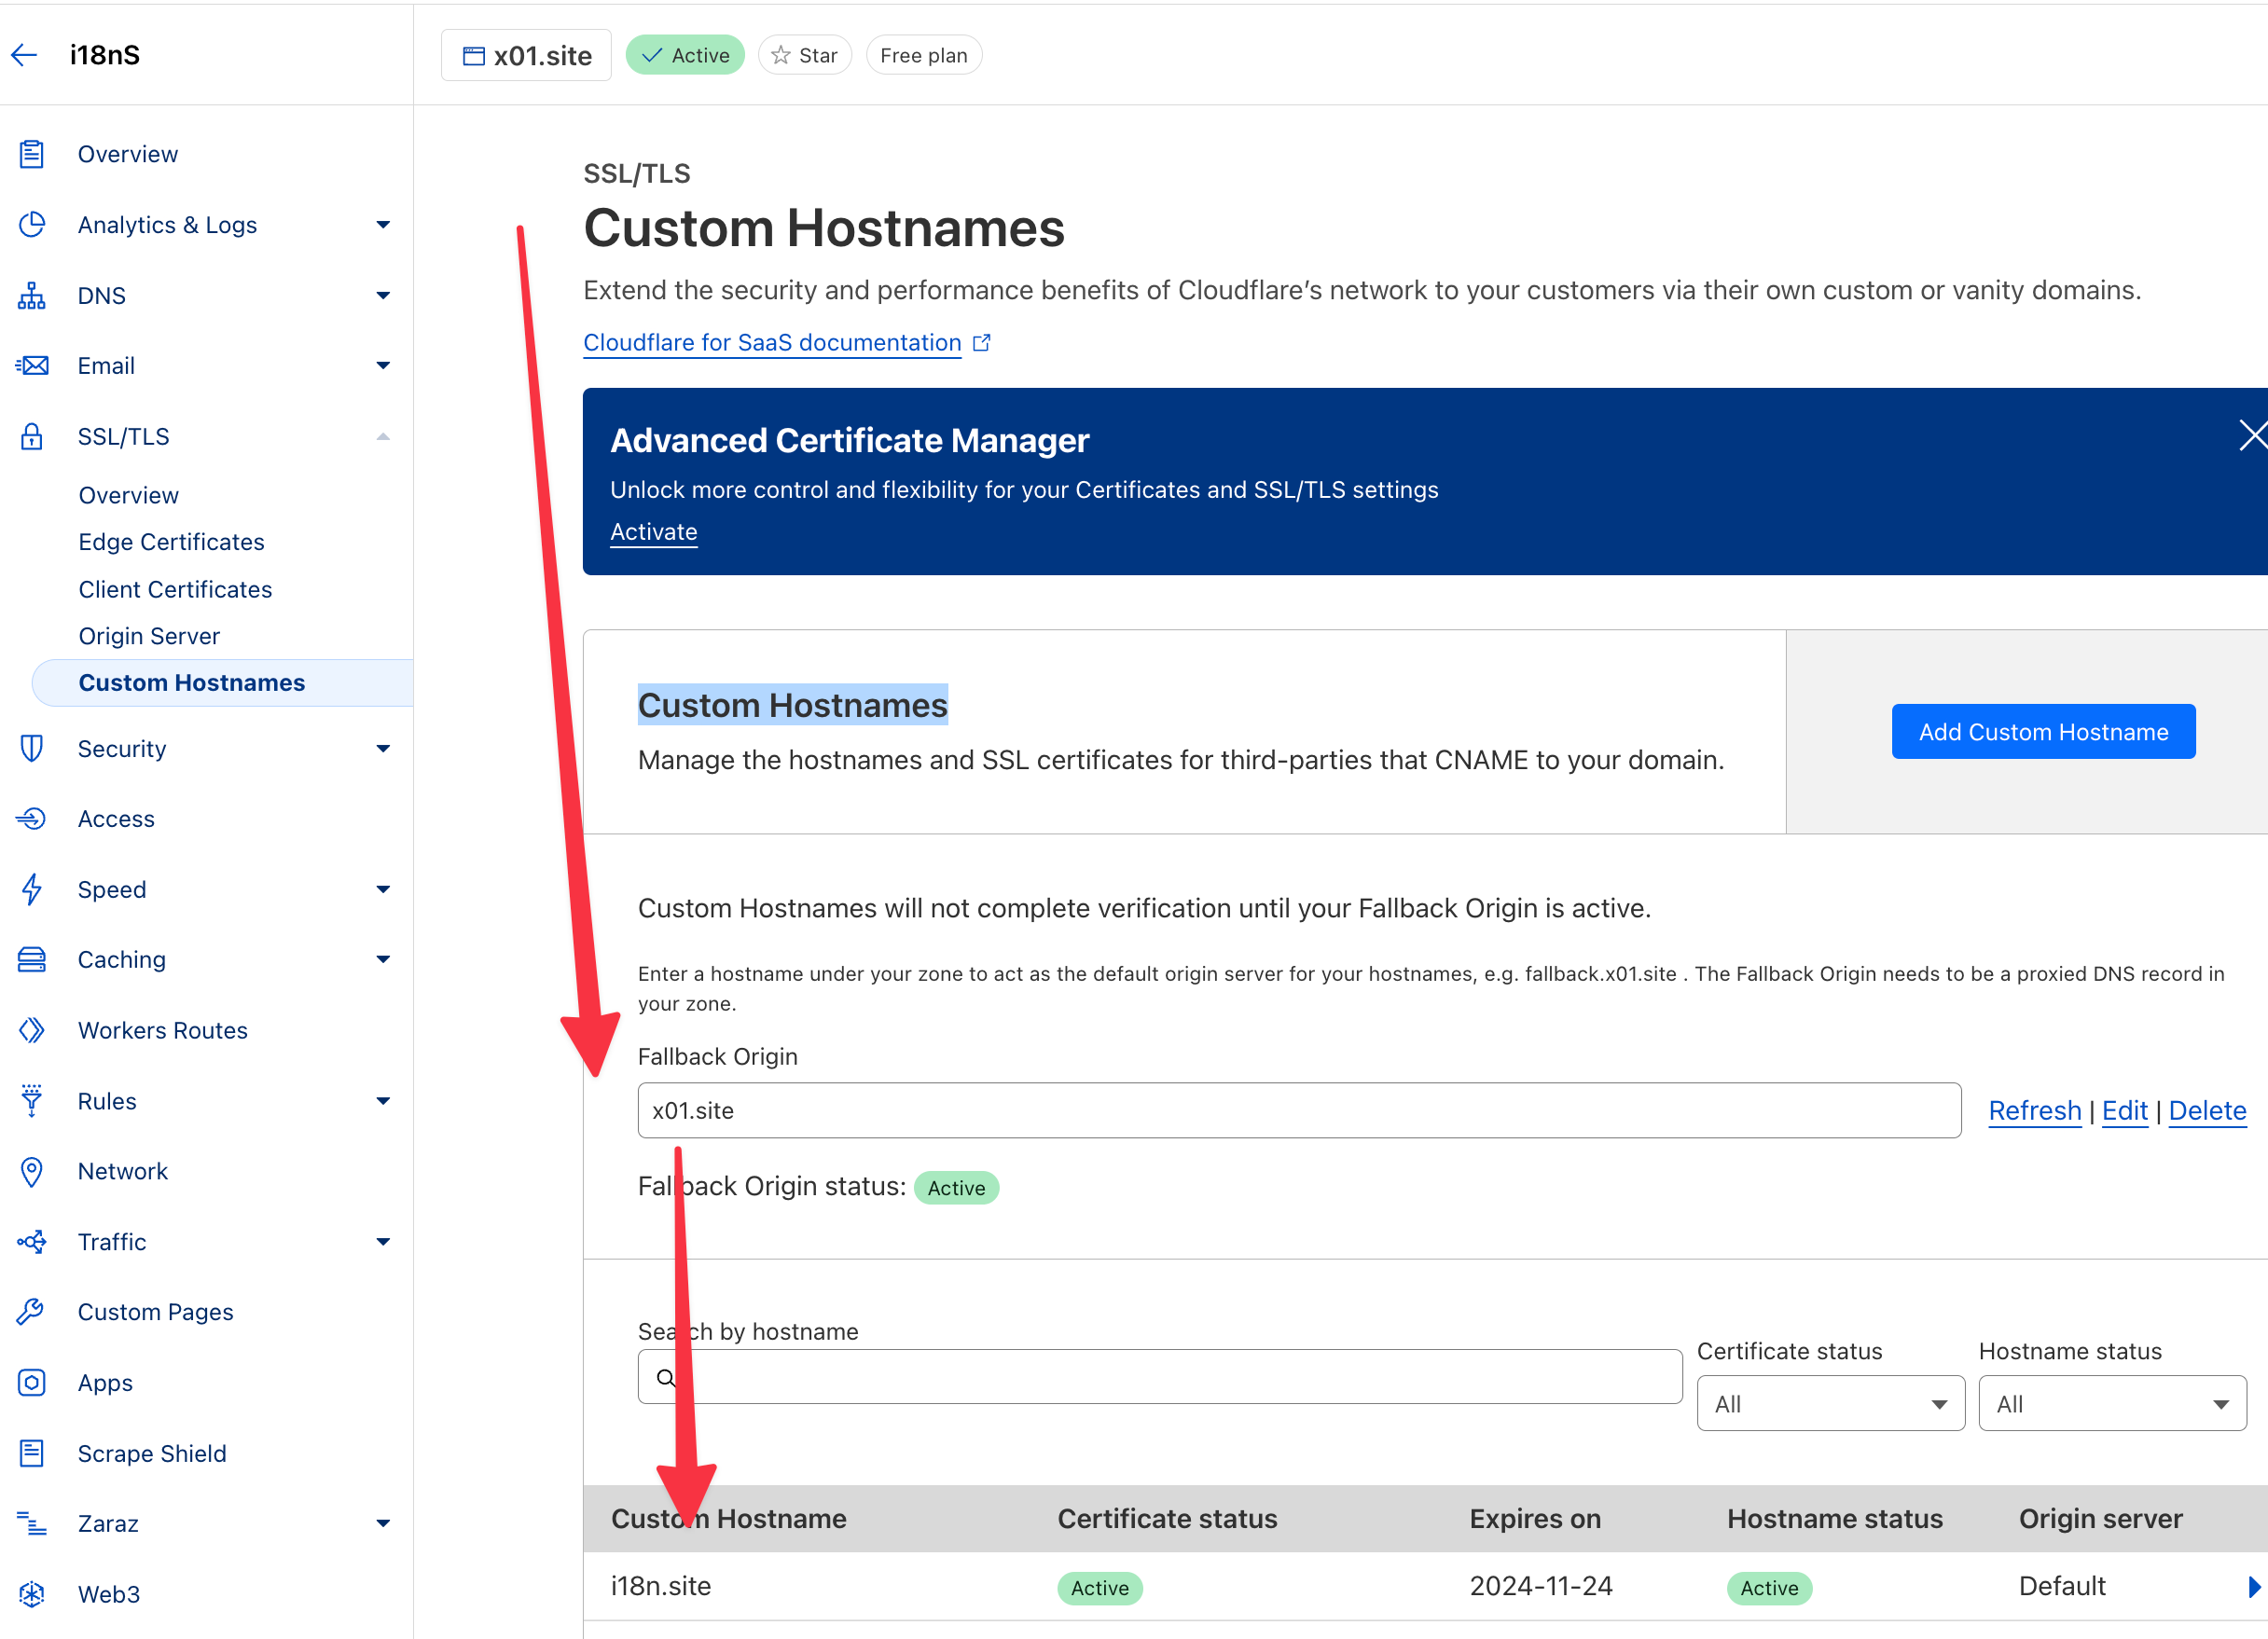
စိတ်ကြိုက်ဒိုမိန်းအမည်ဖြင့် ၀င်ရောက်၍မရပါ cloudflare R2
built cloudflare in object storage R2 ကို စိတ်ကြိုက် domain name ဖြင့် ဝင်ရောက်၍မရသောကြောင့်၊ static files များထားရှိရန် ပြင်ပအရာဝတ္ထုသိုလှောင်မှုကို အသုံးပြုရန်လိုအပ်ပါသည်။
ဤနေရာတွင် ကျွန်ုပ်တို့သည် ပြင်ပအရာဝတ္ထုများကို မည်သို့ချည်နှောင်ပြီး cloudflare တွင် သိမ်းဆည်းနည်းကို သရုပ်ပြရန် ဥပမာတစ်ခုအနေနှင့် ယူပါသည် backblaze.com
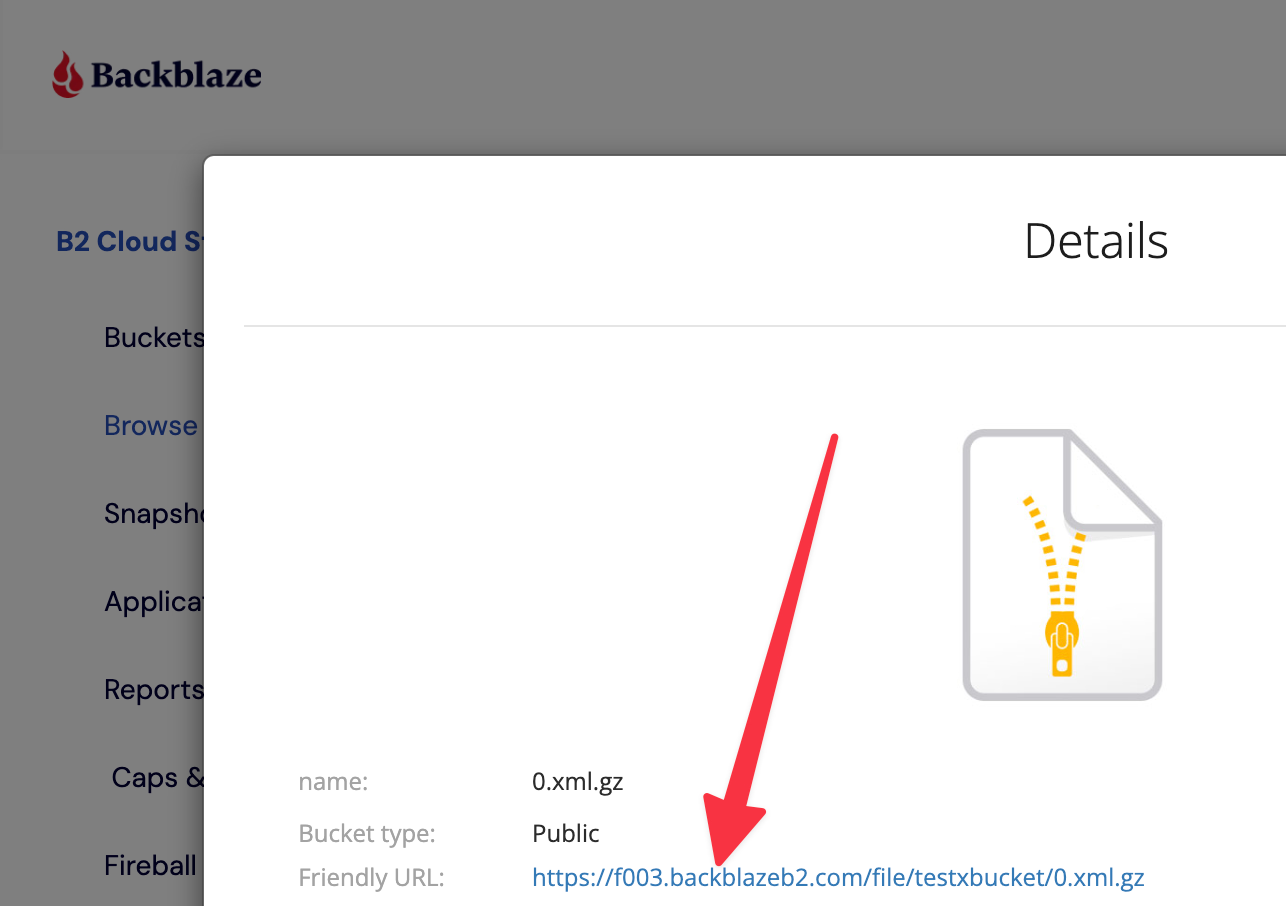
backblaze.com တွင် ပုံးတစ်ခုဖန်တီးပါ၊ မည်သည့်ဖိုင်ကိုမဆို အပ်လုဒ်လုပ်ပါ၊ ဖိုင်ကိုကြည့်ရှုရန် နှိပ်ပါ၊ ဤနေရာတွင် f003.backblazeb2.com ဖြစ်သည့် Friendly URL ၏ဒိုမိန်းအမည်ကို ရယူပါ။
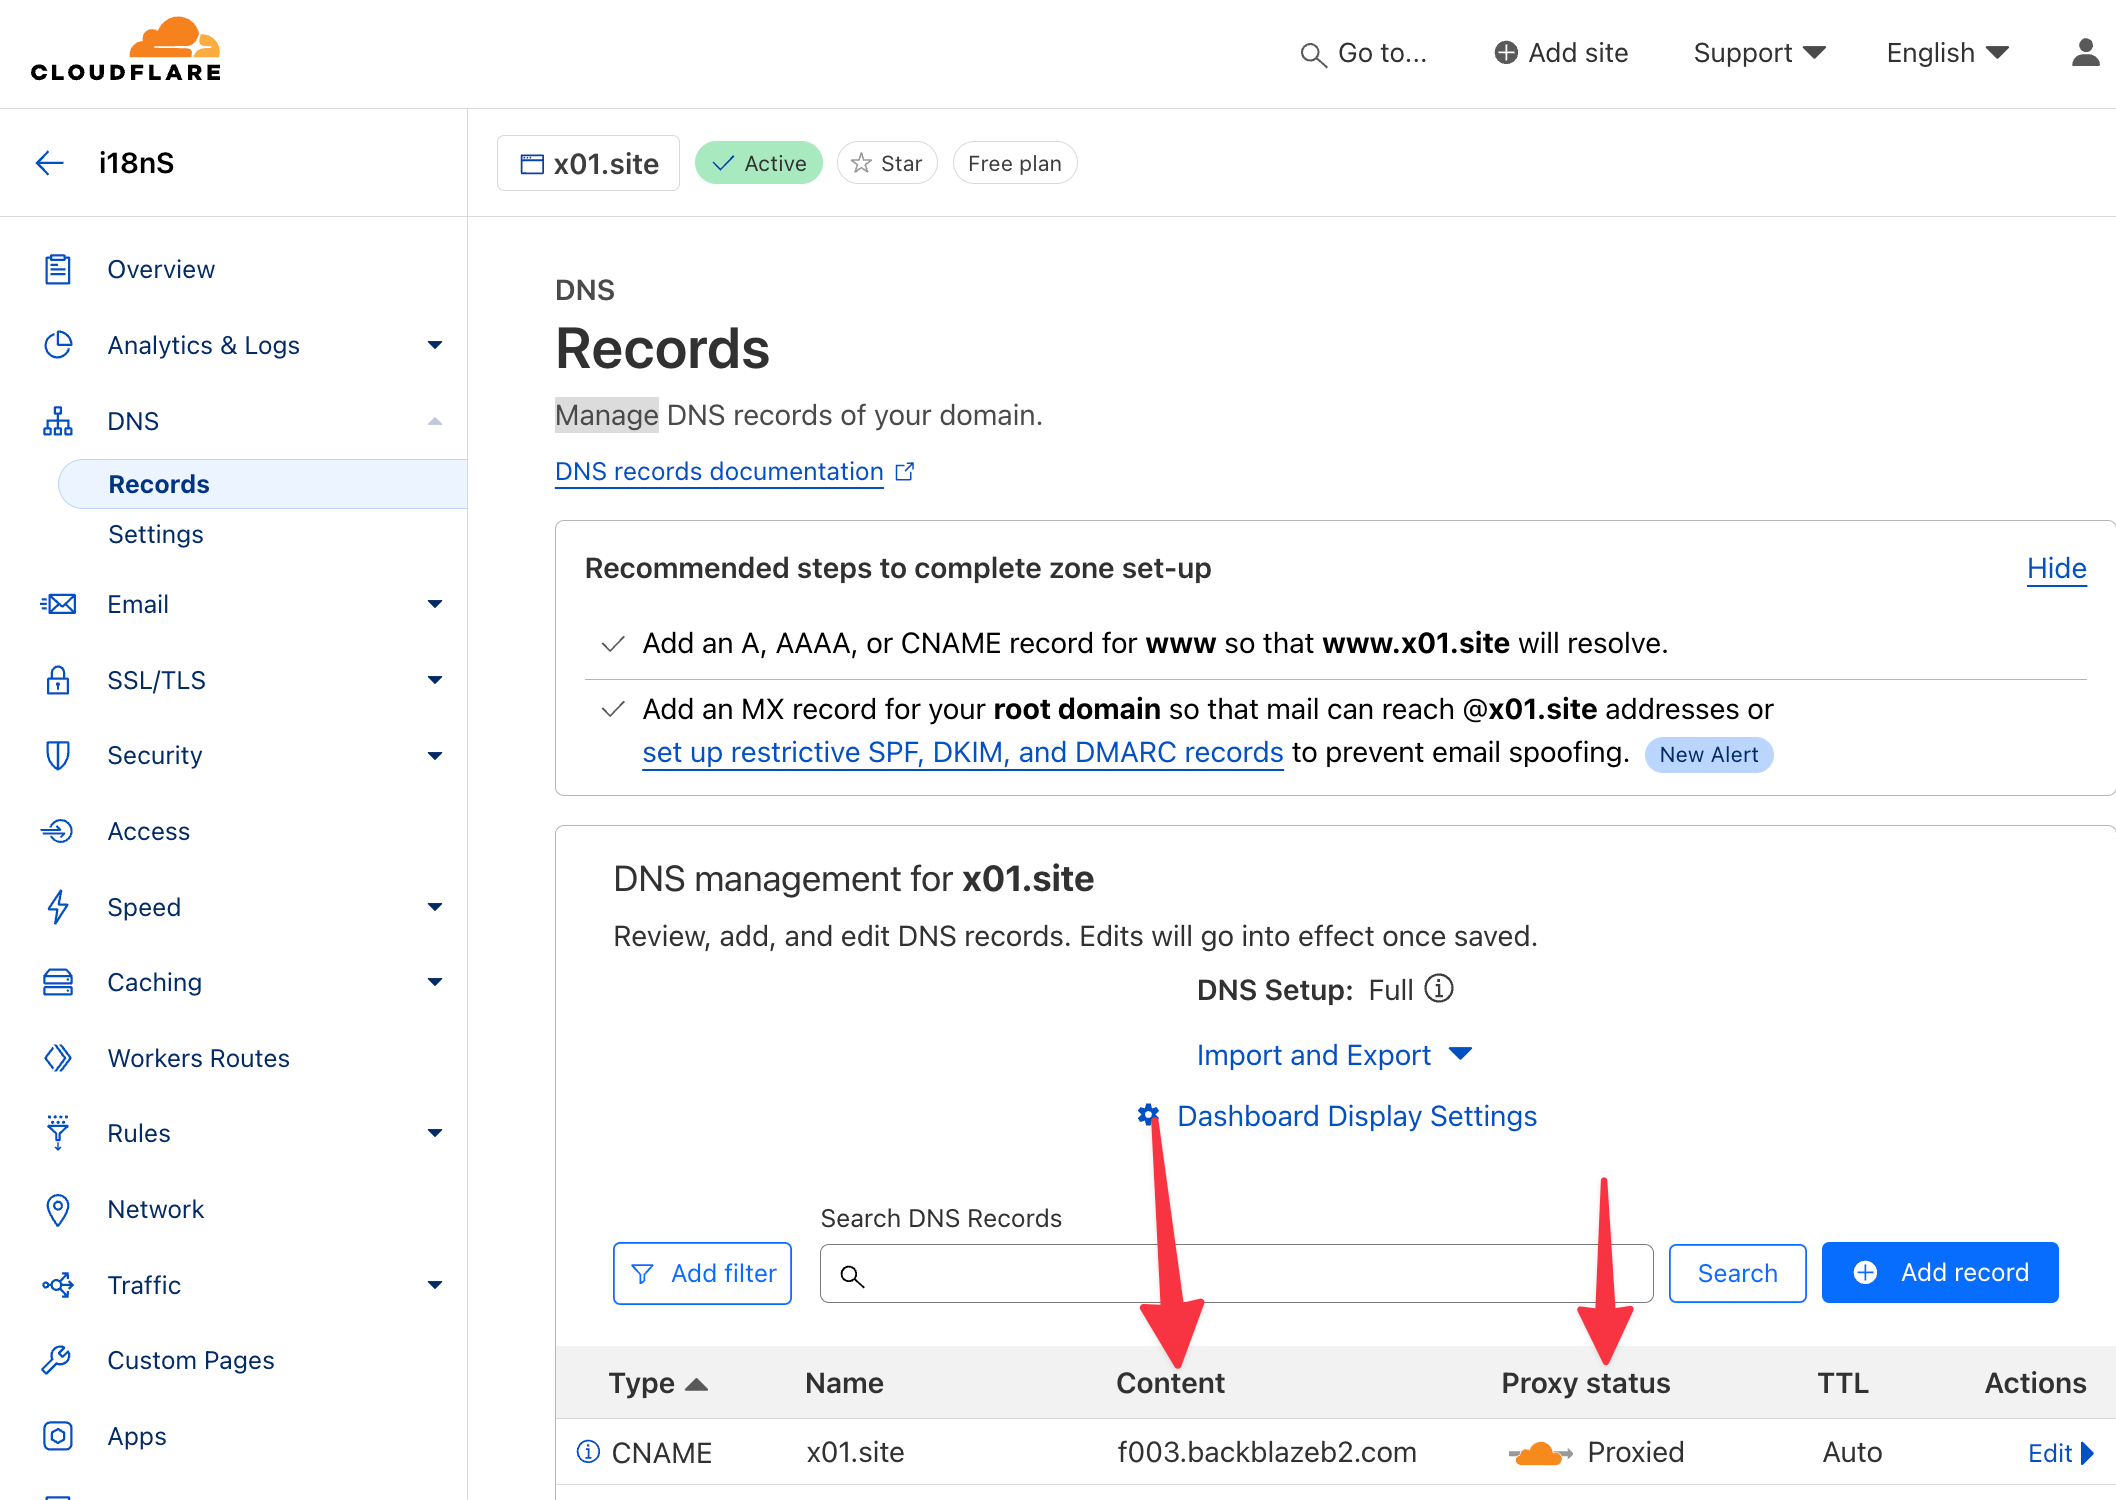
cloudflare တွင် CNAME မှ f003.backblazeb2.com မှ domain name ကိုပြောင်းပြီး proxy ကိုဖွင့်ပါ။
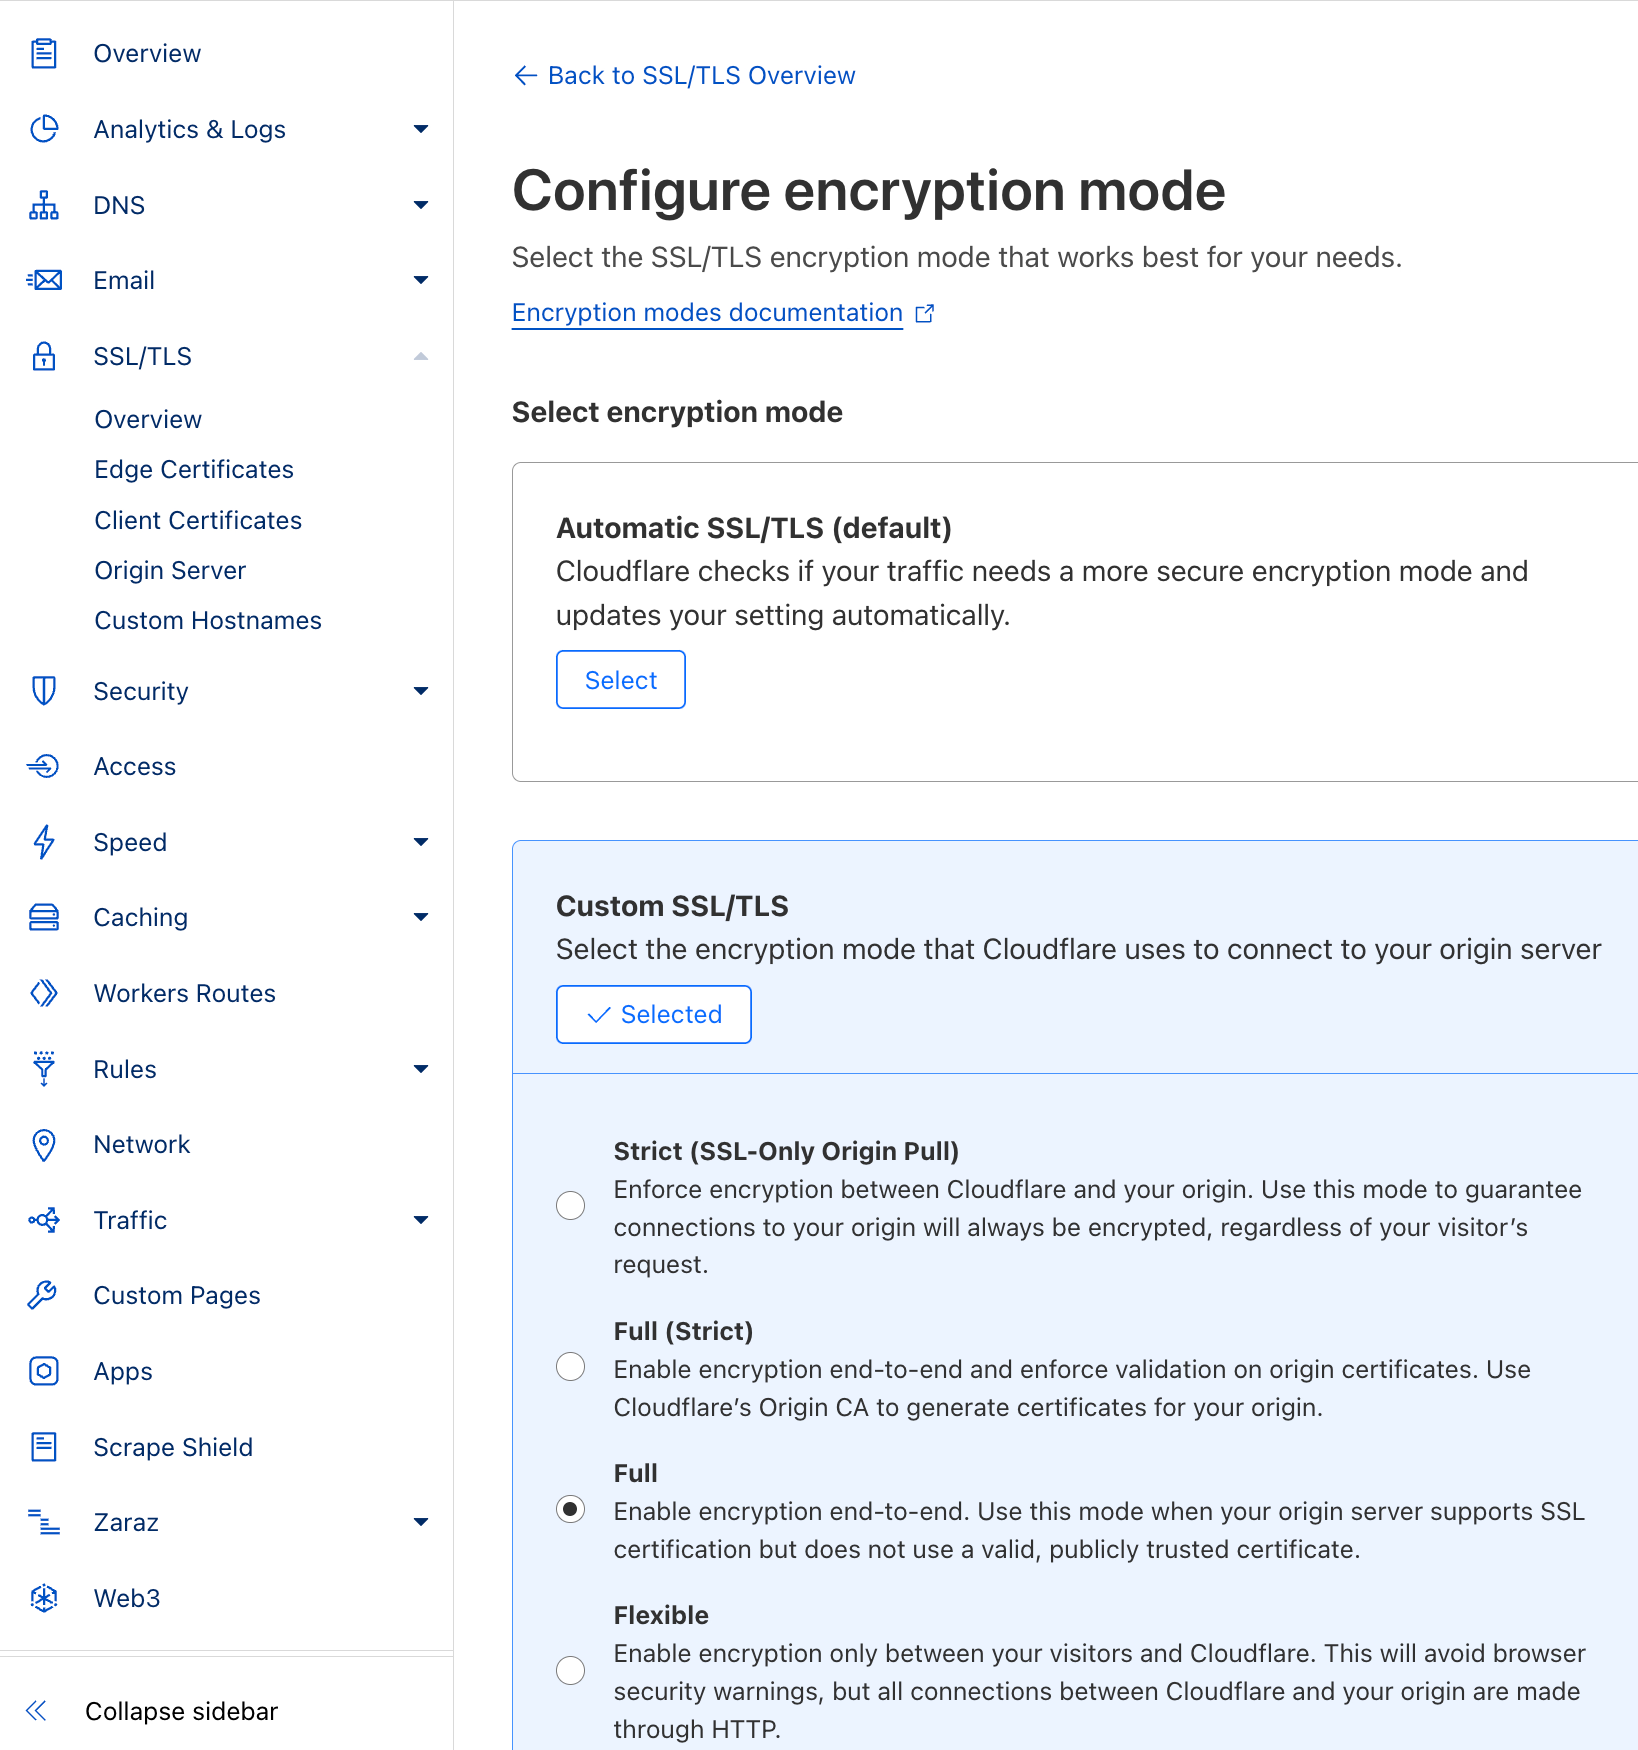
SSL → ကုဒ်ဝှက်ခြင်းမုဒ်မှ cloudflare မွမ်းမံပါ၊ Full သို့သတ်မှတ်ပါ။
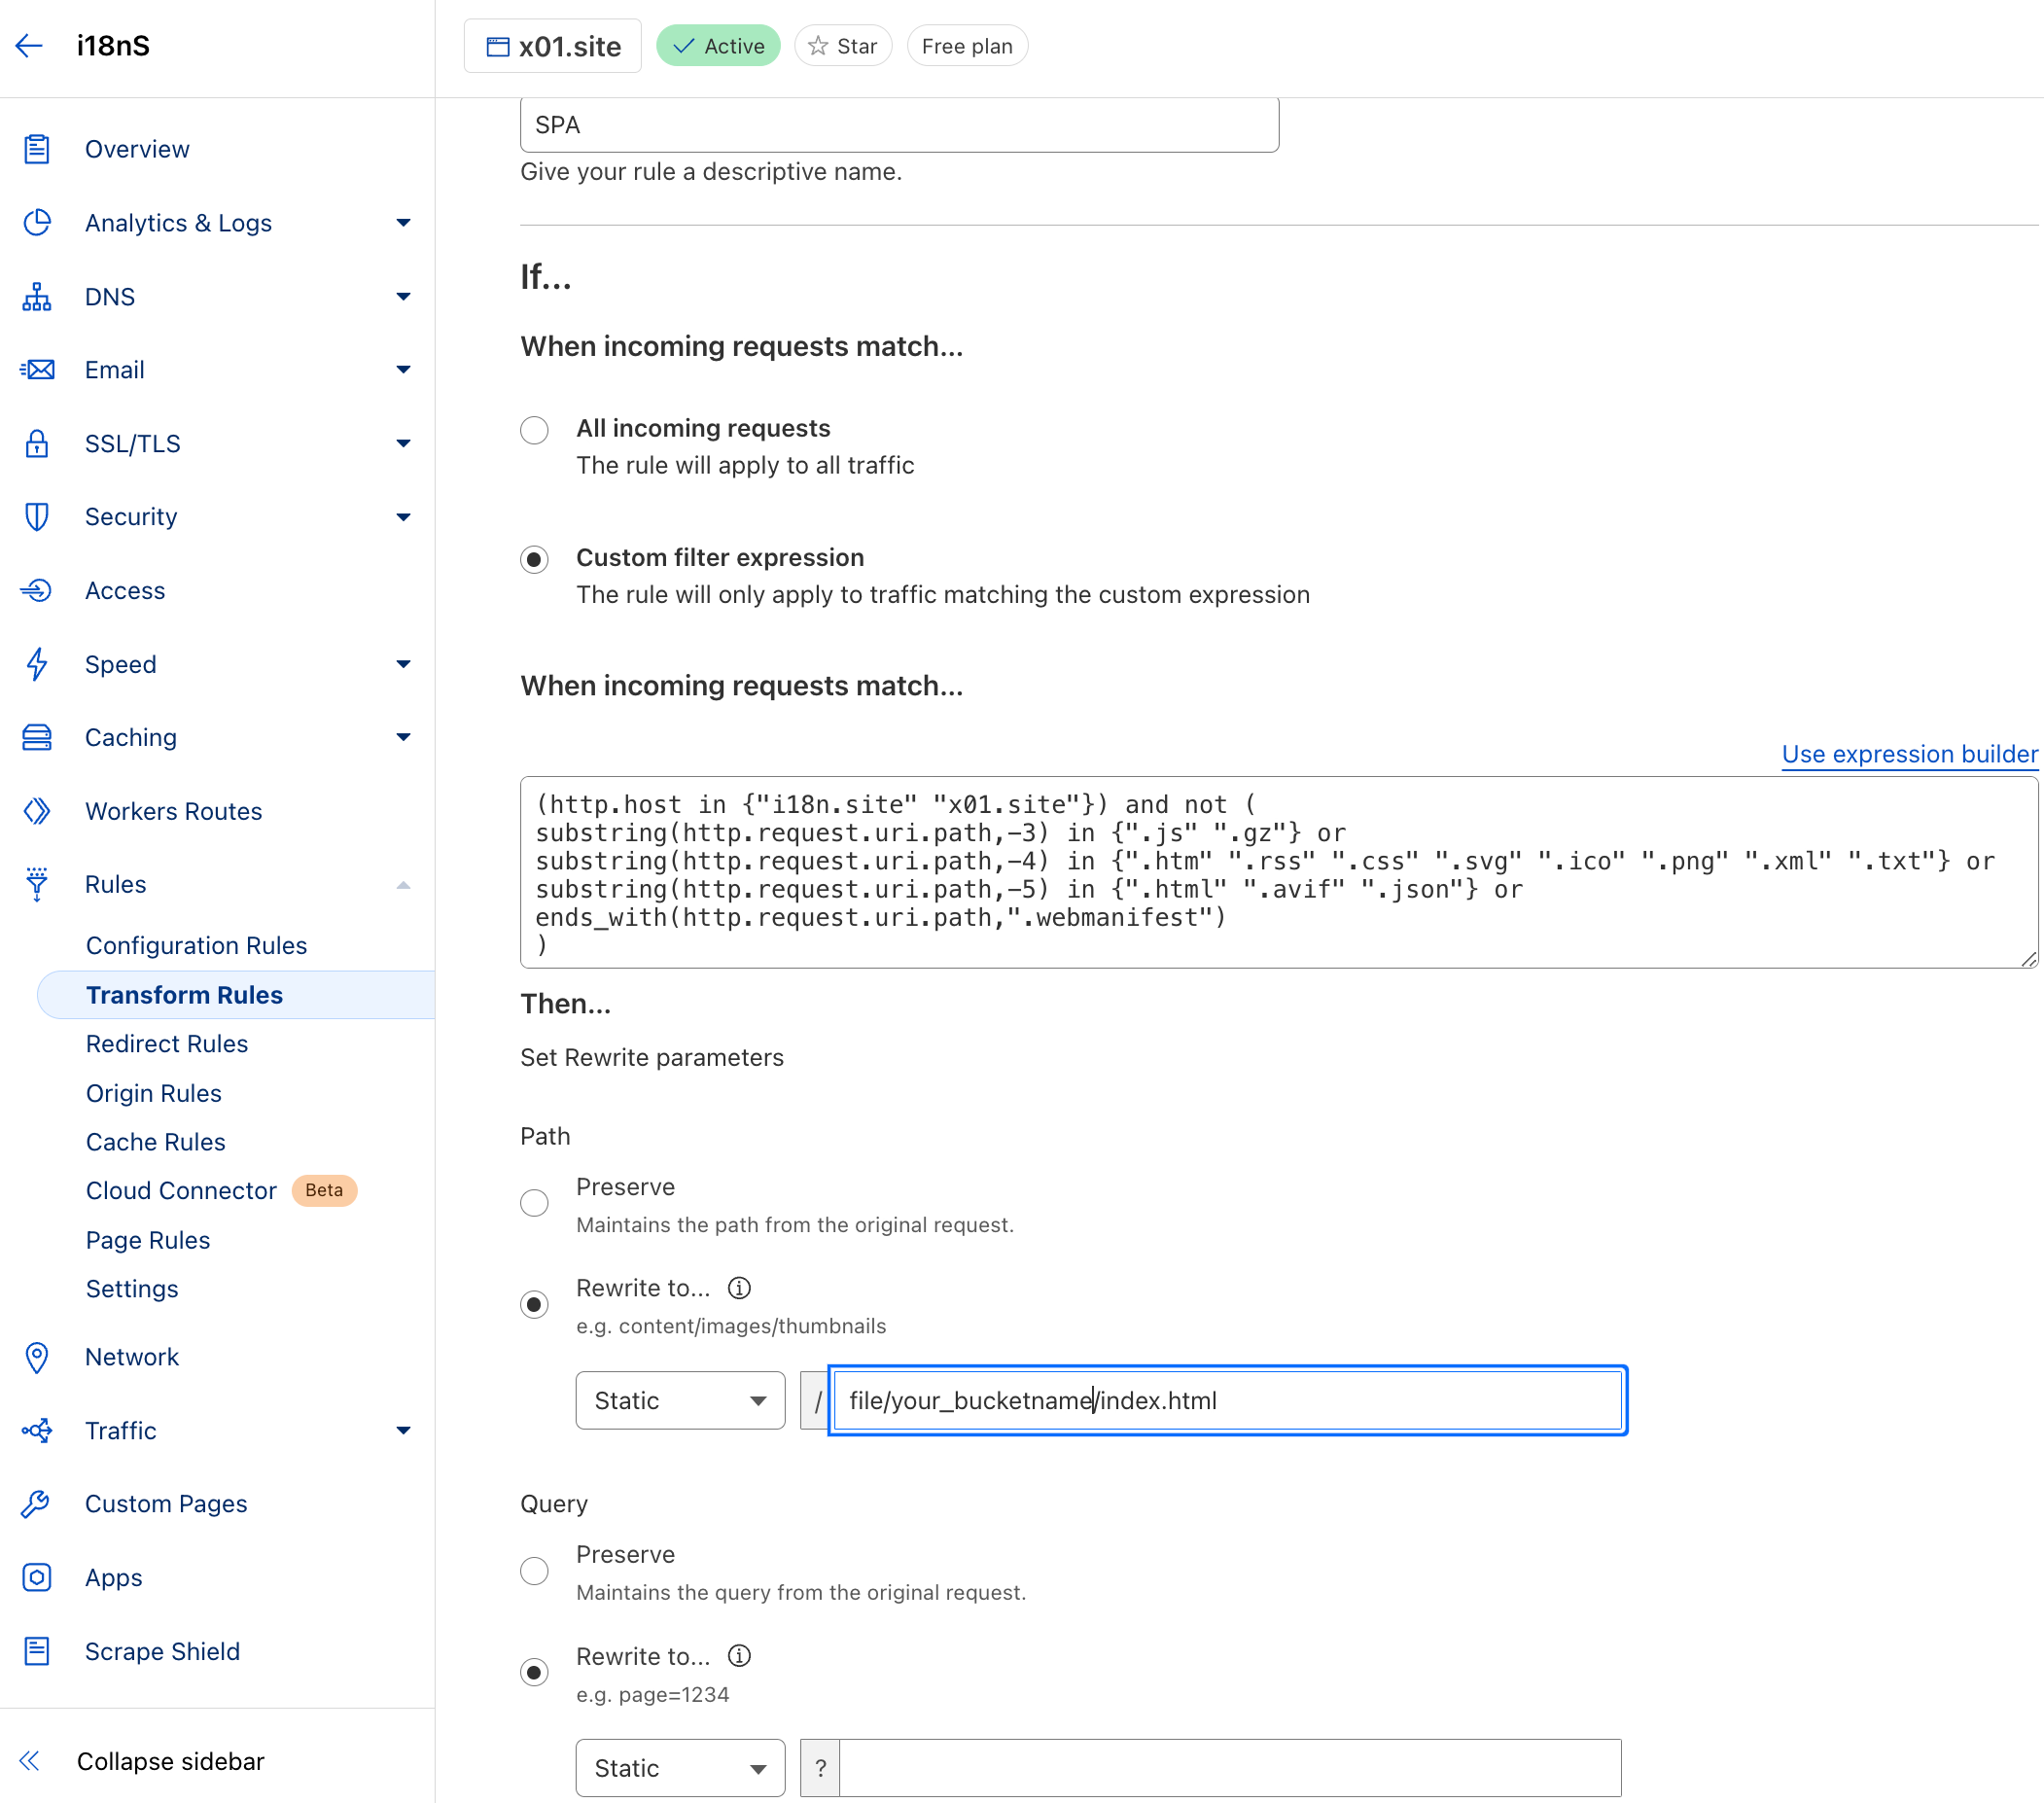
အောက်တွင်ပြထားသည့်အတိုင်း ပြောင်းလဲခြင်းစည်းမျဉ်းကို ထည့်ပါ၊ ၎င်းကို ဦးစွာထည့်ပါ (ပထမတစ်ခုသည် အနိမ့်ဆုံးဦးစားပေးဖြစ်သည်)
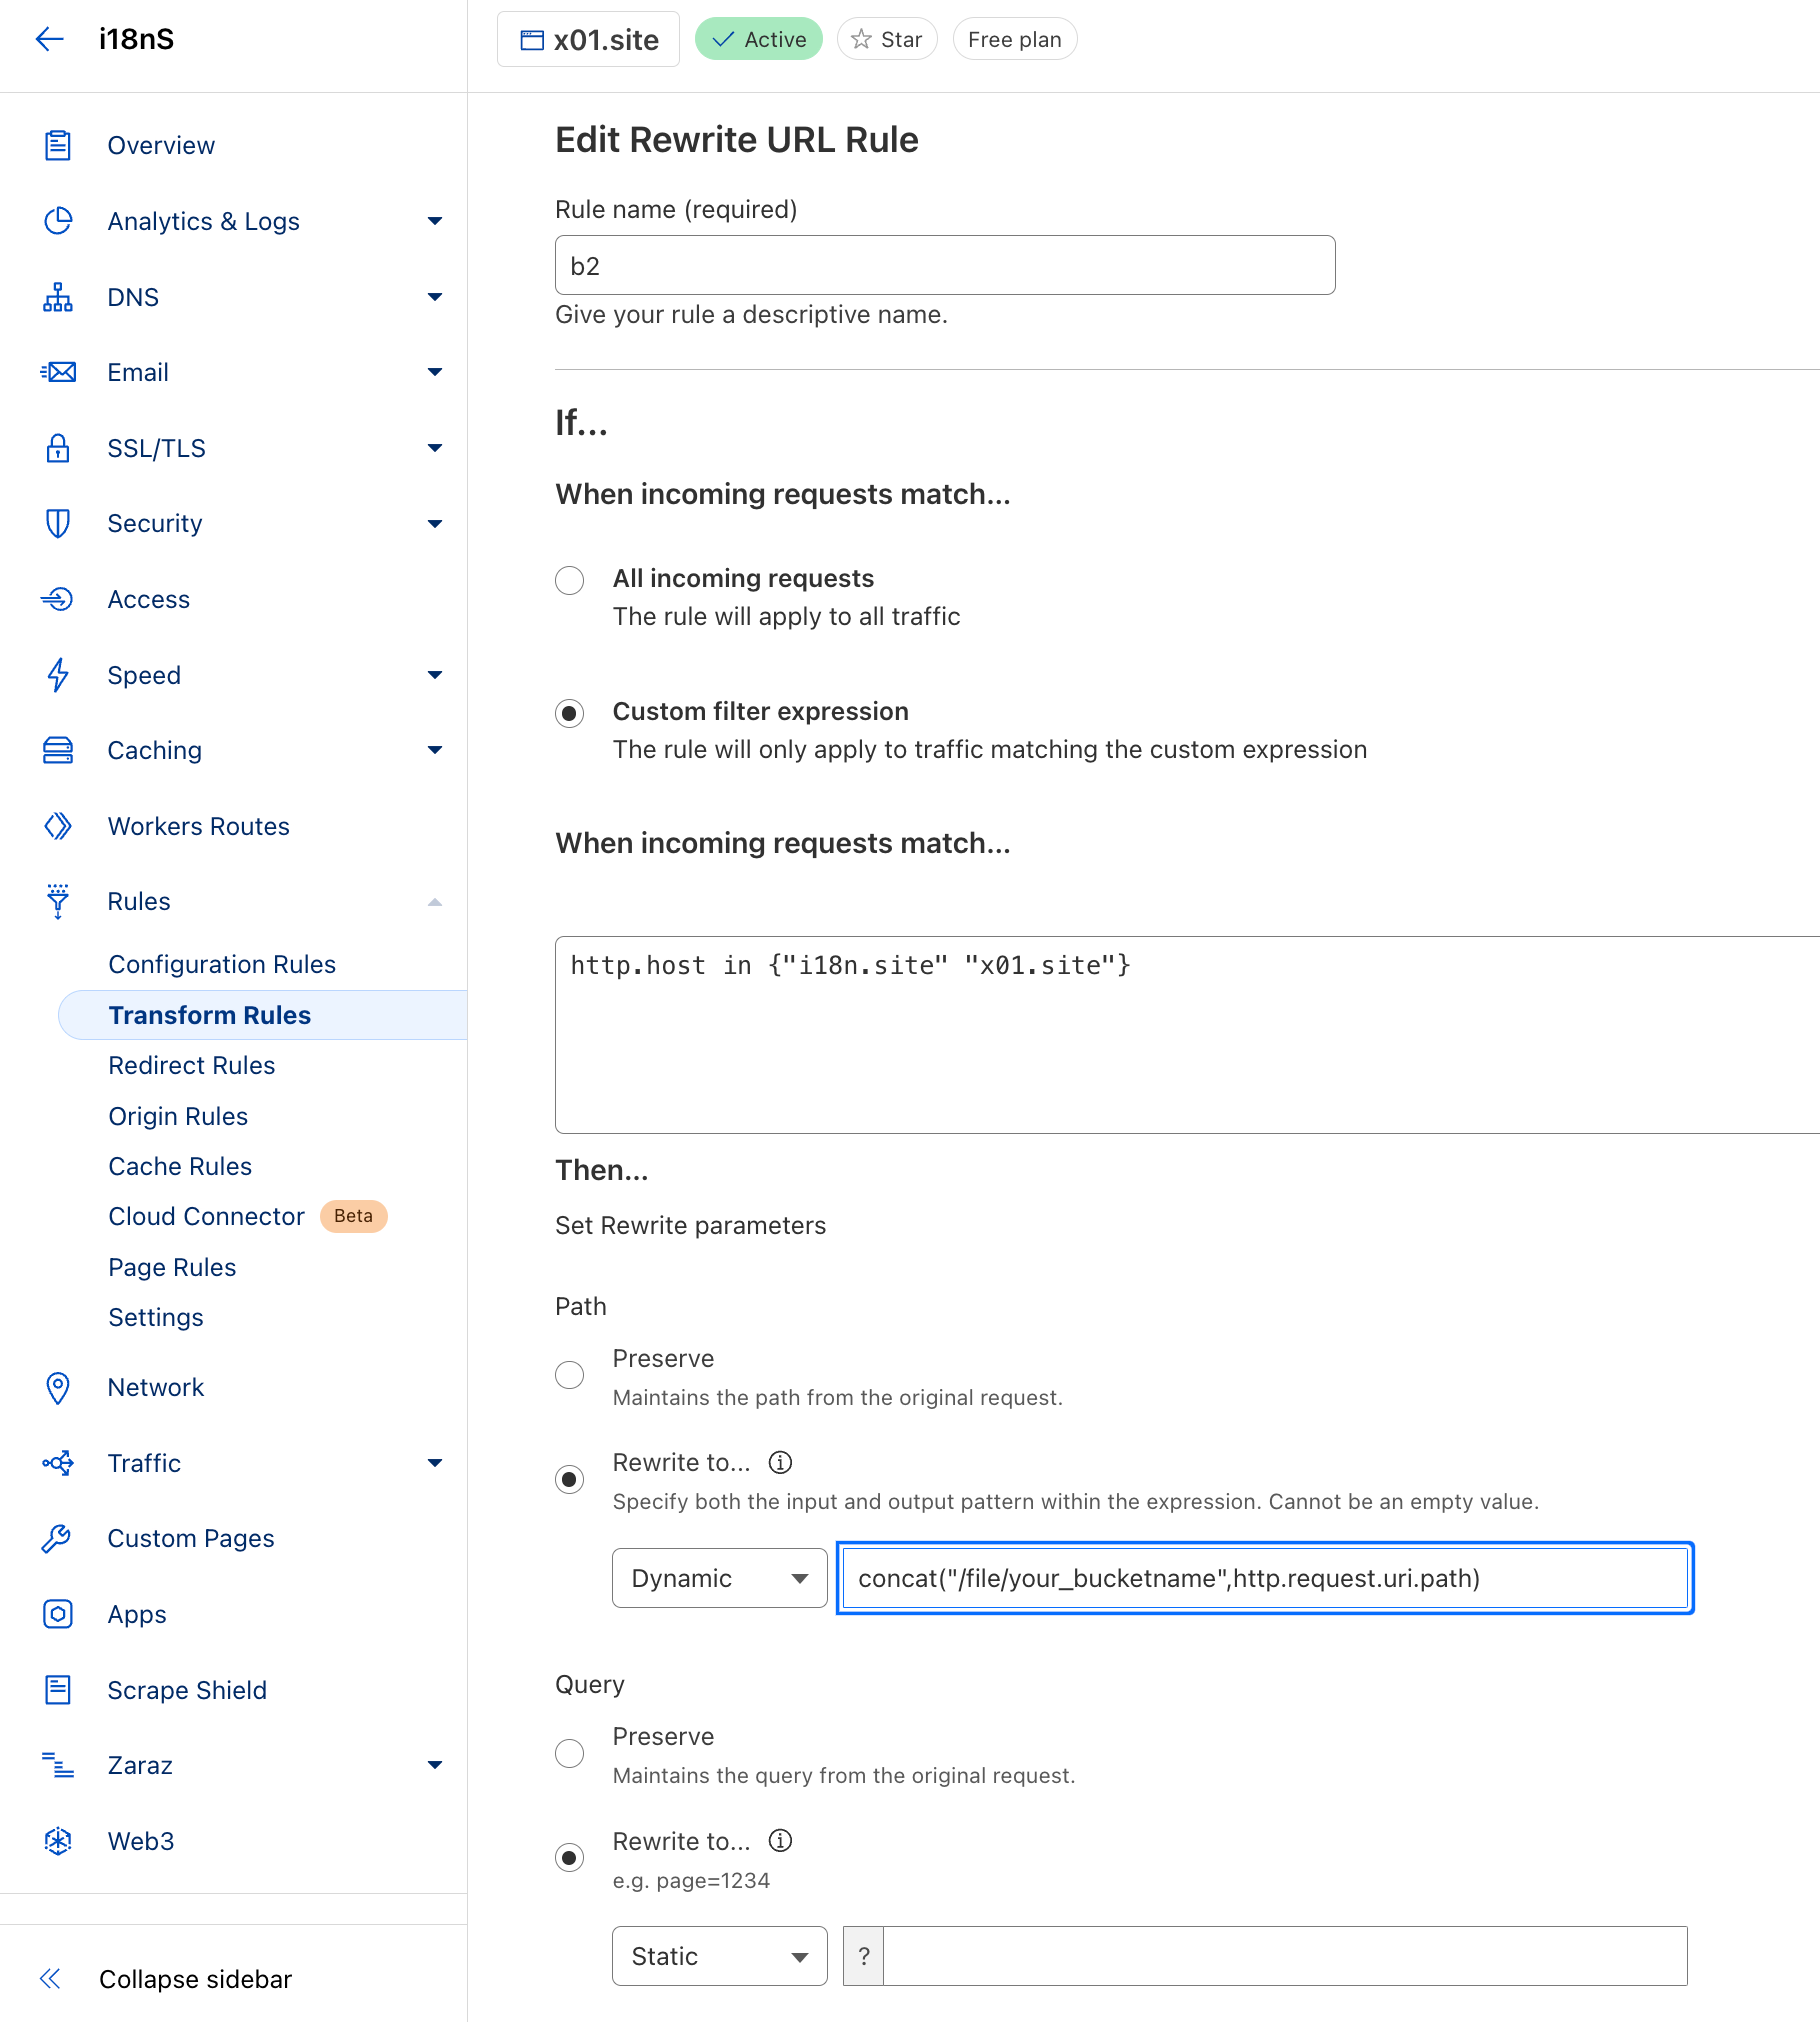
Rewrite to dynamic ကိုရွေးချယ်ပြီး your_bucketname in concat("/file/your_bucketname",http.request.uri.path) ကို သင့်ပုံးအမည်သို့ ပြင်ဆင်ပါ။
ထို့အပြင်၊ အထက်ဖော်ပြပါ cloudflare ပြောင်းလဲခြင်းစည်းမျဉ်းတွင် index.html file/your_bucketname/index.html သို့ပြောင်းပြီး အခြားဖွဲ့စည်းပုံများသည် အတူတူပင်ဖြစ်ပါသည်။
