검색 엔진 최적화(SEO)
원칙
i18n.site 새로 고침되지 않는 단일 페이지 아키텍처를 채택하여 검색 색인 생성을 용이하게 하기 위해 크롤러가 크롤링할 수 있도록 별도의 정적 페이지와 sitemap.xml 생성됩니다.
검색 엔진 크롤러가 액세스 요청의 User-Agent 사용하면 요청은 302 통해 정적 페이지로 리디렉션됩니다.
정적 페이지에서는 link 사용하여 이 페이지의 다른 언어 버전에 대한 링크를 나타냅니다(예: :
<link rel=alternate hreflang=zh href="https://i18n.site/zh/.htm">
<link rel=alternate hreflang=en href="https://i18n.site/en/.htm">
로컬 nginx 구성
데모 프로젝트의 .i18n/htm/main.yml 구성 파일을 예로 들어 보겠습니다.
host: i18n-demo.github.io
seo: true
out:
  - fs

pkg:
  i: i18n.site
  md: i18n.site

cdn:
  v:
  jsd:
먼저 위의 host: 값을 도메인 이름으로 수정하세요(예: xxx.com .
그런 다음 i18n.site -n , 정적 페이지가 out/main/htm 디렉터리에 생성됩니다.
물론 main 의 구성을 먼저 참조하여 .i18n/htm/dist.package.json 과 .i18n/htm/dist.yml 만드는 등 다른 구성 파일을 활성화할 수도 있습니다.
그런 다음 i18n.site -n -c dist 실행하면 정적 페이지가 out/dist/htm 로 생성됩니다.
nginx 아래 구성을 참고하여 설정할 수 있습니다.
map $http_user_agent $botLang {
  "~*baidu|yisou|sogou|360|byte" "/zh";
  "~*facebookexternalhit|slurp|bot|spider|curl" "/en";
  default "";
}

server {
  http2 on;
  listen 443 quic ;
  listen 443 ssl ;
  listen [::]:443 quic ;
  listen [::]:443 ssl ;

  add_header Alt-Svc 'h3=":443";ma=99999;persist=1';

  server_name doc.flashduty.com;

  ssl_certificate /root/.acme.sh/doc.flashduty.com_ecc/fullchain.cer;
  ssl_certificate_key /root/.acme.sh/doc.flashduty.com_ecc/doc.flashduty.com.key;

  root /mnt/doc.flashduty.com;

# 서버 작업자 스크립트를 너무 오랫동안 캐시하지 마세요.
  location = /S.js {
    add_header Cache-Control "max-age=600";
  }

# 다른 정적 리소스에 대해 더 긴 캐시 시간 설정
  location ~* \.(js|css|htm|html|md|avif|json|ico|xml|rss|gz|mp4|png|svg|txt|webmanifest)$ {
    add_header Cache-Control "max-age=999999";
  }

# 크롤러가 홈페이지 항목으로 사용하는 정적 파일 설정
  location = / {
    # $botLang 가 비어 있지 않으면 설정된 언어 경로에 따라 크롤러 액세스 및 리디렉션을 의미합니다.
    if ($botLang) {
        return 301 $botLang/flashduty.htm;
    }
    add_header Cache-Control "max-age=600";
    rewrite ^ /index.html break;
  }

# 단일 페이지 애플리케이션 구성
  location / {
    if ($botLang) {
      return 302 $botLang$request_uri.htm;
    }
    add_header Cache-Control "max-age=600";
    rewrite ^ /index.html break;
  }
}

server {
  server_name doc.flashduty.com;
  listen      80;
  listen      [::]:80 ;
  location    / {
    rewrite ^(.+) https://$host$1 permanent;
  }
  location /.well-known/acme-challenge/ {
    root /mnt/doc.flashduty.com/;
  }
}
정적 파일 업로드를 위한 객체 스토리지 구성
정적 파일은 로컬에서 생성할 수 있지만 더 일반적인 접근 방식은 해당 파일을 객체 스토리지에 업로드하는 것입니다.
위에서 구성한 out : 로 수정하세요.
out:
  - s3
그런 다음 ~/.config/i18n.site.yml 편집하고 다음 구성을 추가하십시오 :
site:
  i18n.site:
    s3:
      - endpoint: s3.eu-central-003.backblazeb2.com
        ak: # access key
        sk: # secret key
        bucket: # bucket name
        # region:
구성에서 i18n.site host: in .i18n/htm/main.yml 값으로 변경하세요. s3 에서 여러 객체 저장소를 구성할 수 있으며 region 필드는 선택 사항입니다(많은 객체 저장소에서는 이 필드를 설정할 필요가 없습니다).
그런 다음 i18n.site -n 실행하여 프로젝트를 다시 게시합니다.
~/.config/i18n.site.yml 수정하고 다시 업로드하고 싶다면 프로젝트 루트 디렉터리에서 다음 명령어를 사용하여 업로드 캐시를 지워주세요 :
rm -rf .i18n/data/seo .i18n/data/public
클라우드플레어 구성
에 호스팅된 도메인 이름입니다 cloudflare
변환 규칙
아래와 같이 변환 규칙을 추가합니다.
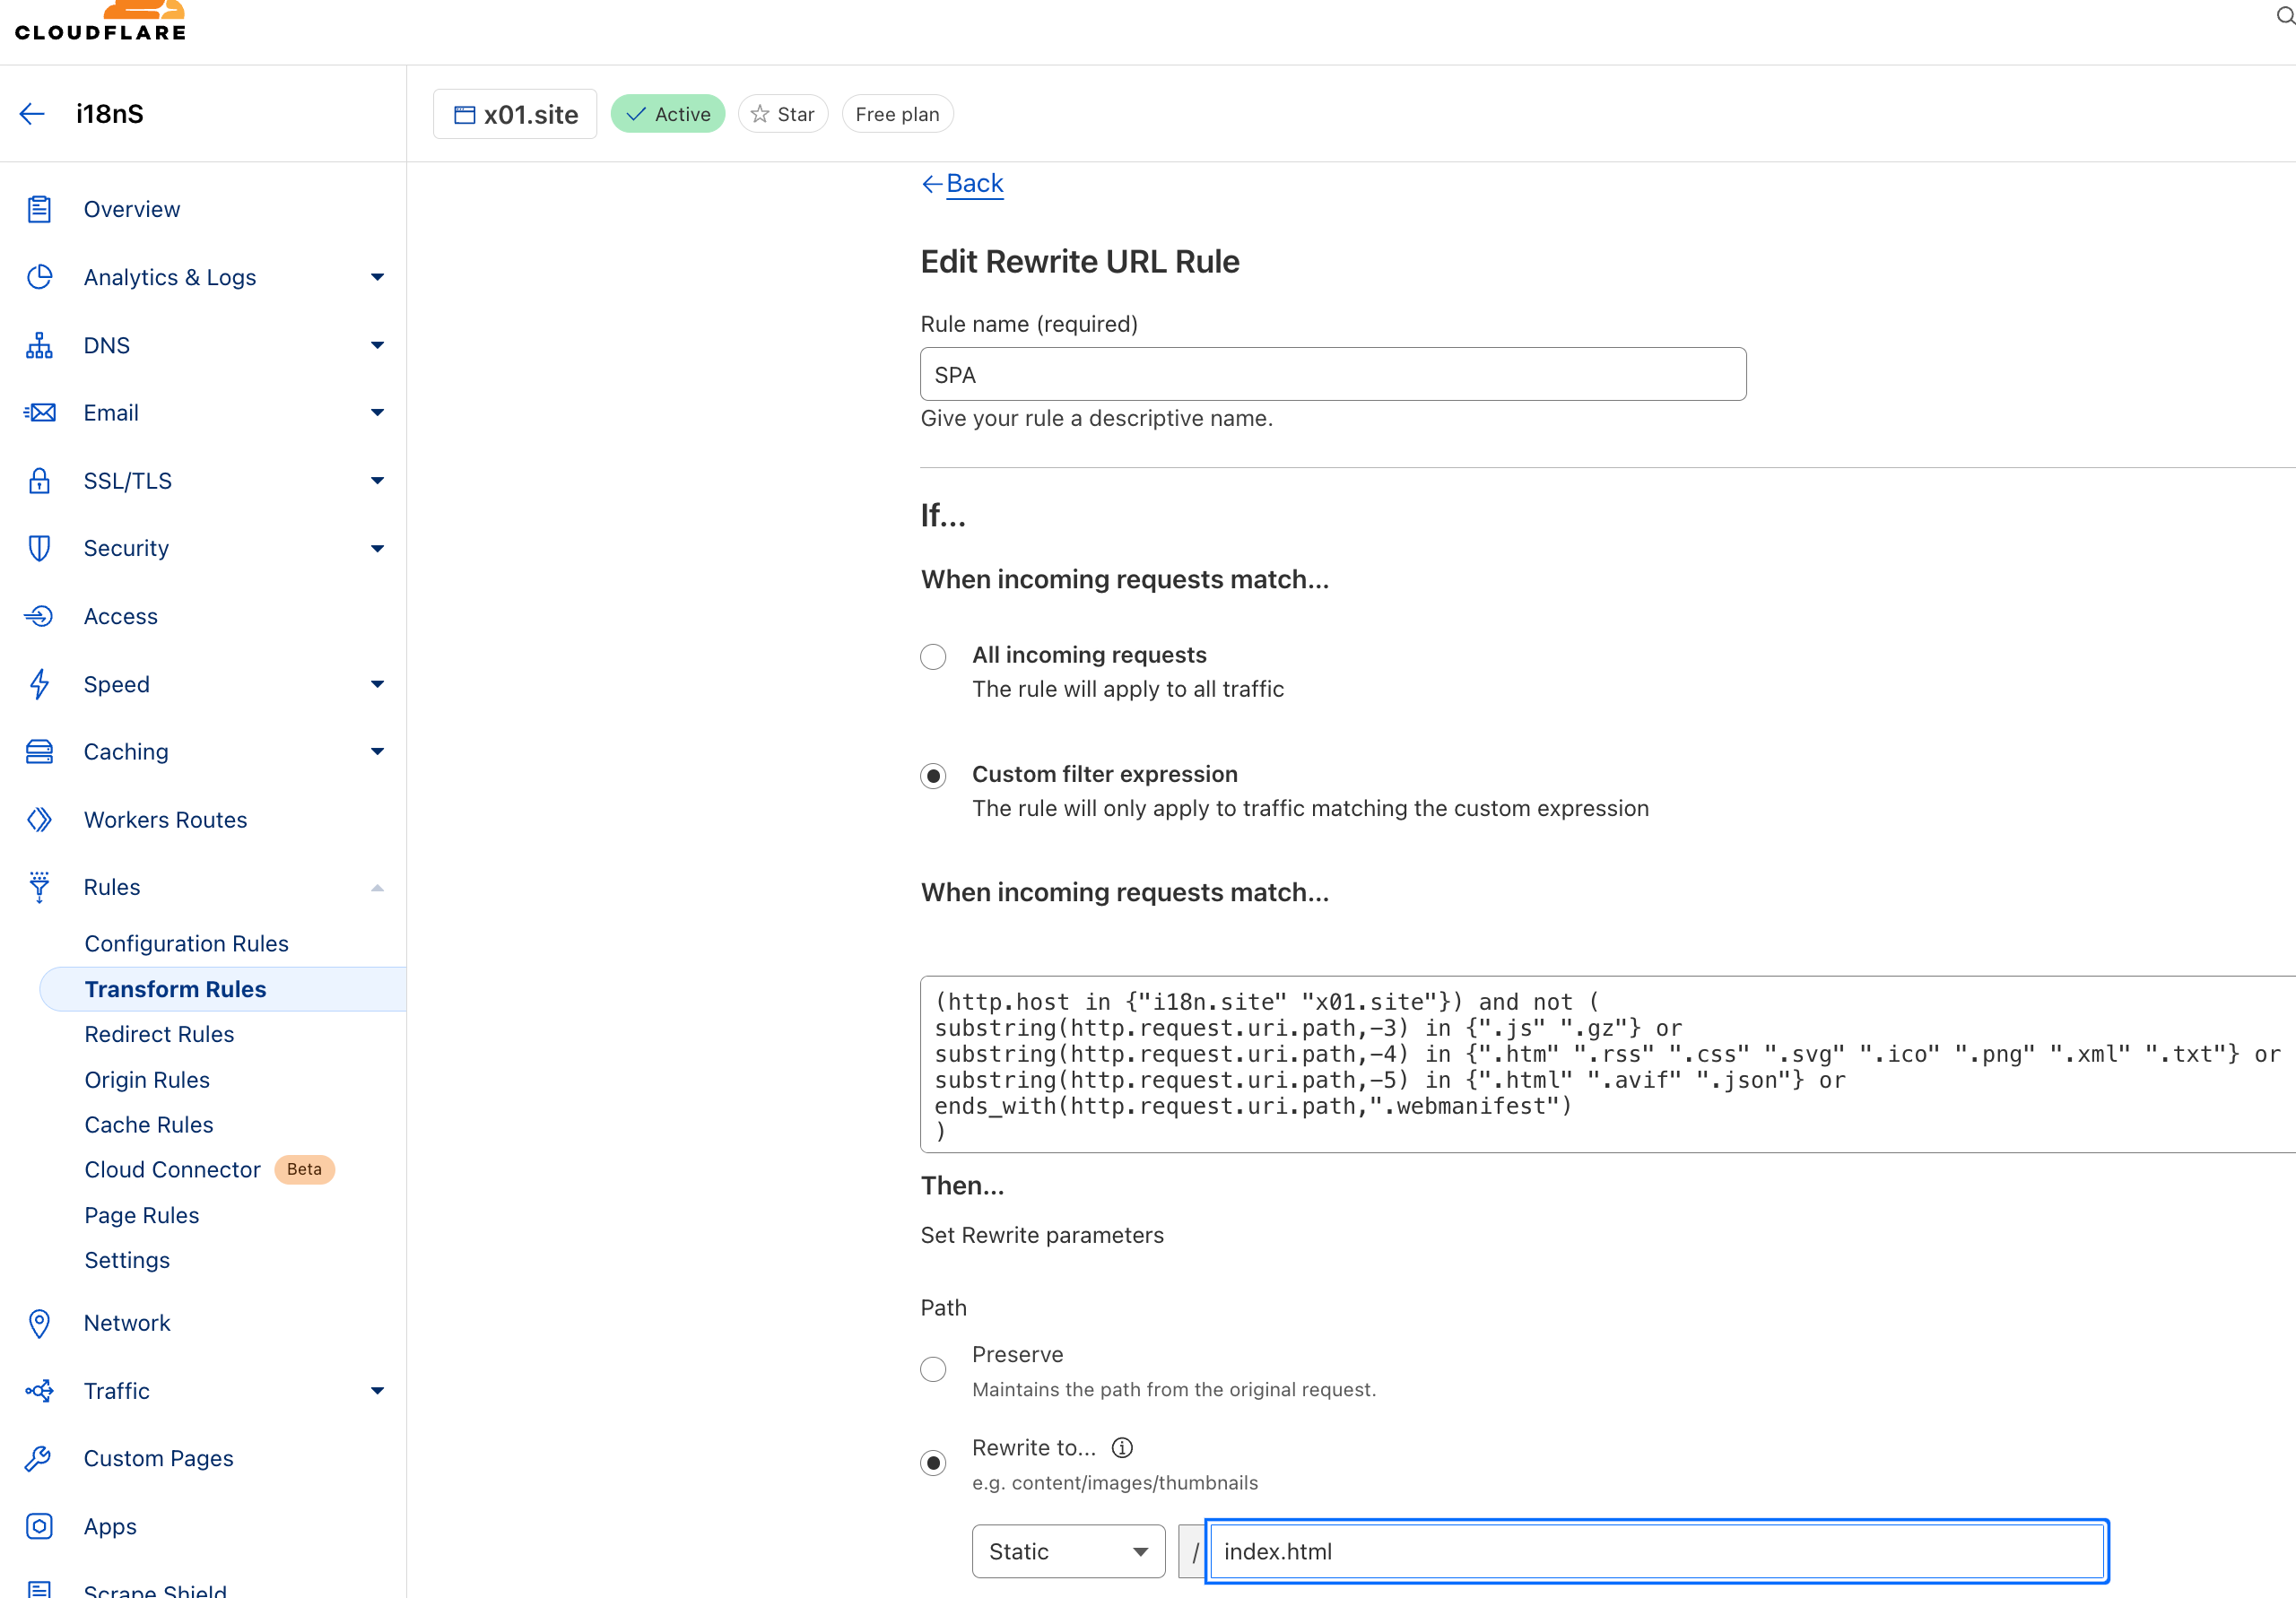
규칙 코드는 다음과 같습니다. "i18n.site" 코드를 도메인 이름으로 수정하세요.
(http.host in {"i18n.site"}) and not (
substring(http.request.uri.path,-3) in {".js" ".gz"} or
substring(http.request.uri.path,-4) in {".htm" ".rss" ".css" ".svg" ".ico" ".png" ".xml" ".txt"} or
substring(http.request.uri.path,-5) in {".html" ".avif" ".json"} or
ends_with(http.request.uri.path,".webmanifest")
)
캐싱 규칙
다음과 같이 캐시 규칙을 추가합니다.
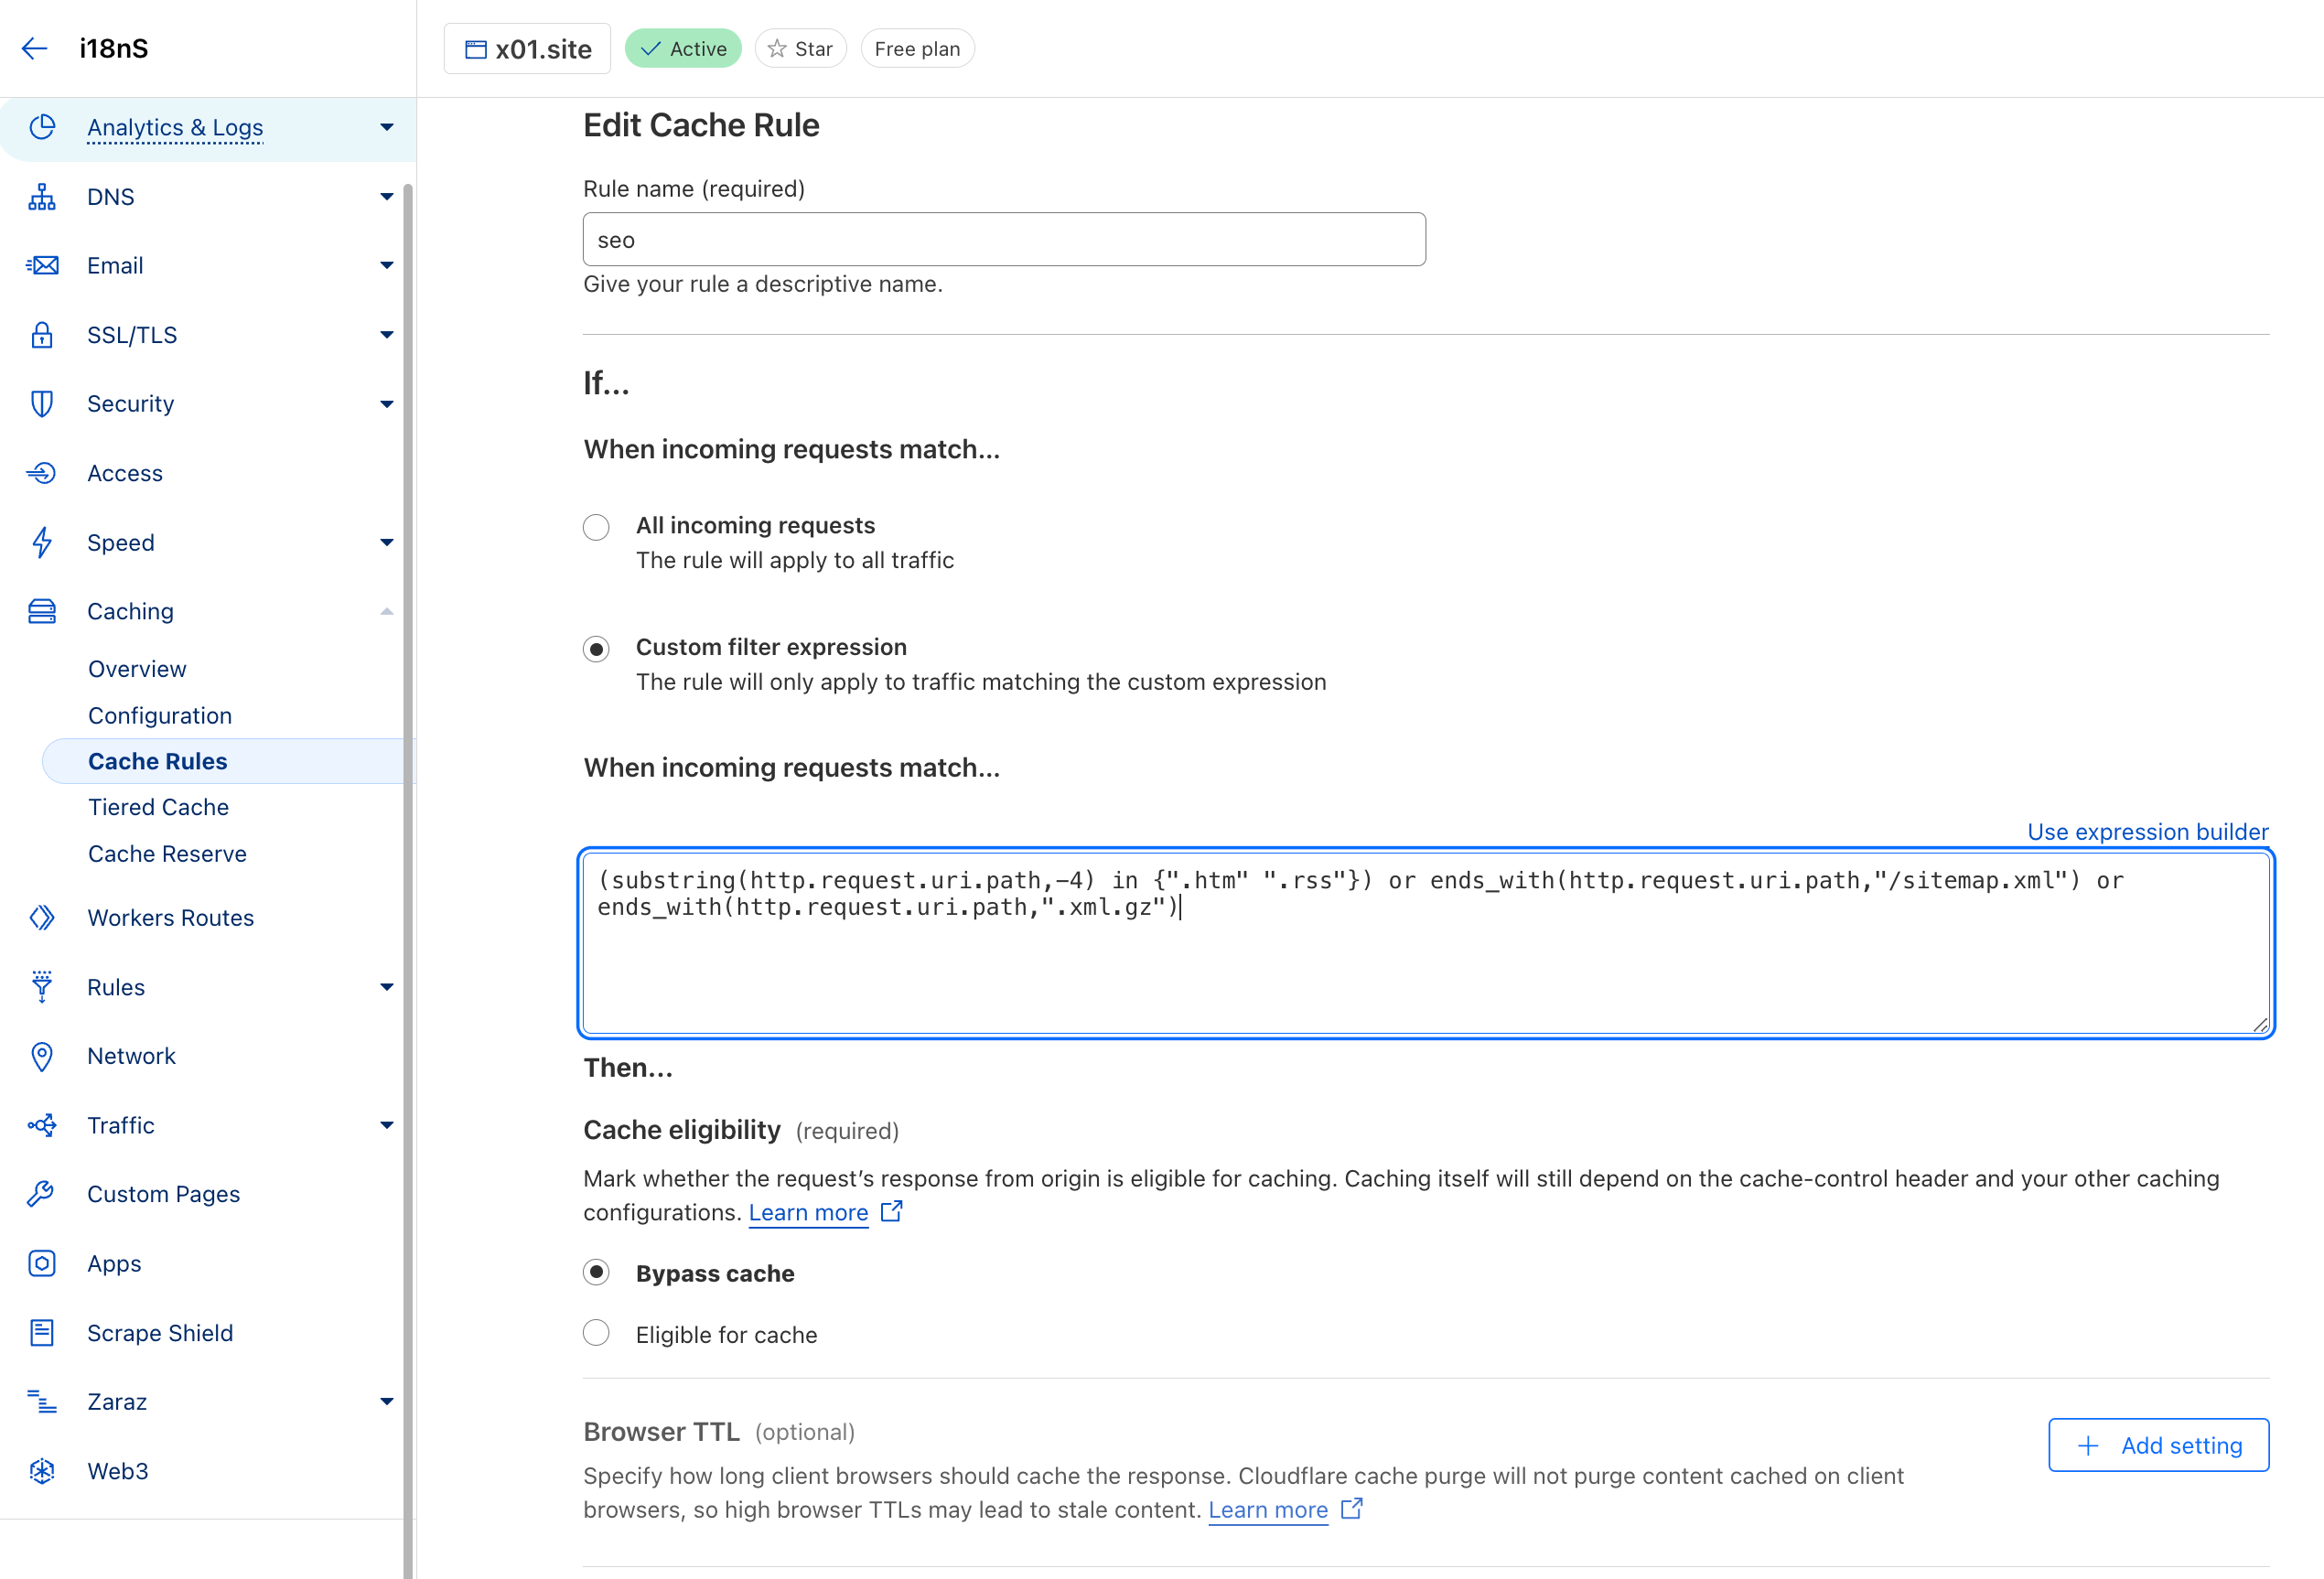
(substring(http.request.uri.path,-4) in {".htm" ".rss"}) or ends_with(http.request.uri.path,"/sitemap.xml") or ends_with(http.request.uri.path,".xml.gz")
리디렉션 규칙
리디렉션 규칙을 다음과 같이 설정하세요. "i18n.site" 코드를 도메인 이름으로 수정하세요.
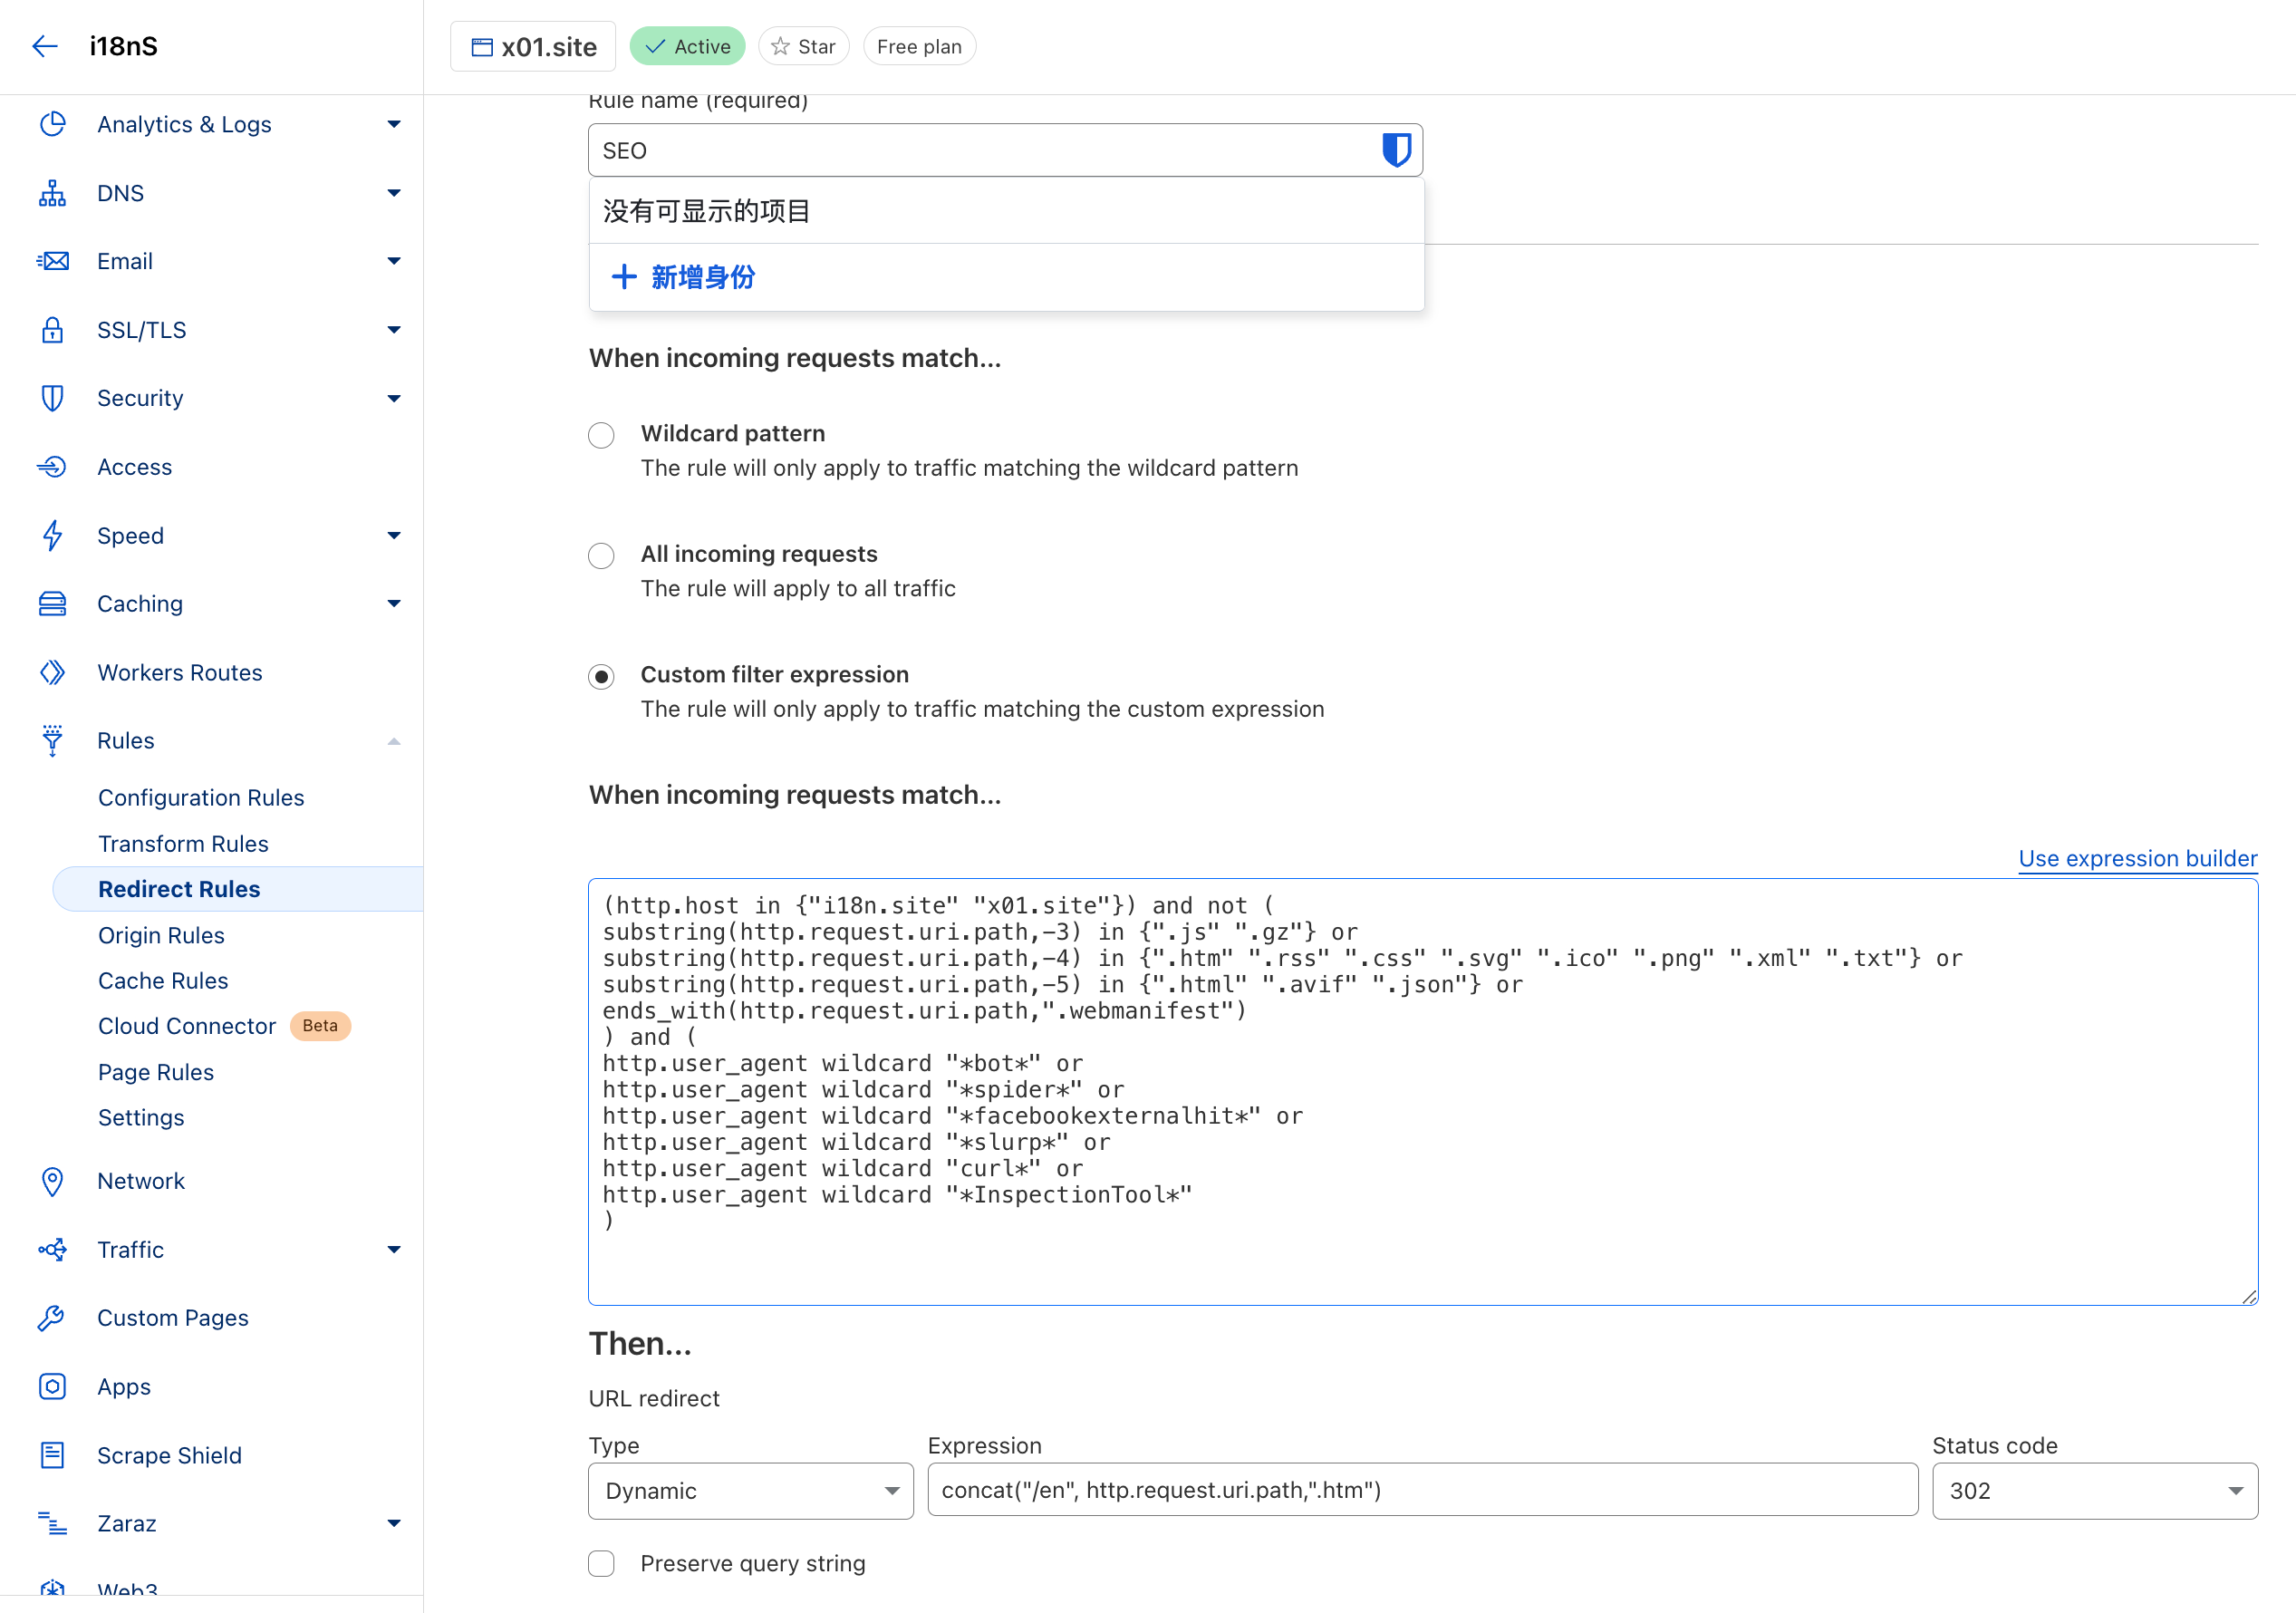
(http.host in {"i18n.site"}) and not (
substring(http.request.uri.path,-3) in {".js" ".gz"} or
substring(http.request.uri.path,-4) in {".htm" ".rss" ".css" ".svg" ".ico" ".png" ".xml" ".txt"} or
substring(http.request.uri.path,-5) in {".html" ".avif" ".json"} or
ends_with(http.request.uri.path,".webmanifest")
) and (
http.user_agent wildcard "*bot*" or
http.user_agent wildcard "*spider*" or
http.user_agent wildcard "*facebookexternalhit*" or
http.user_agent wildcard "*slurp*" or
http.user_agent wildcard "curl*" or
http.user_agent wildcard "*InspectionTool*"
)
URL redirect 동적 리디렉션을 선택하세요. 리디렉션 경로 concat("/en",http.request.uri.path,".htm") 의 /en 검색 엔진에 포함할 기본 언어로 수정하세요.
Baidu 지능형 클라우드 구성
중국 본토에 서비스를 제공해야 하는 경우 Baidu Smart Cloud를 사용할 수 있습니다.
데이터는 Baidu Object Storage에 업로드되고 Baidu 콘텐츠 배포 네트워크에 바인딩됩니다.
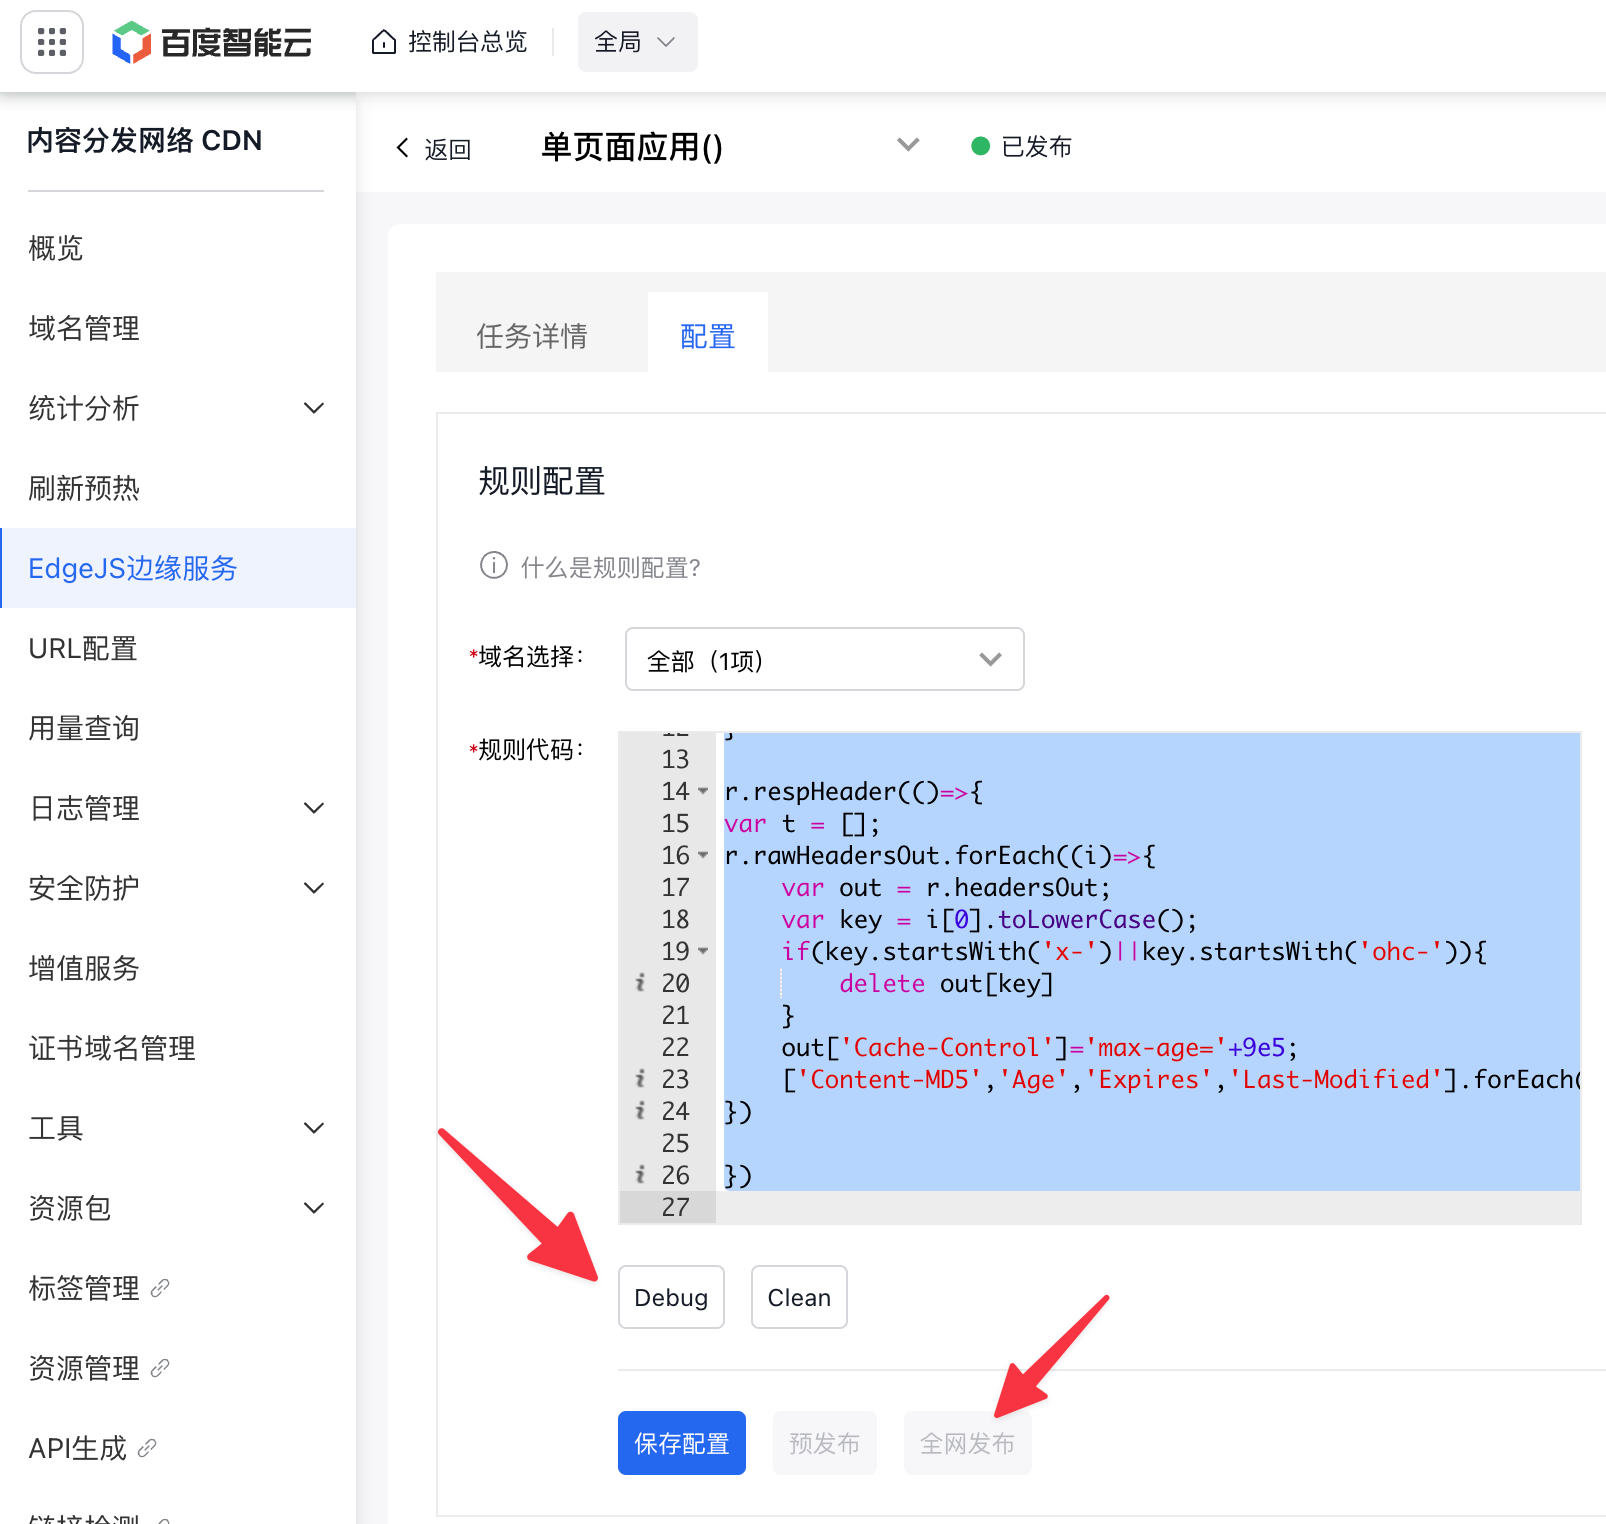
그런 다음 다음과 같이 EdgeJS Edge 서비스 에 스크립트를 작성하십시오.
const uri = r.uri, p = uri.lastIndexOf(".");
if (
  p < 0 ||
  !"|js|css|htm|html|md|avif|json|ico|xml|rss|gz|mp4|png|svg|txt|webmanifest|".includes(
    "|" + uri.slice(p + 1) + "|",
  )
) {
  const ua = r.headersIn["User-Agent"].toLowerCase()
  if (/facebookexternalhit|slurp|bot|spider|curl/.test(ua)) {
    r.return(
      302,
      (/baidu|yisou|sogou|360|byte/.test(ua) ? "/zh" : "/en") + r.uri + ".htm",
    )
  } else {
    r.uri = "/index.html"
  }
}

r.respHeader(() => {
  const t = [], out = r.headersOut;
  ["Content-MD5", "Age", "Expires", "Last-Modified"].forEach(
    i => delete out[i]
  )
  r.rawHeadersOut.forEach(i => {
    const key = i[0].toLowerCase()
    if (key.startsWith("x-") || key.startsWith("ohc-")) {
      delete out[key]
    }
  })
  out["Cache-Control"] = "max-age=" + 9e5
  // out.XXX = 'MSG';와 같이 출력을 디버그하도록 응답 헤더를 설정할 수 있습니다.
})
Debug 클릭한 다음 전체 네트워크에 게시를 클릭합니다.
고급 사용법: 지역 해상도에 따라 트래픽 분산
중국 본토에서 서비스를 제공하고 무료 국제 트래픽 cloudflare 원할 경우 지역 해상도로 DNS 사용할 수 있습니다.
예를 들어, Huawei Cloud DNS 는 중국 본토 트래픽이 Baidu Smart Cloud를 통과하고 국제 트래픽이 cloudflare 통과할 수 있는 무료 지역 분석을 제공합니다.
cloudflare 구성에는 많은 함정이 있습니다. 다음은 참고할 몇 가지 사항입니다 :
도메인 이름은 다른 DNS 에서 호스팅됩니다. 사용 방법 cloudflare
먼저 임의의 도메인 이름을 cloudflare 에 바인딩한 다음 SSL/TLS → 사용자 지정 도메인 이름을 사용하여 기본 도메인 이름을 이 도메인 이름에 연결합니다.
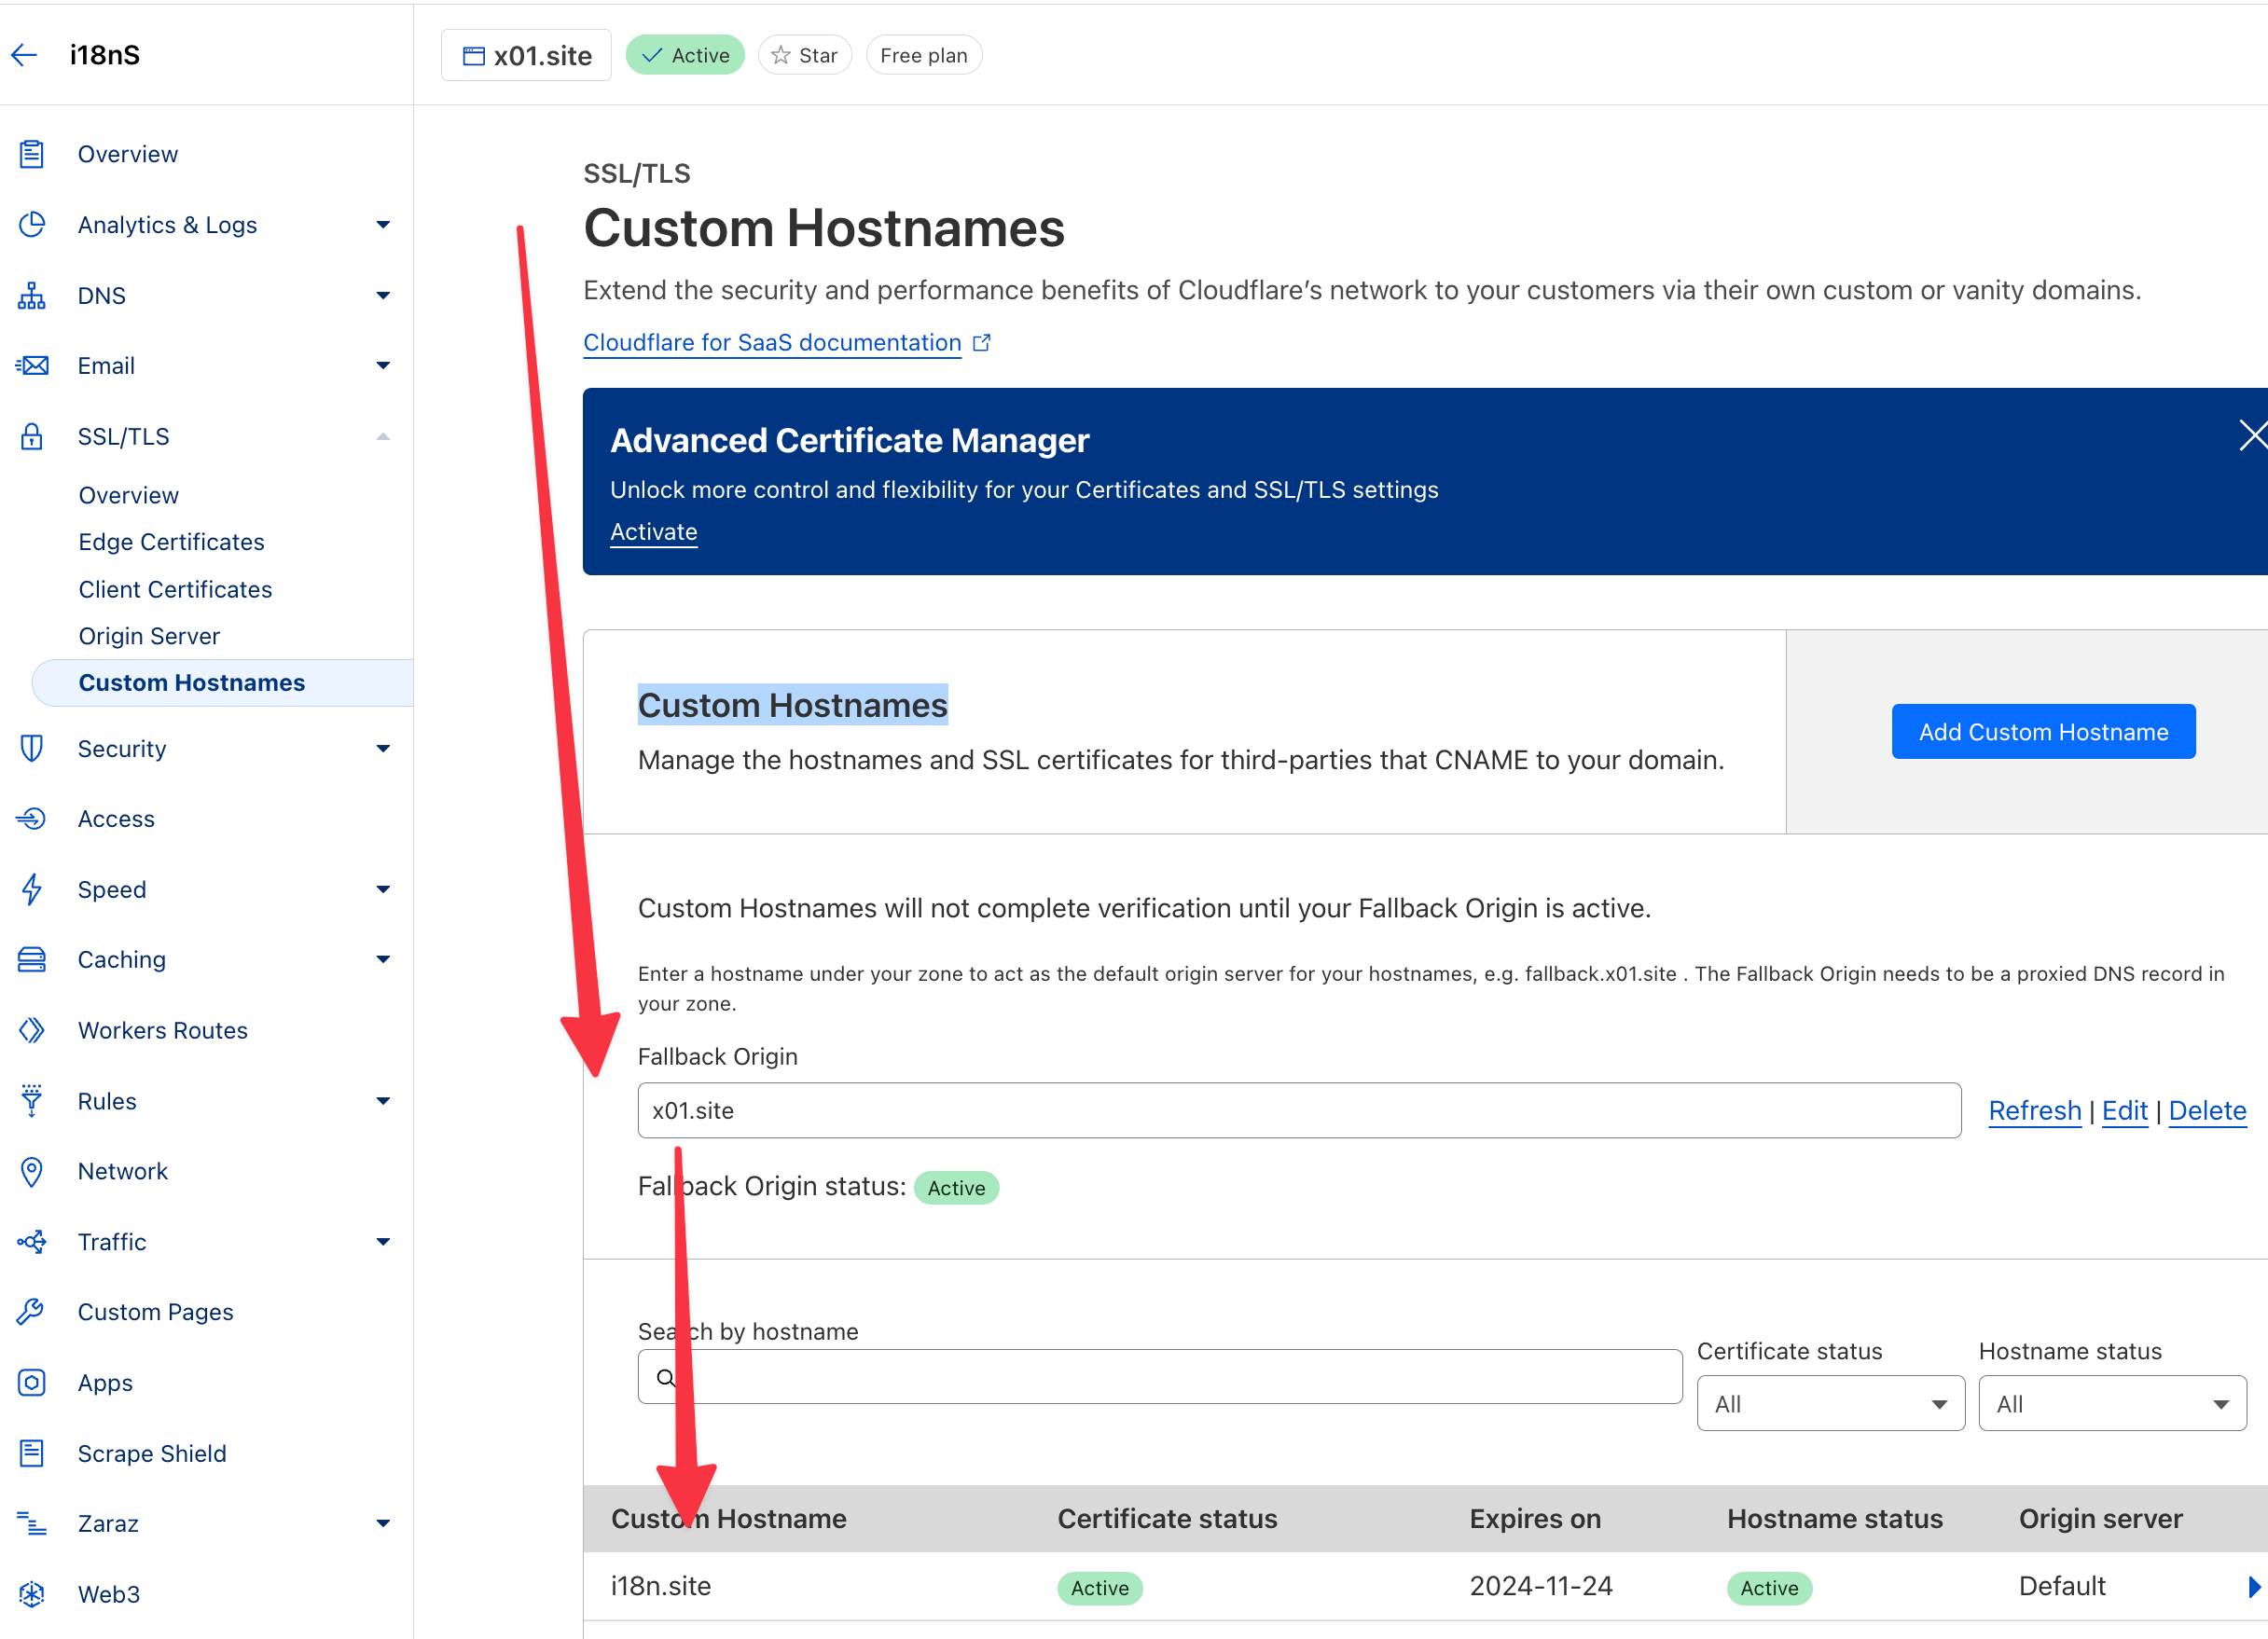
cloudflare R2 사용자 정의 도메인 이름을 통해 액세스할 수 없습니다.
내장 cloudflare 객체 스토리지 R2 사용자 정의된 도메인 이름으로 접근할 수 없기 때문에 정적 파일을 배치하려면 타사 객체 스토리지를 사용해야 합니다.
여기서는 타사 객체를 바인딩하고 cloudflare 에 저장하는 방법을 보여주기 위해 backblaze.com 예로 들겠습니다.
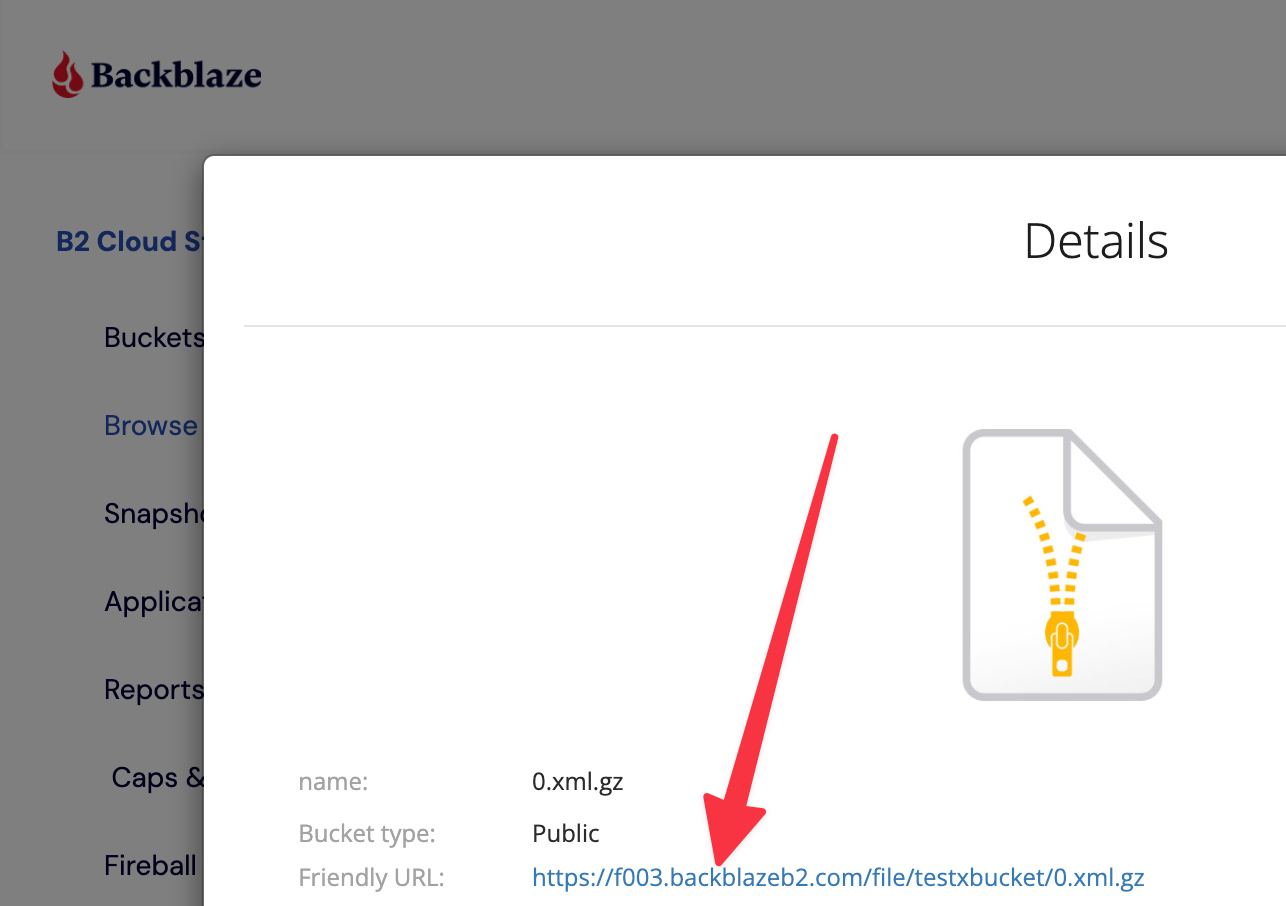
backblaze.com 에 버킷을 생성하고, 파일을 업로드하고, 클릭하여 파일을 찾아보고, 여기서는 f003.backblazeb2.com 인 Friendly URL 의 도메인 이름을 가져옵니다.
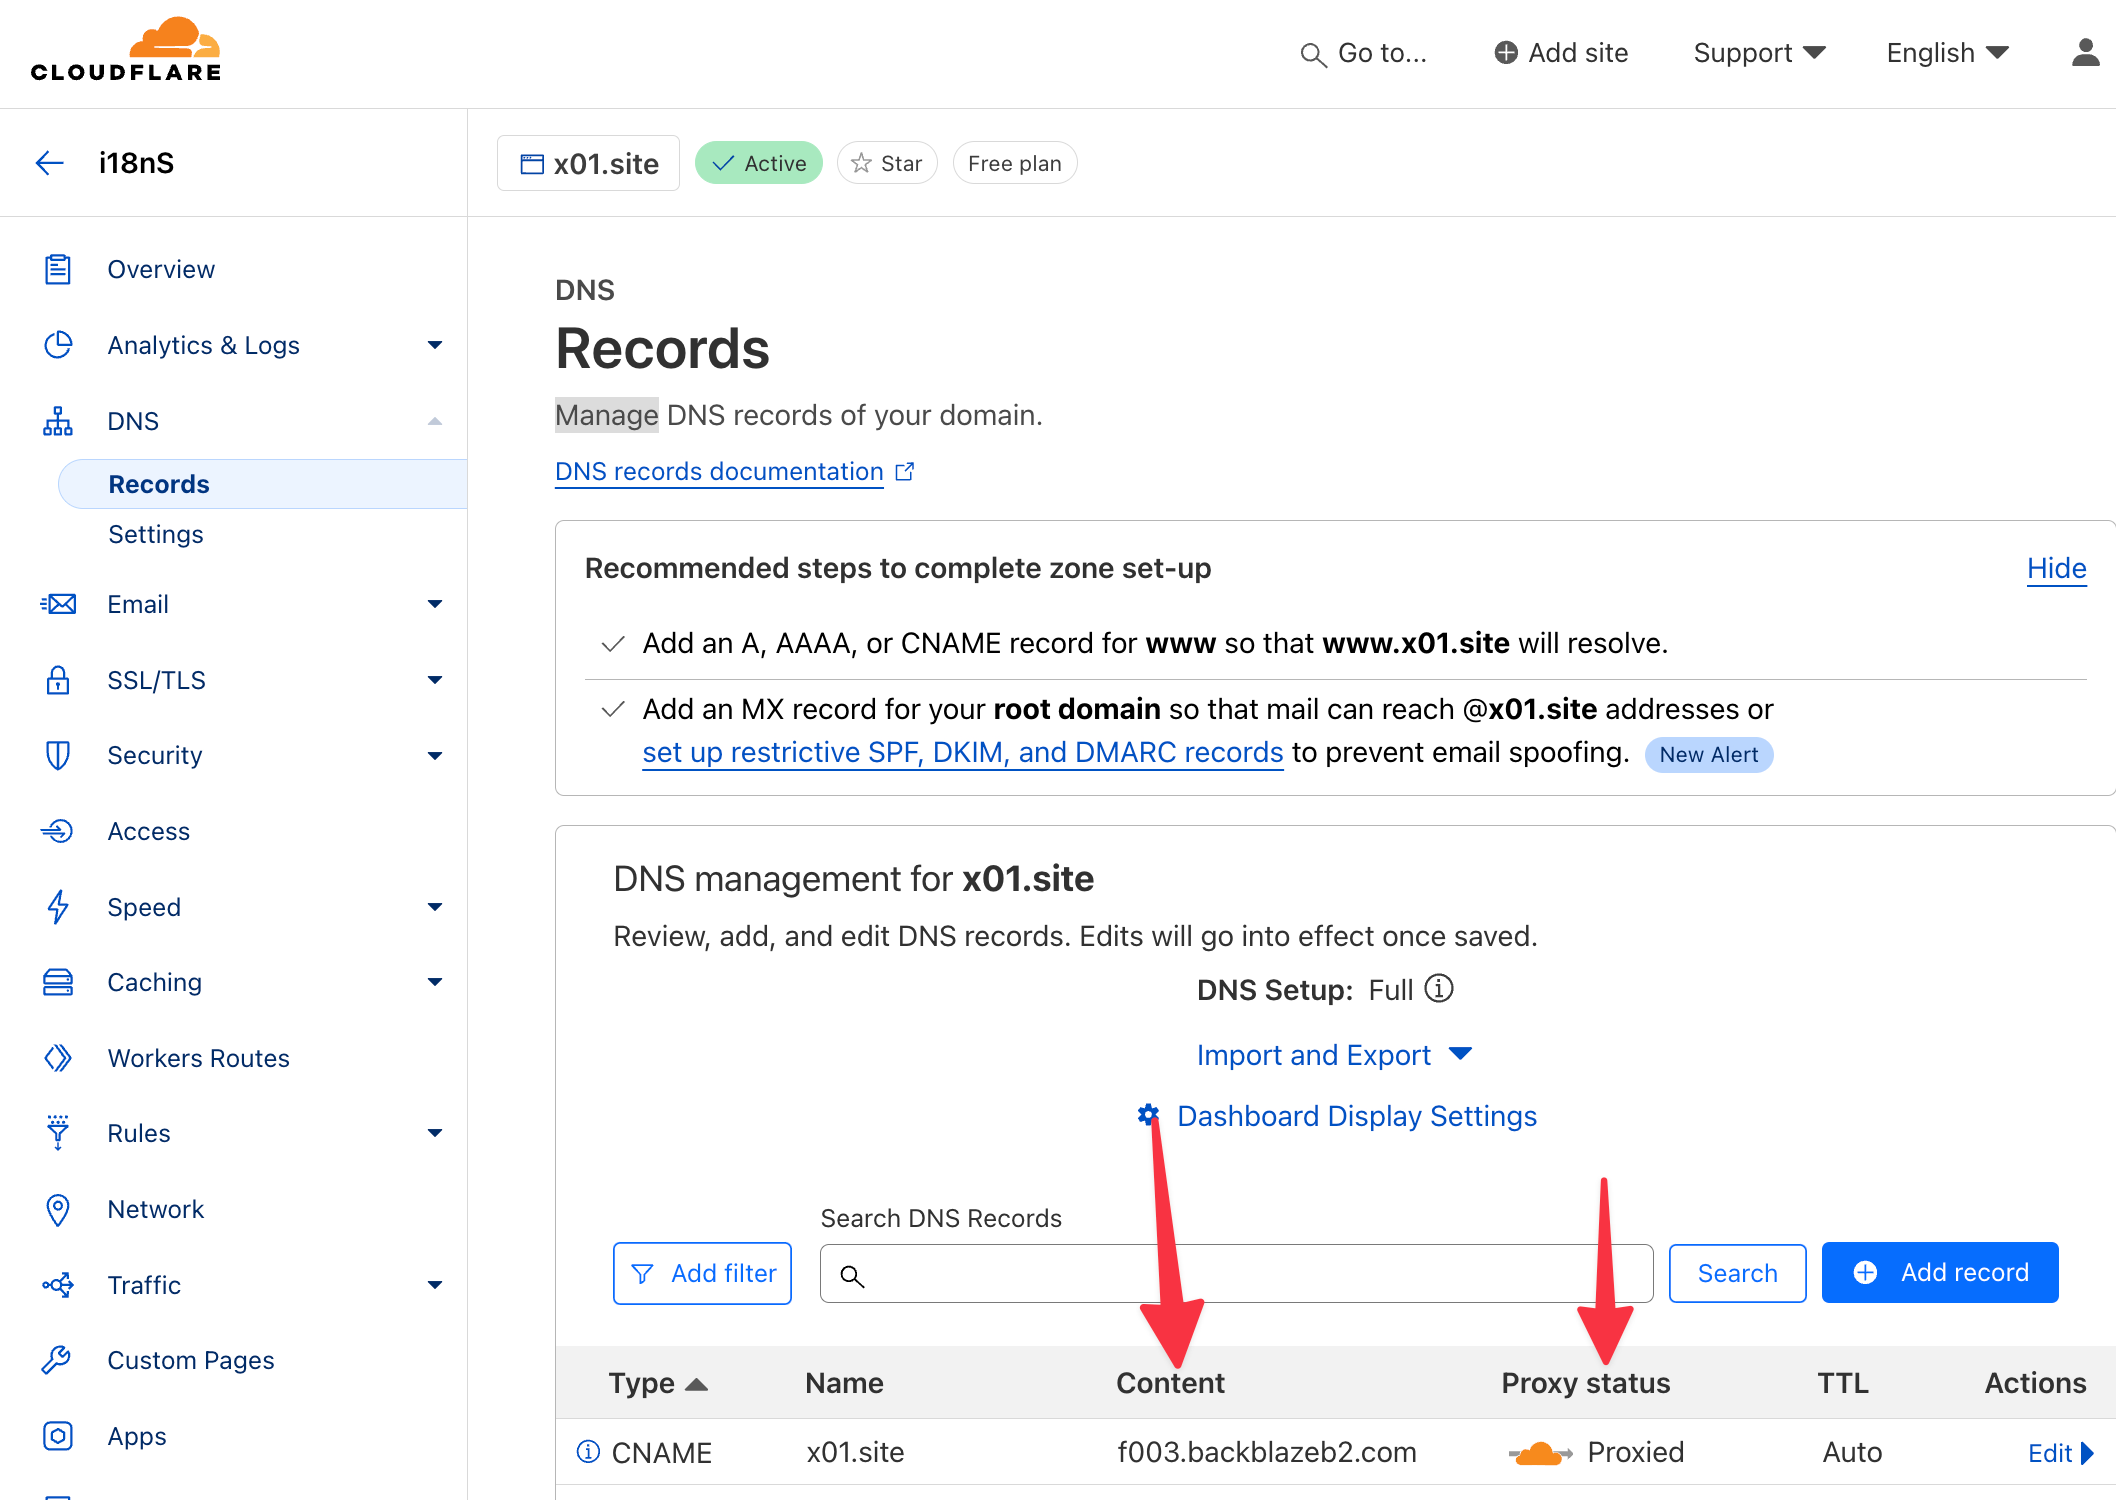
cloudflare 에서 도메인 이름을 CNAME 에서 f003.backblazeb2.com 로 변경하고 프록시를 활성화합니다.
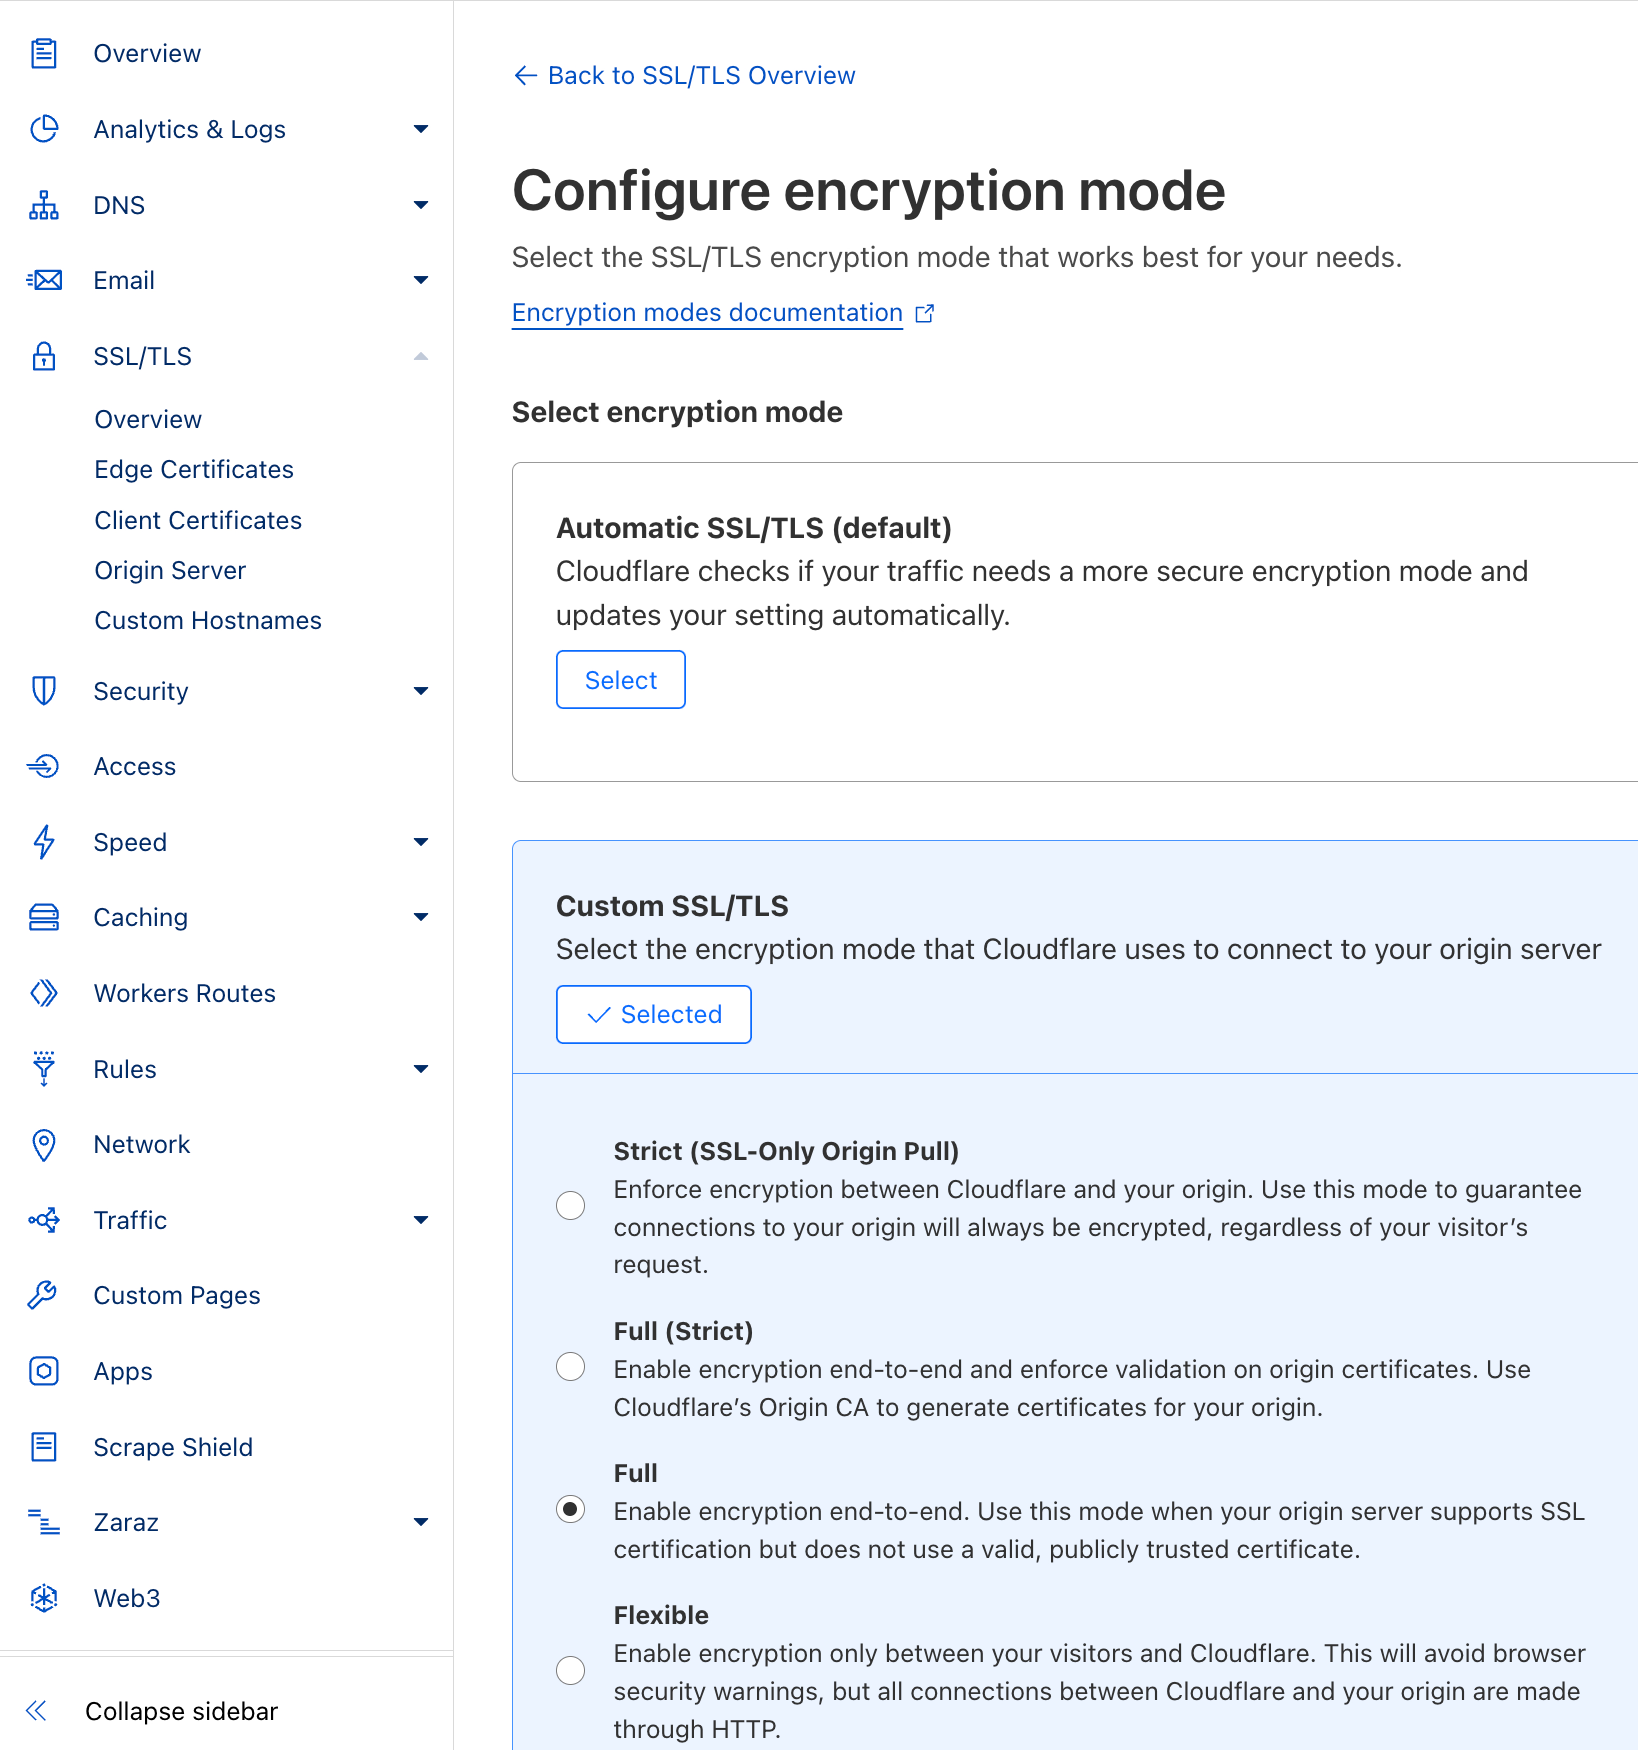
cloudflare 수정 → 암호화 모드, SSL Full 설정
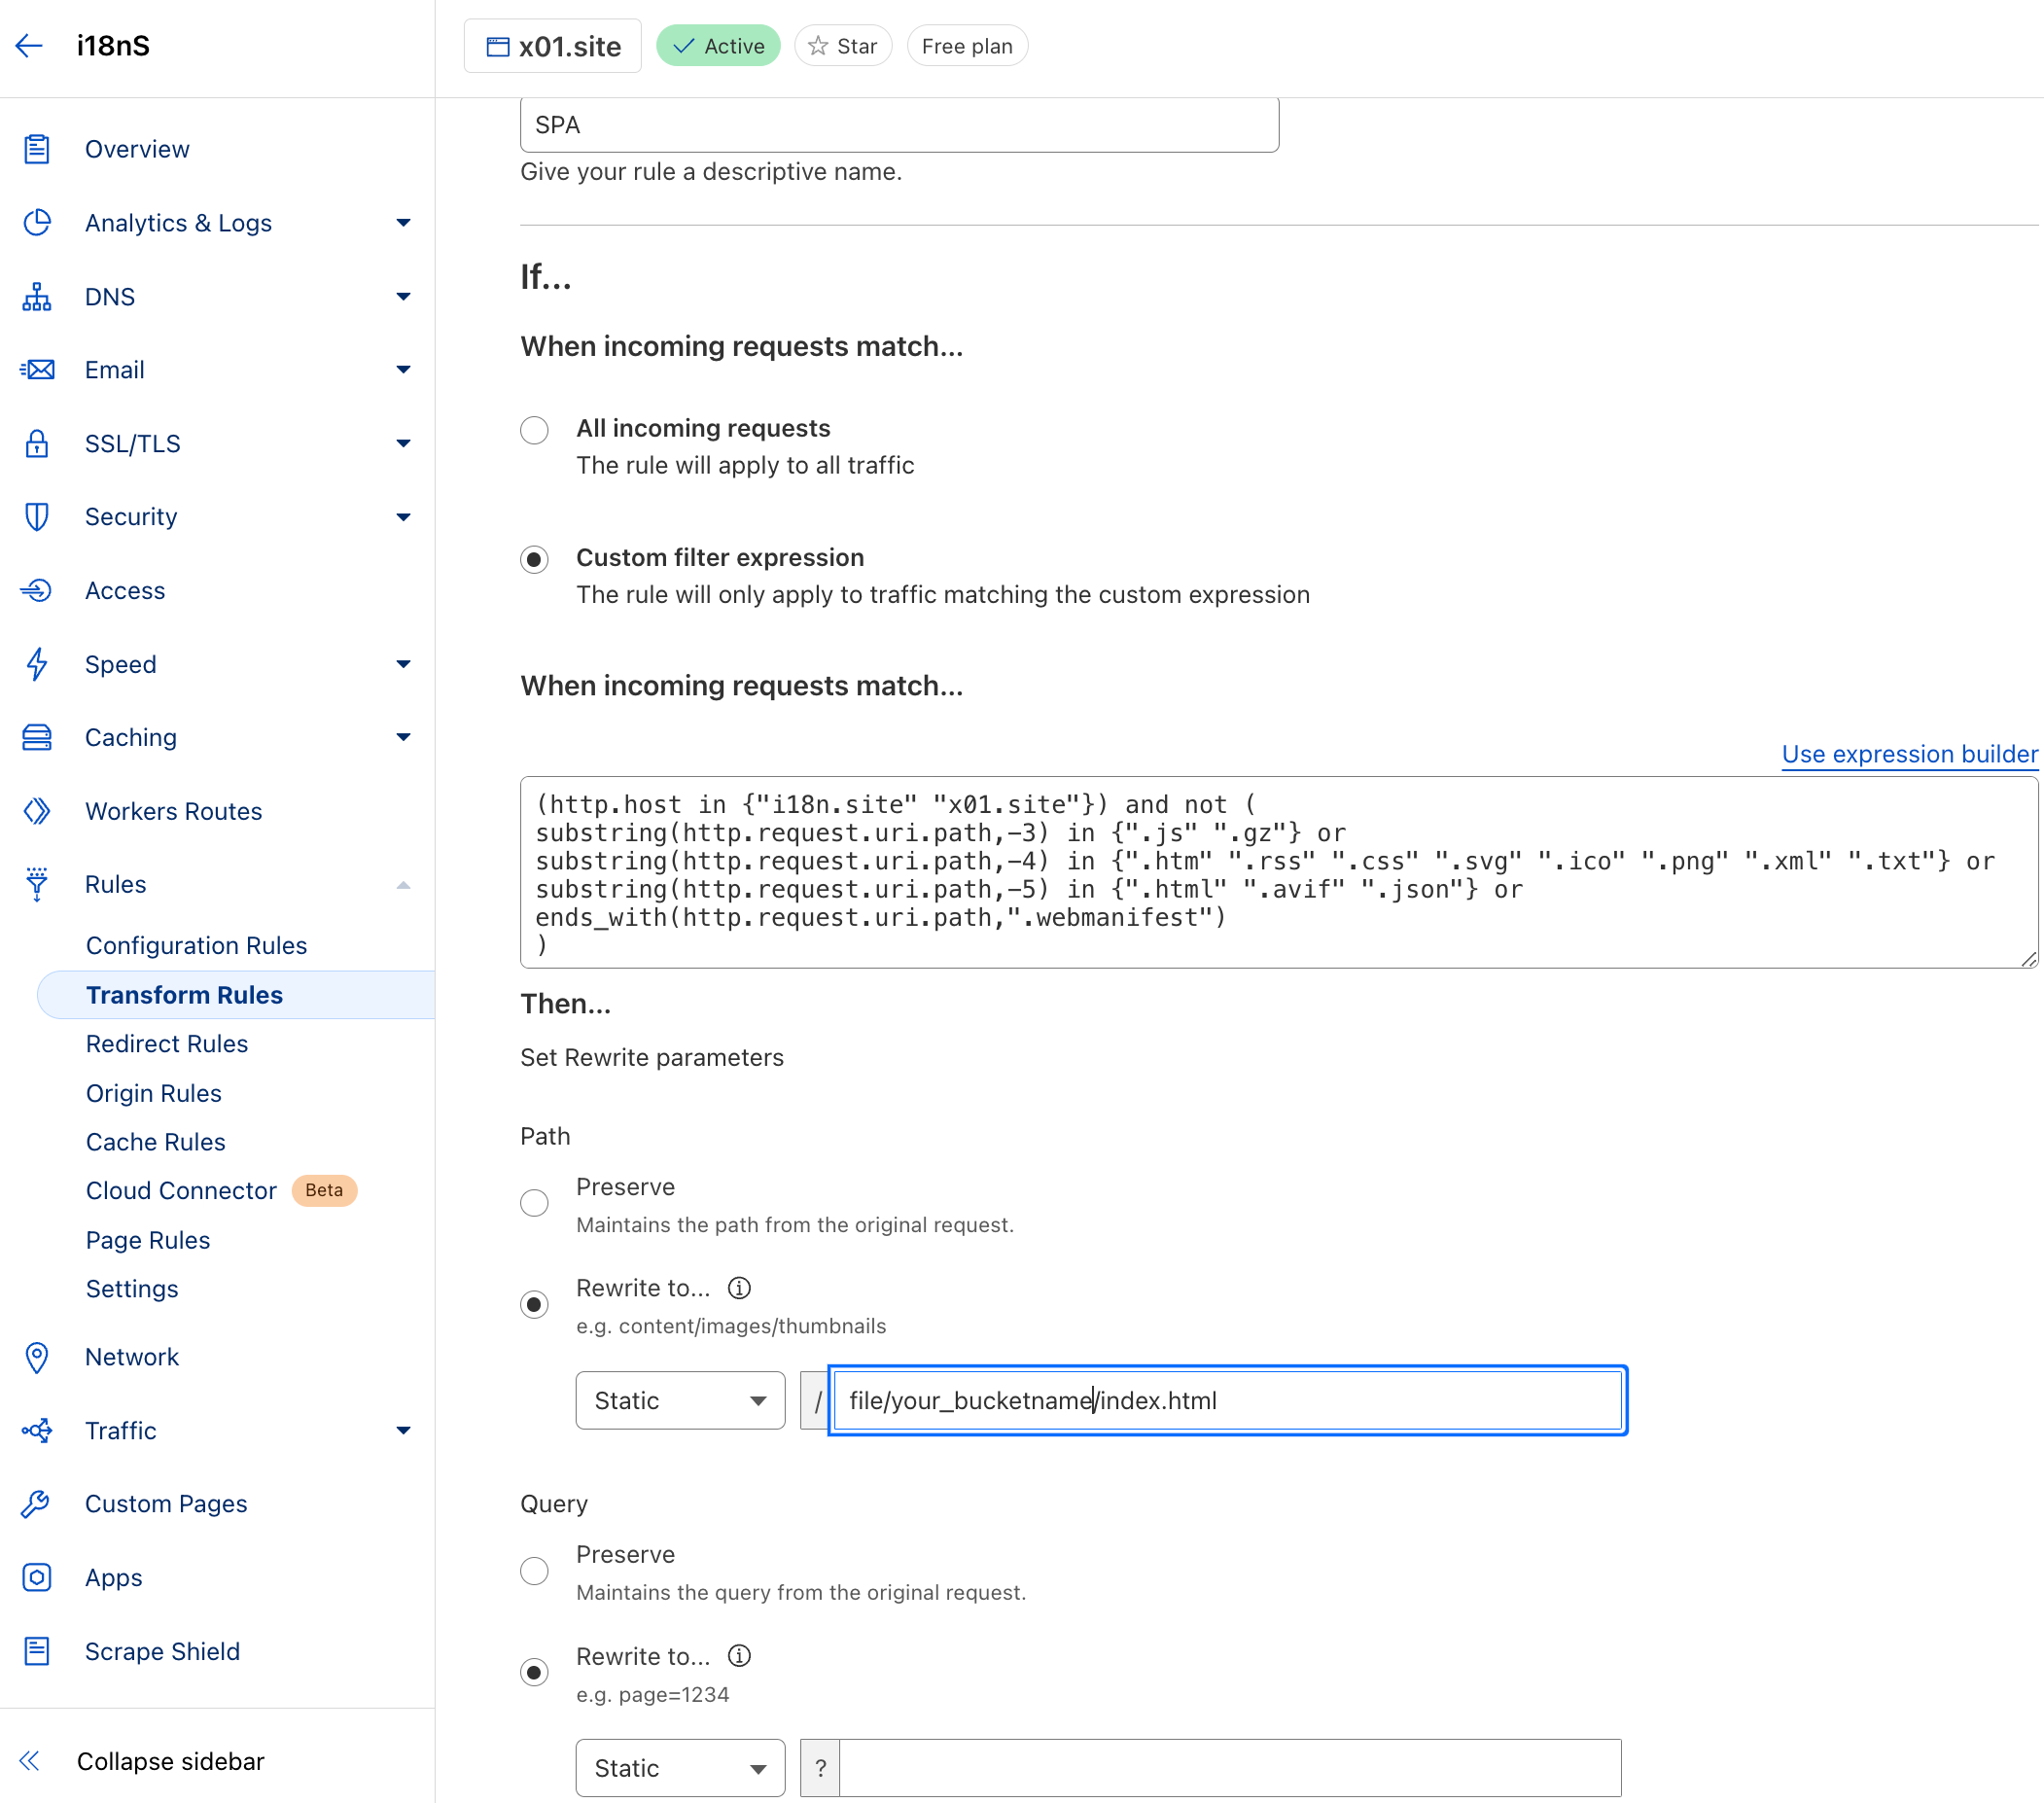
아래와 같이 변환 규칙을 추가하고 먼저 넣습니다(첫 번째 규칙의 우선순위가 가장 낮습니다).
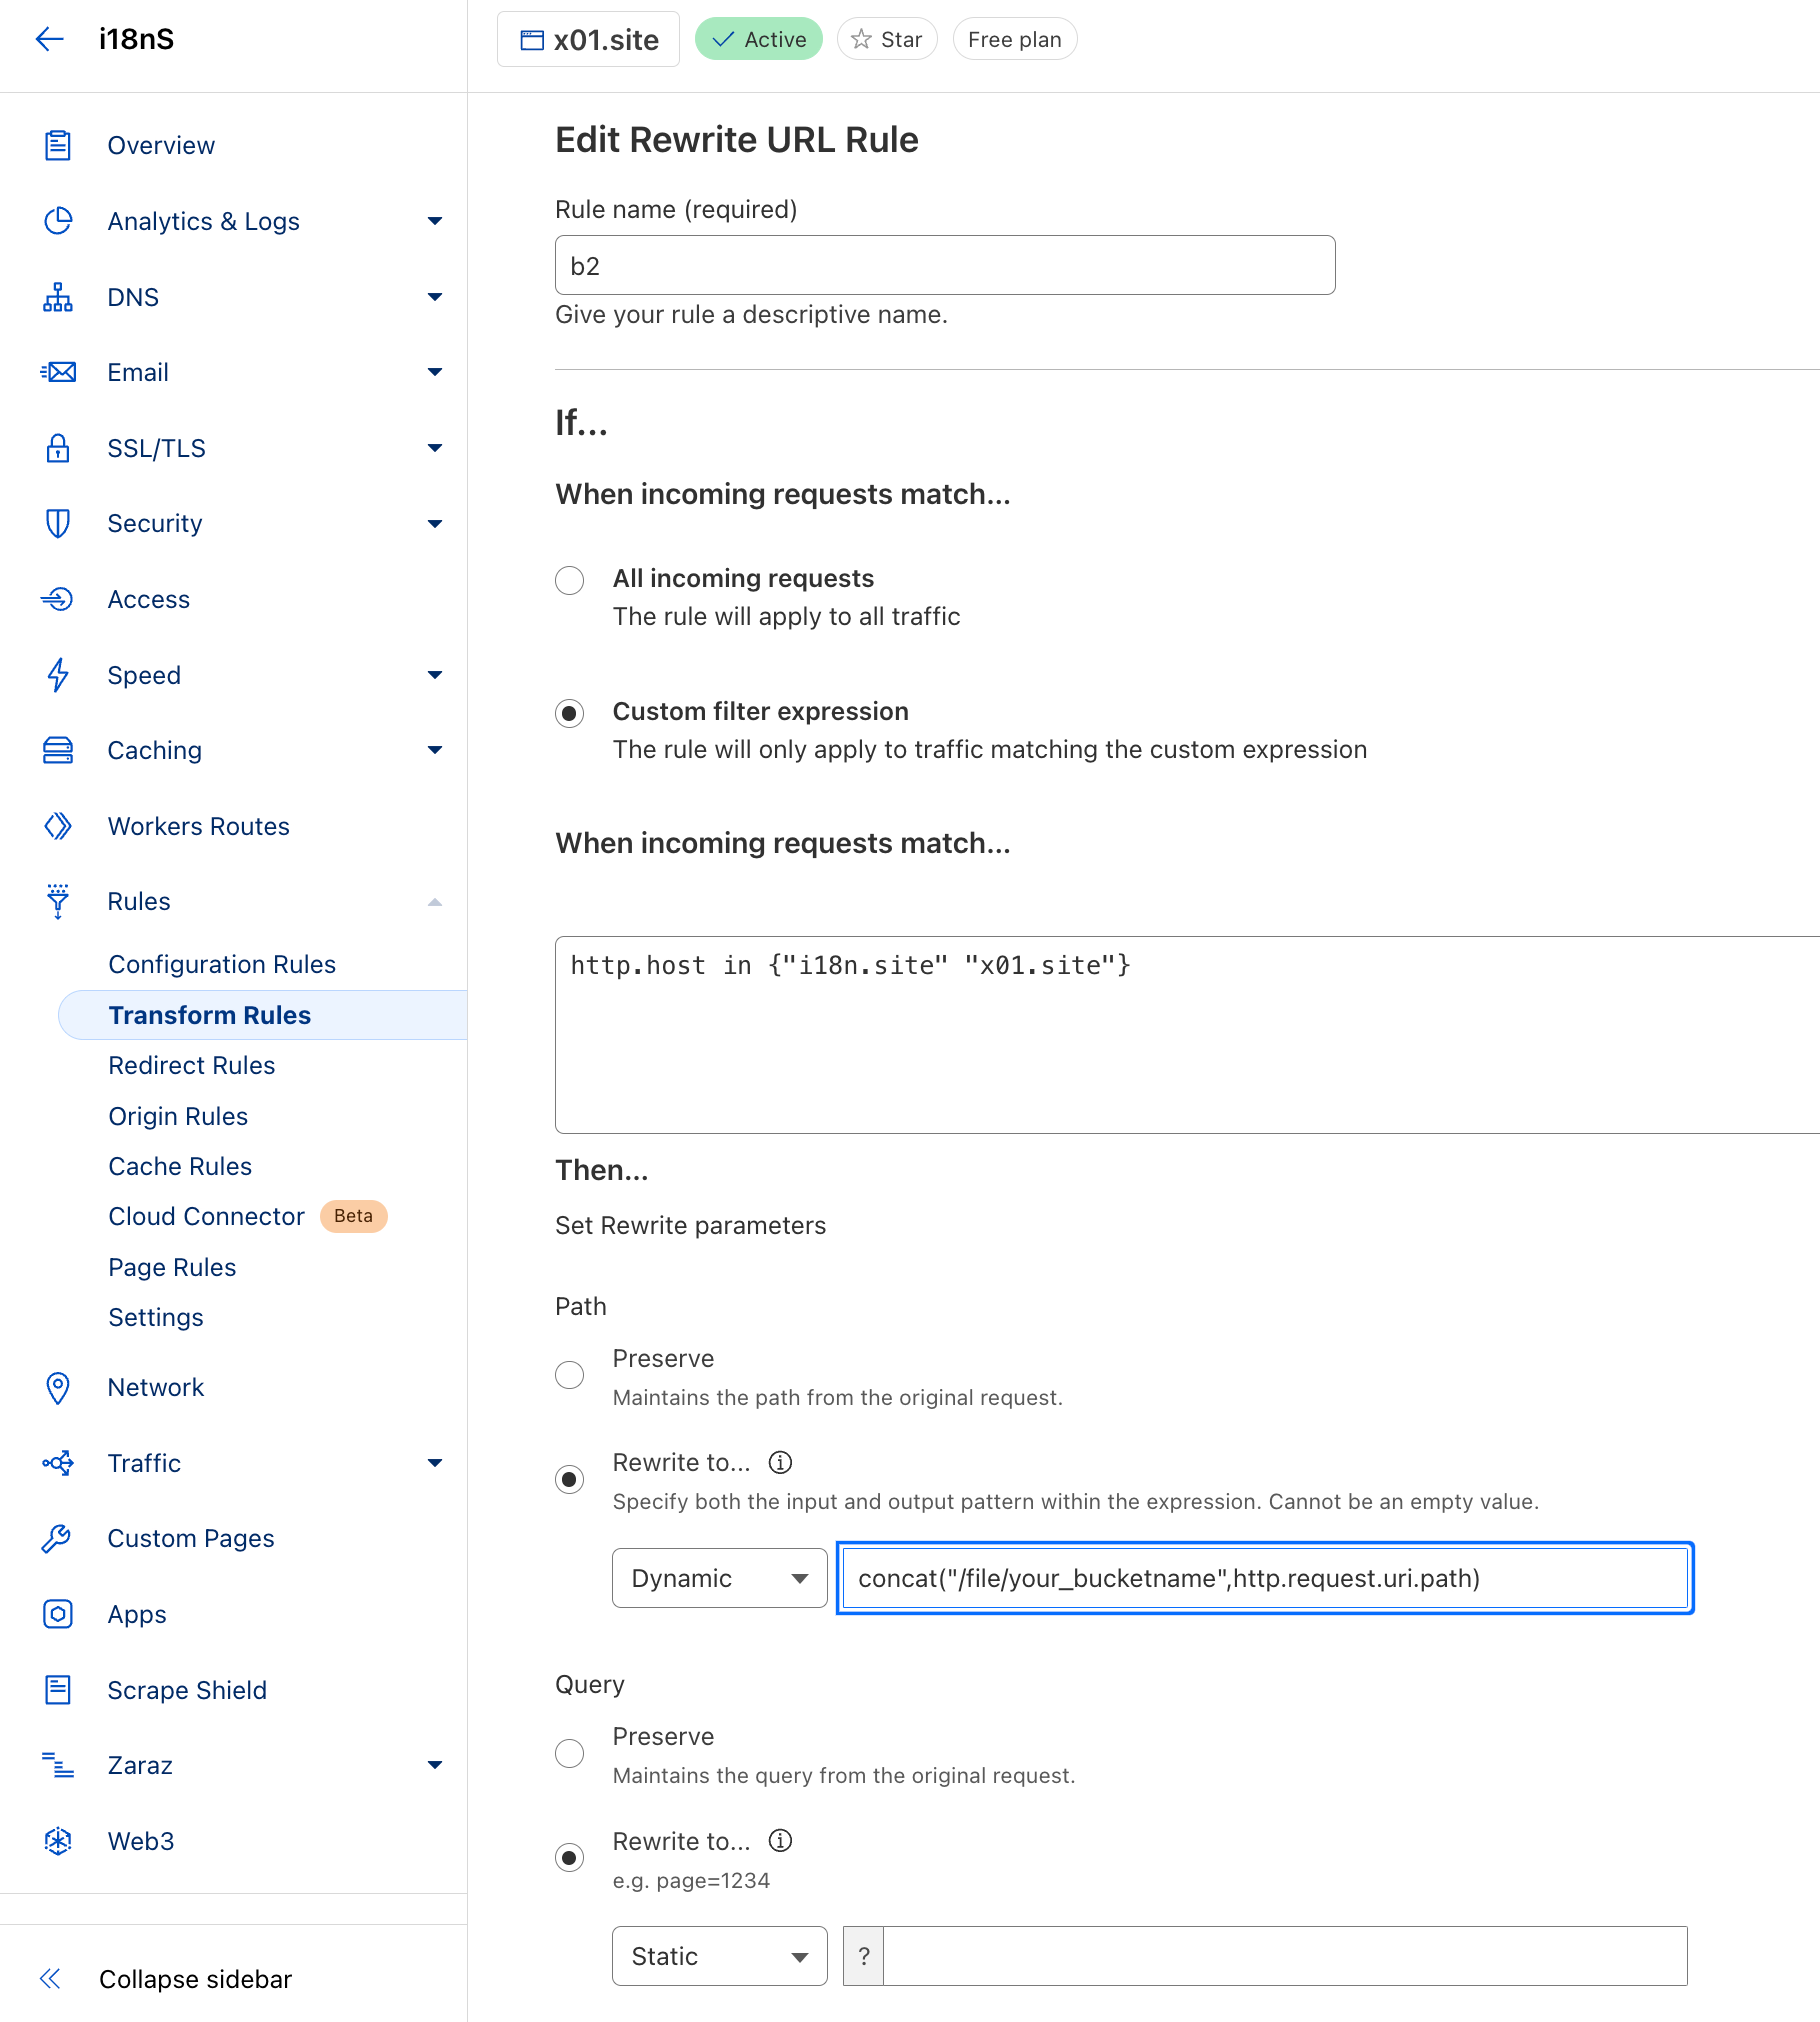
Rewrite to 동적을 선택하고 your_bucketname in concat("/file/your_bucketname",http.request.uri.path) 을 버킷 이름으로 수정합니다.
또한 위의 cloudflare 변환 규칙에서는 index.html file/your_bucketname/index.html 로 변경되고 다른 구성은 동일하게 유지됩니다.
