Deployment and Launch
i18n.site adopts a single-page application architecture, with the website entry page and content deployed independently.
After running the above translation, directories htm and v will be generated under the md/out/dev directory.
Here, dev means it is built based on the .i18n/htm/dev.yml configuration file.
dev directory:
The htm directory is the website entry page.
The v directory contains website content with version numbers.
Local preview does not care about the version number and will copy all files to the out/dev/v/0.1.0 directory.
For official release, changed files will be copied to the new version number directory.
Specify Configuration File with -c
Different configuration files will create corresponding directories in the out directory.
For example, .i18n/htm/main.yml will create the out/main directory.
dev.yml and main.yml are the default configurations.
dev is the abbreviation of development, indicating the development environment, used for local preview, and is also the default configuration file.
ol is the abbreviation of online, indicating the online environment, which is used for official release. It is also the default configuration file when using the command line parameter -n to release to npm.
You can also create other configuration files. Use --htm_conf on the command line to specify the configuration file name to use:
For example:
i18n.site --htm_conf dist --save
Here --save indicates updating the release version number.
Publish Content to npmjs.com
Publishing content to npmjs.com is the recommended default solution (see Front-end High Availability).
npm Login & Publish
Install nodejs, and log in using npm login.
Edit md/.i18n/htm/main.yml and change the value of md: from YOUR_NPM_PACKAGE to your own npm package name. Any unoccupied package name on npmjs.com will do.
Then modify md/.i18n/htm/main.package.json
Run i18n.site --npm or i18n.site -n in the md directory to translate and publish.
If you use a continuous integration environment to publish, there is no need to install nodejs. Just copy the logged-in and publishing permissions ~/.npmrc to the environment.
If you modify the package name of v: in main.yml, please be sure to delete .i18n/v/main first and then publish.
npm Publish Proxy Server
If users in mainland China encounter network issues preventing them from publishing npm packages, they can set the environment variable https_proxy to configure the proxy server.
Assuming your proxy server port is 7890, you can write:
https_proxy=http://127.0.0.1:7890 i18n.site -n
Self-Hosted Content
If you want to self-host the content, first edit md/.i18n/htm/main.yml and change v: //unpkg.com/i18n.site to your URL prefix, such as v: //i18n-v.xxx.com.
Enter the md directory and run:
i18n.site --htm_conf ol --save
Or abbreviate it as:
i18n.site -c ol -s
Then, configure the content in the md/out/main/v directory to the URL prefix path set in v:.
Finally, configure the cache time of the path ending in /.v to 1s, otherwise the newly released content cannot be accessed immediately.
The cache time for other paths can be set to one year or more to reduce unnecessary requests.
Host Content to S3
To self-host content, in addition to using your own server, another common option is to use S3 + CDN.
You can use rclone to log in to the S3 server, then refer to and modify the following script to copy only the incremental changes to S3 each time you publish.
i18n.site -c ol -s
s3=your-s3
bucket=your-bucket
ver=$(head -1 .i18n/v/main/v.hash | cut -c 2-)
rclone copy --overwrite-dir out/main/htm/v/$ver $s3:/$bucket/$ver
rclone copy out/main/v/.v "$s3:/$bucket/"
Remember to configure CDN so that the cache time of the path ending in /.v is 1s, otherwise the newly released content cannot be accessed immediately.
Publish Website
The website can be deployed anywhere, such as GitHub Pages or Cloudflare Pages, both of which are excellent choices.
Since the website uses a single-page application architecture, remember to rewrite URL paths that do not contain . to index.html.
The website entry page only needs to be deployed once, and there is no need to redeploy the website entry page for subsequent content updates.
Deploy on GitHub Pages
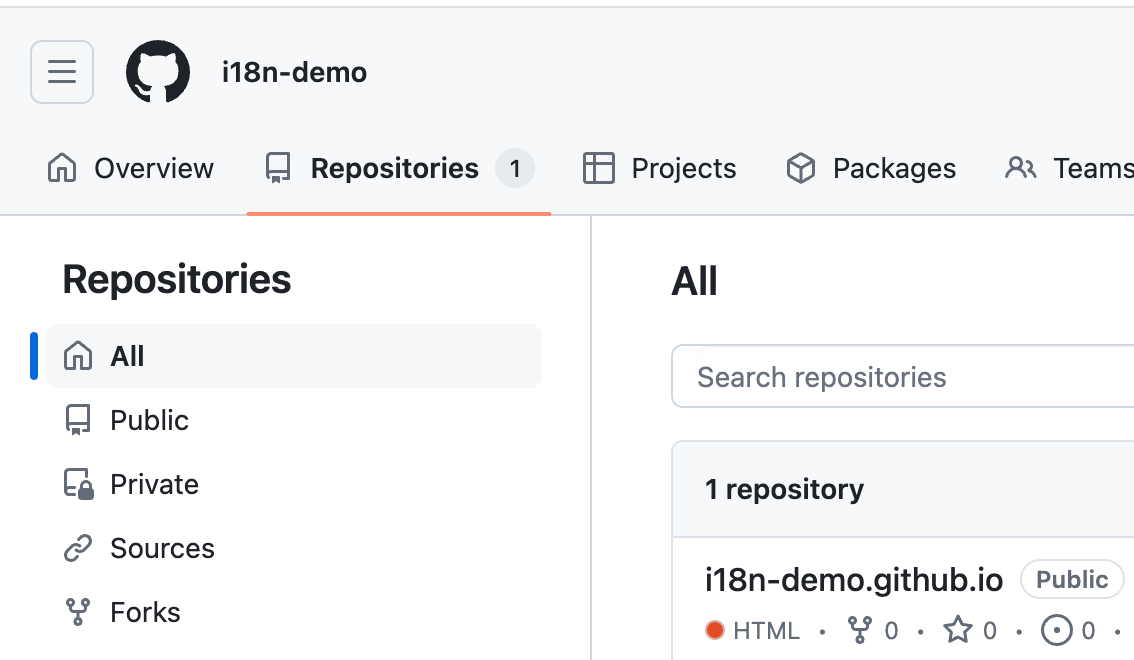
First, click here to create an organization on GitHub. In the following, the organization name is i18n-demo as an example.
Then create the repository i18n-demo.github.io under this organization (please replace i18n-demo with the organization name you created):
When publishing the content in the previous section, out/main/htm has been generated. Please enter this directory and run:
ln -s index.html 404.html
Because GitHub Pages does not support URL path rewriting, 404.html is used instead.
Then run the following command in the htm directory (remember to replace i18n-demo/i18n-demo.github.io.git with your own repository address):
git init
git branch -M main
git remote add origin [email protected]:i18n-demo/i18n-demo.github.io.git
git push -u origin main -f
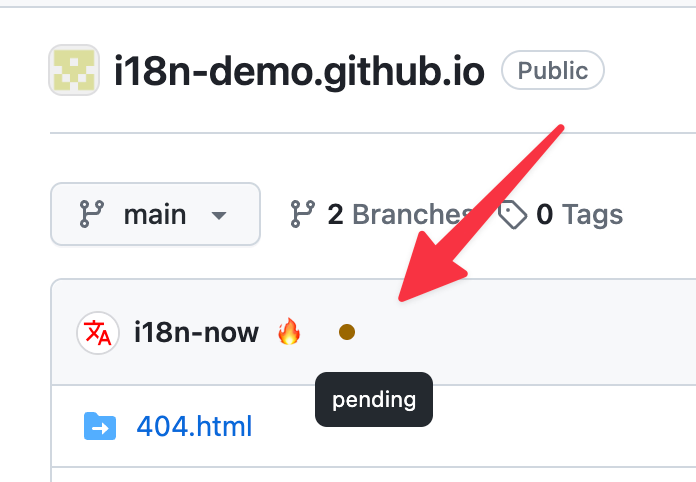
After pushing the code, wait for the deployment of GitHub Pages to run successfully (as shown below) before you can access it.
The demo page can be found at:
https://i18n-demo.github.io
Deploy on Cloudflare Pages
Cloudflare Pages compared to GitHub Pages, provides path rewriting and is more friendly to mainland China and more accessible. It is recommended to use.
The deployment of Cloudflare Pages is usually based on the deployment of GitHub Pages above.
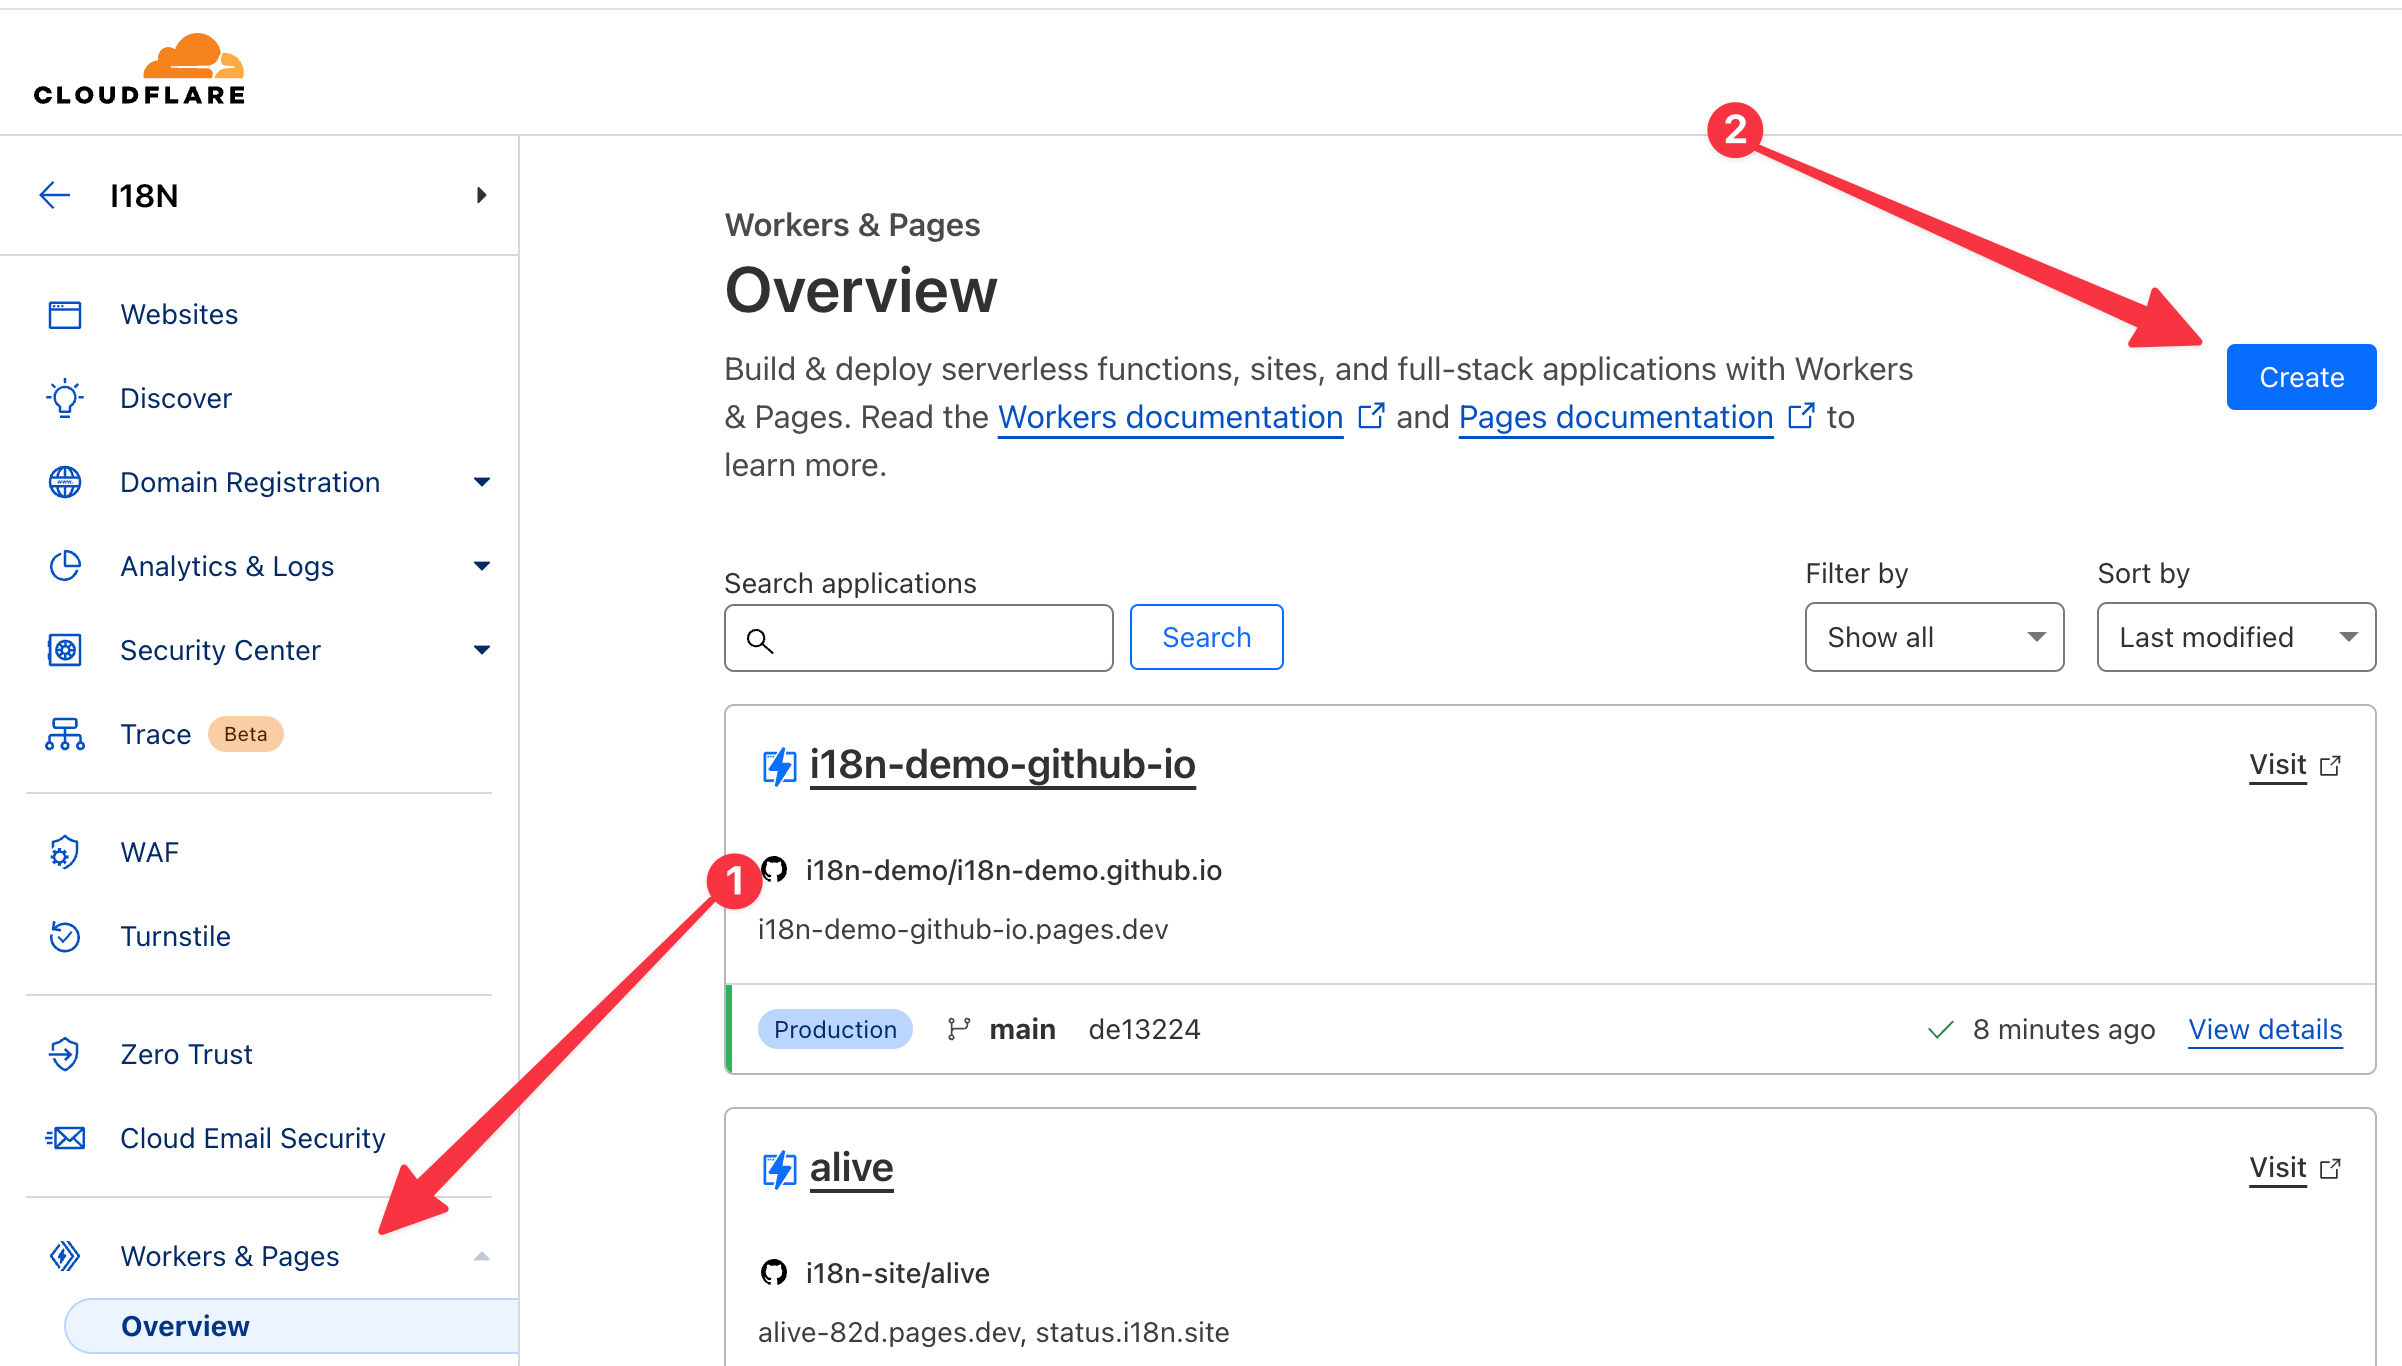
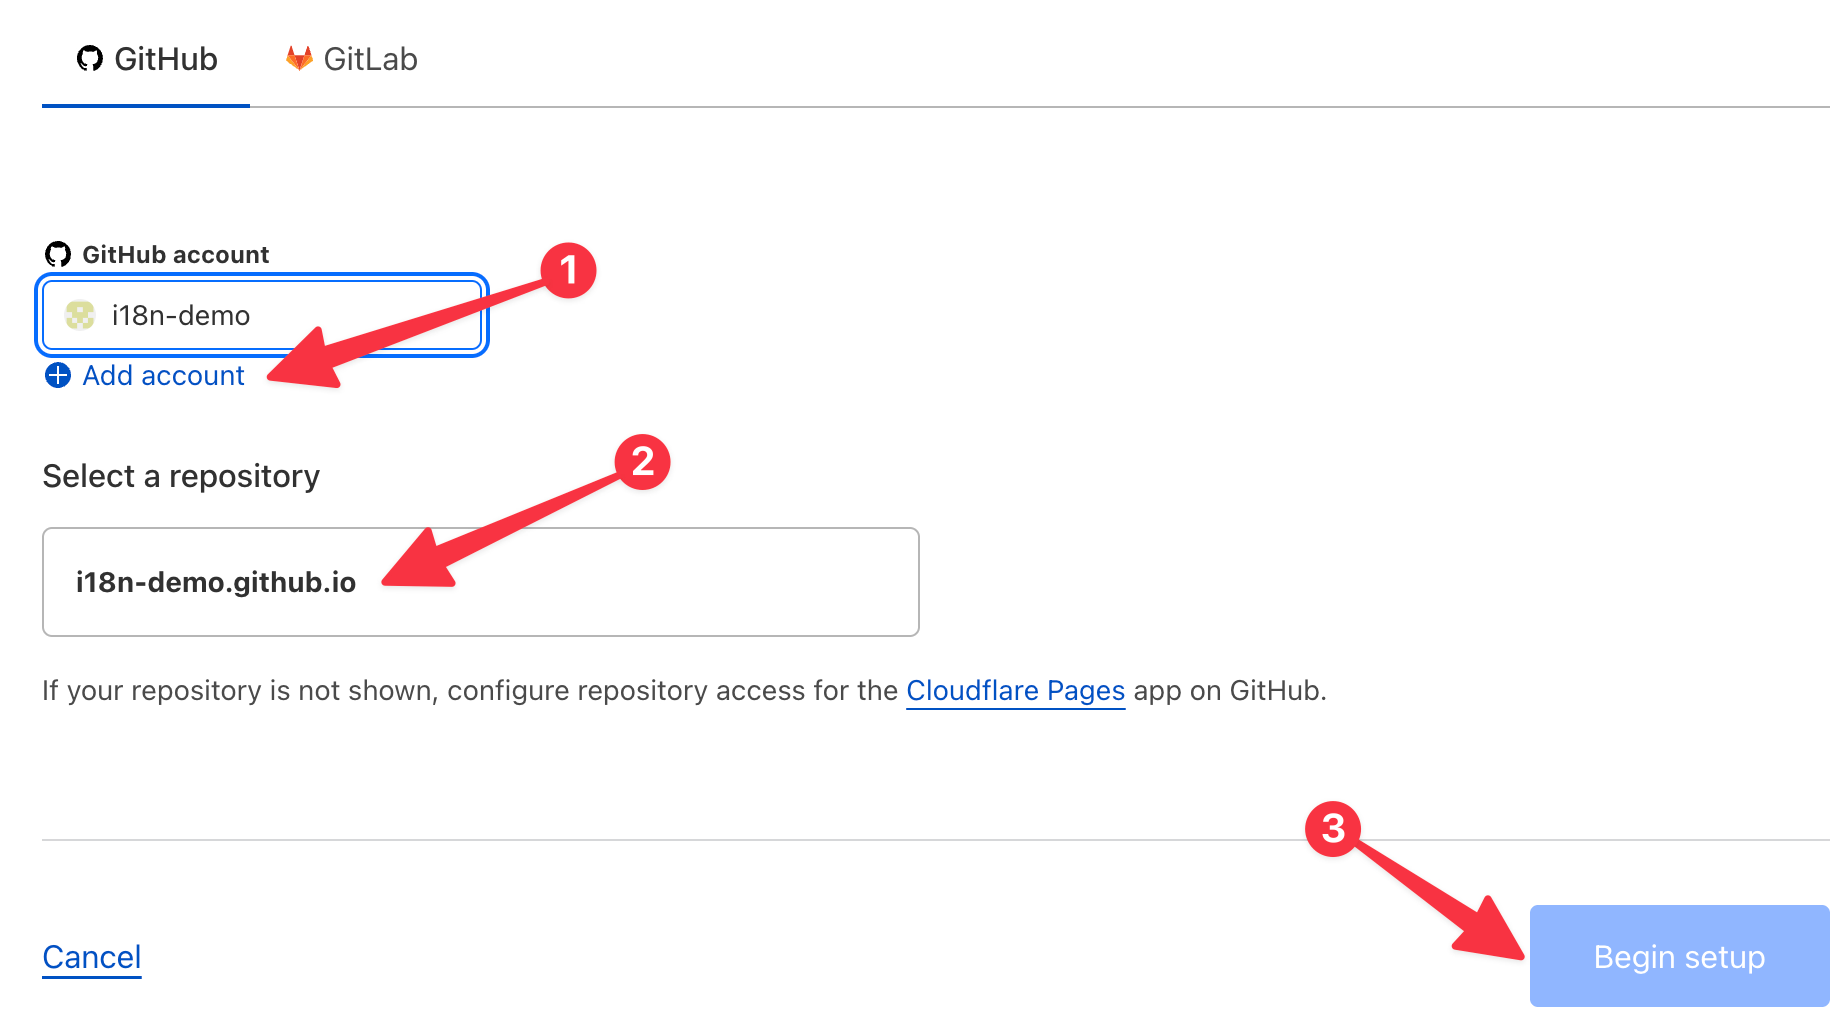
Create a project and bind the i18n-demo.github.io repository above.
The process is shown in the figure below:
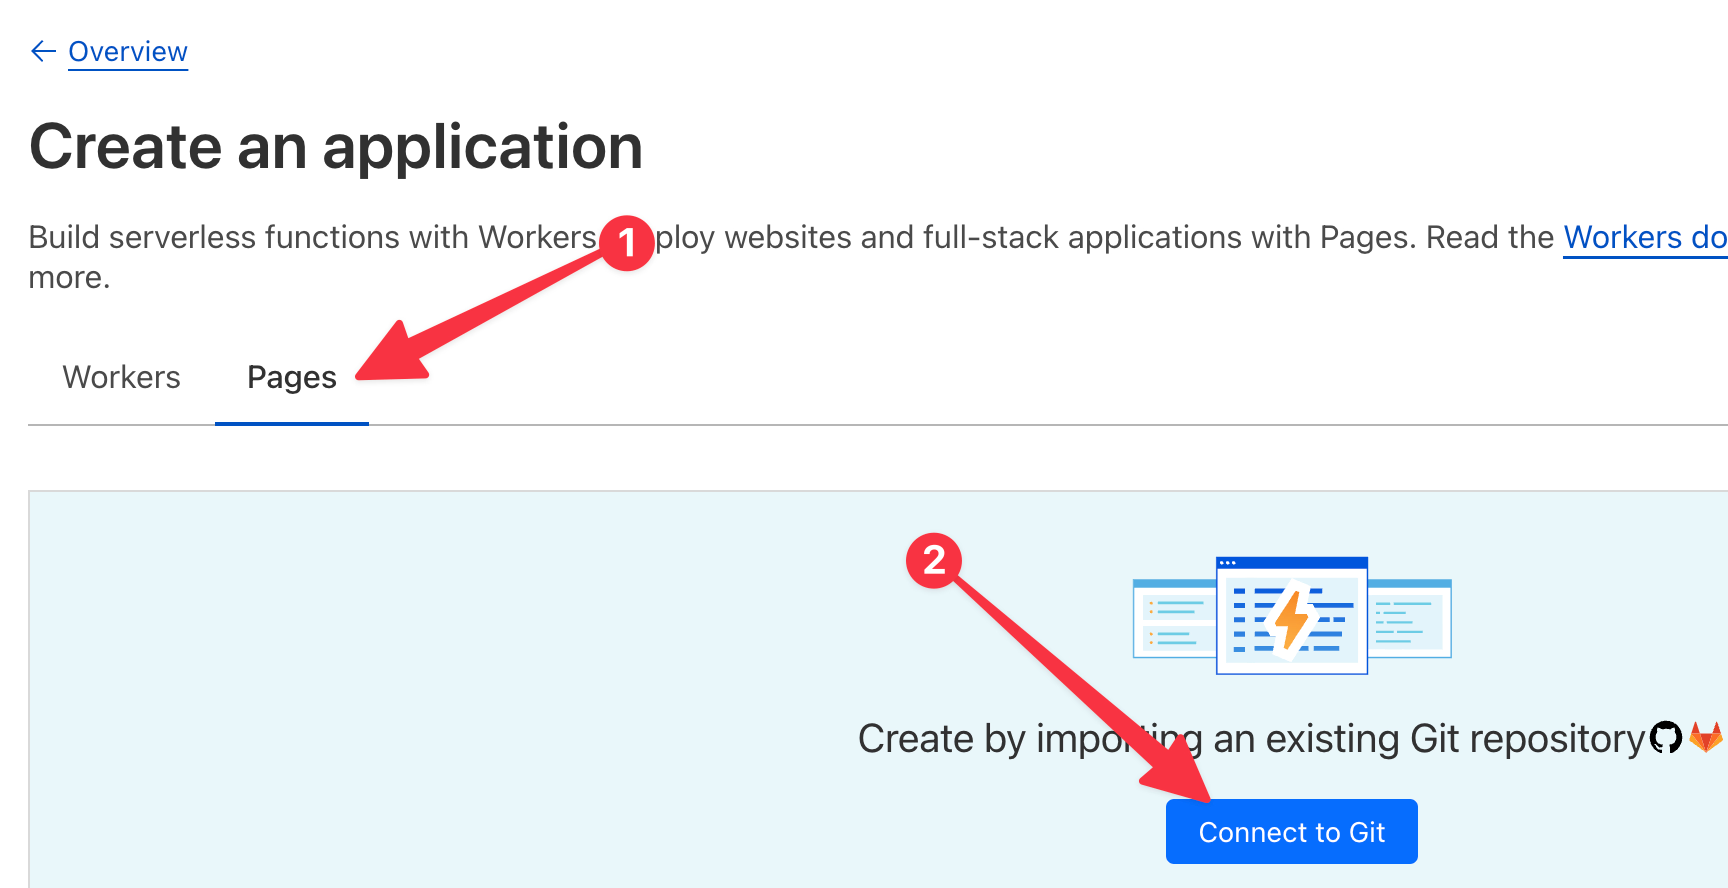
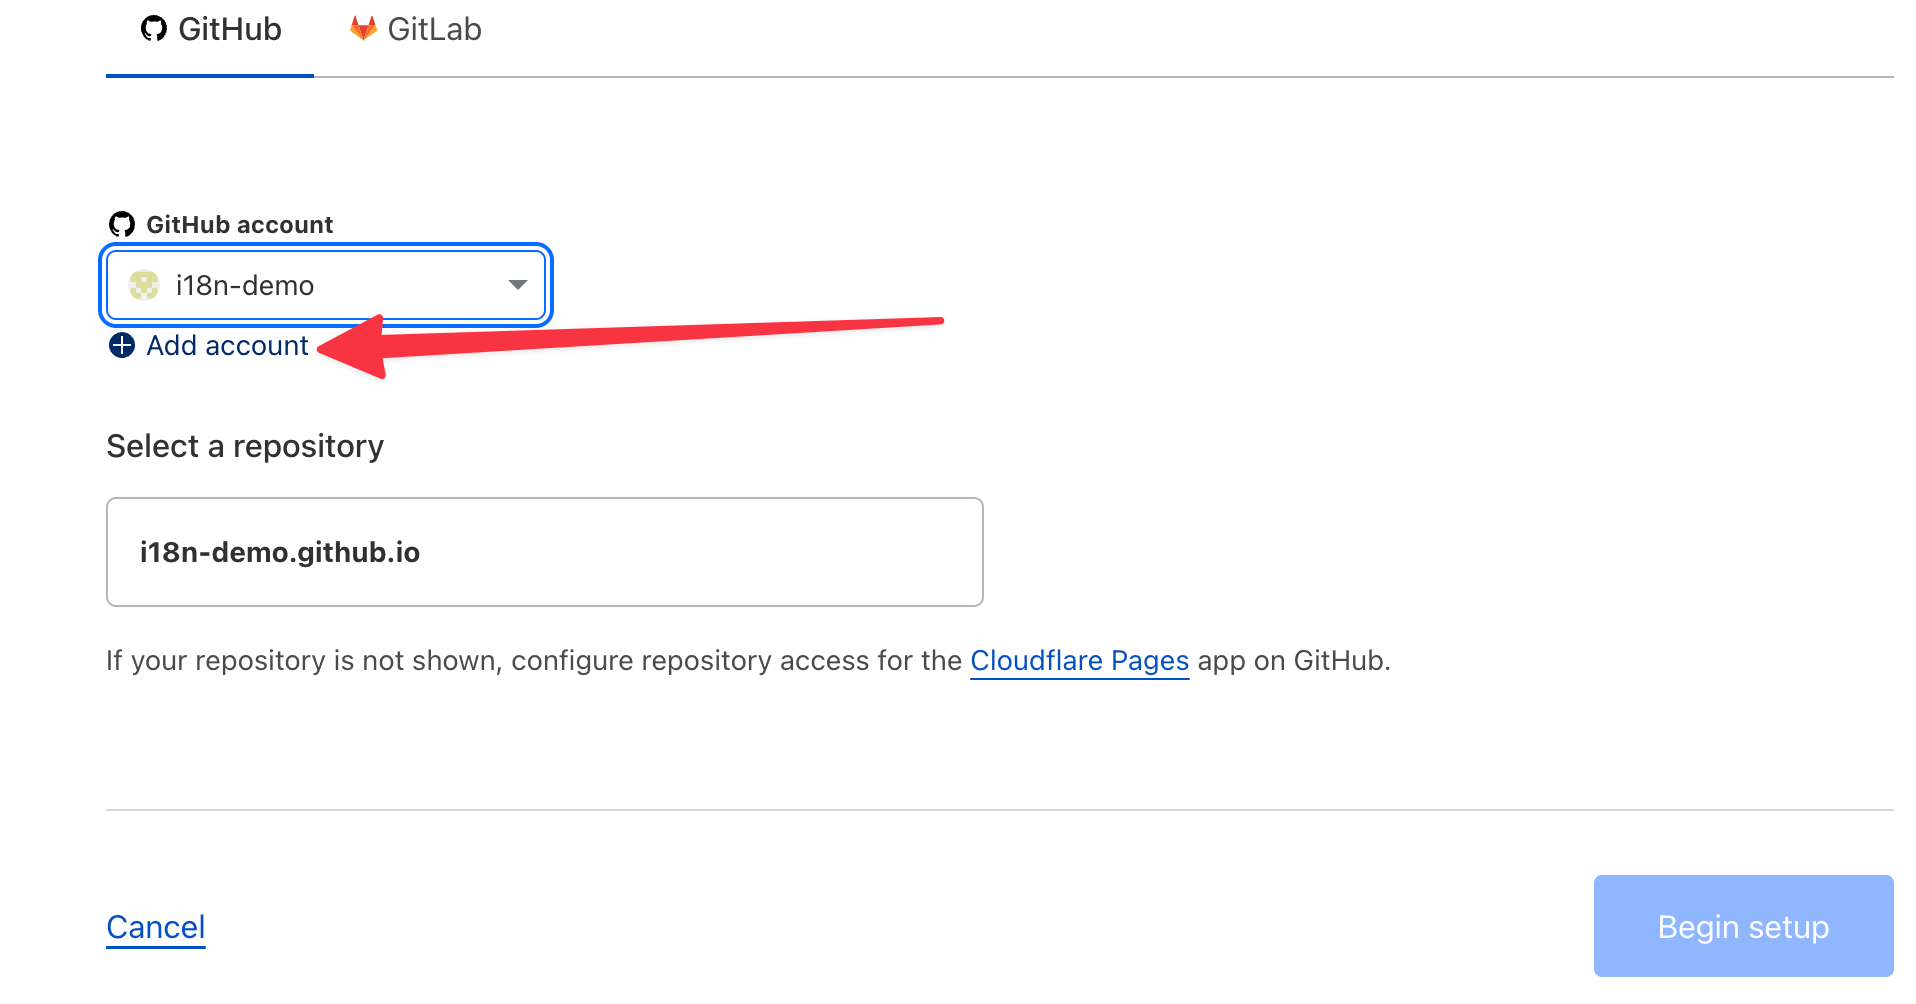
Please click Add Account to grant access to the organization i18n-demo.
If you have bound the repository of another organization, you may need to click Add Account twice to authorize twice before the new organization will be displayed.
Next, select the repository i18n-demo.github.io, then click Begin setup, and use the default values for subsequent steps.
After binding for the first time, you need to wait a few minutes before you can access it.
After deployment, you can bind a custom domain name.
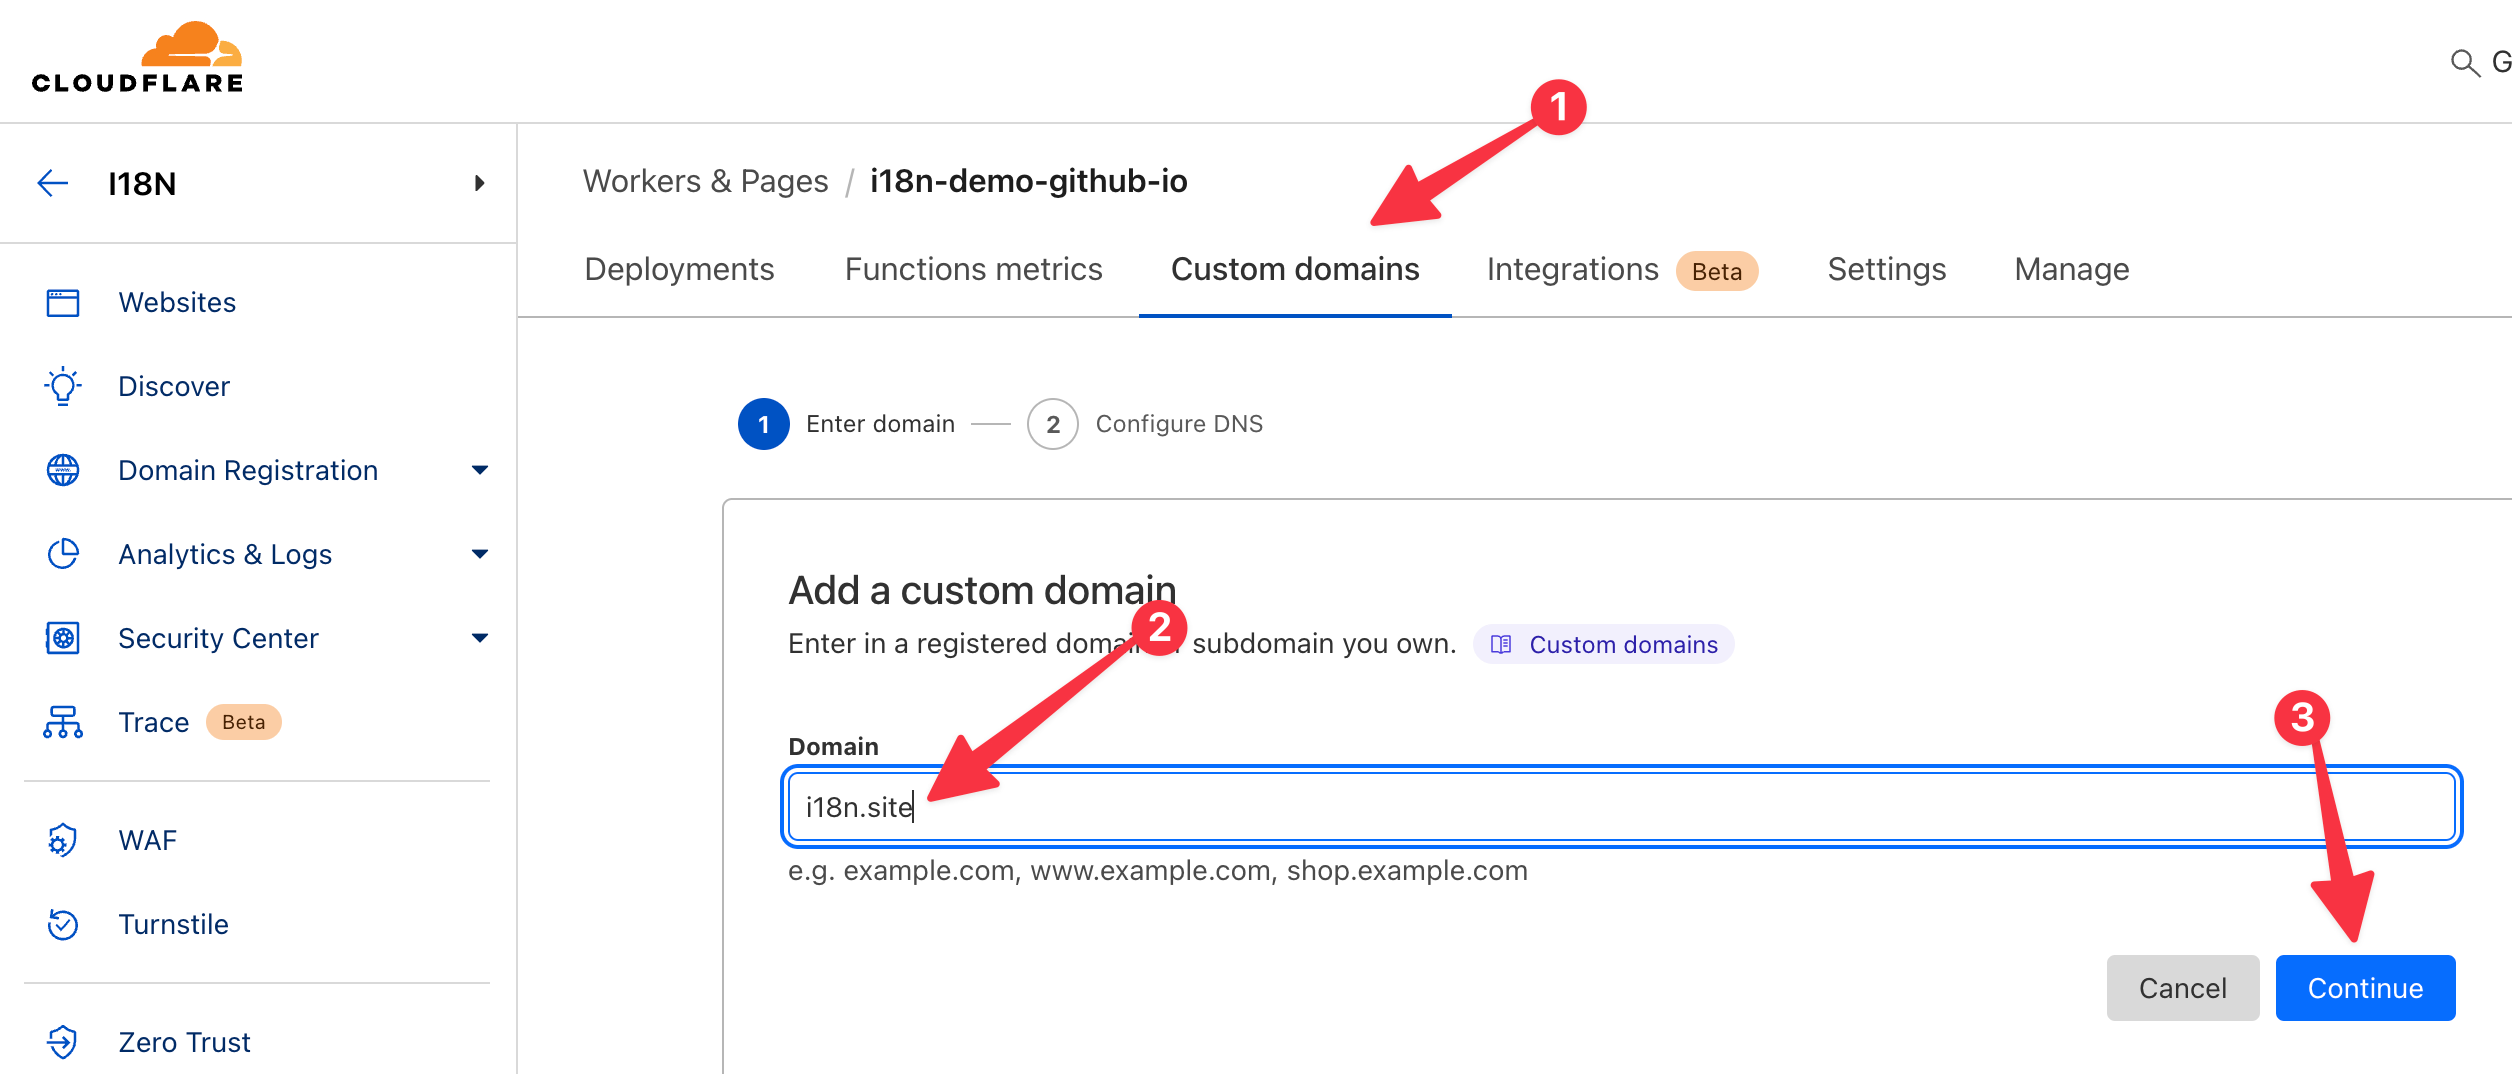
After binding the custom domain name, please go to the domain name to configure the path rewriting of the single-page application, as shown below:
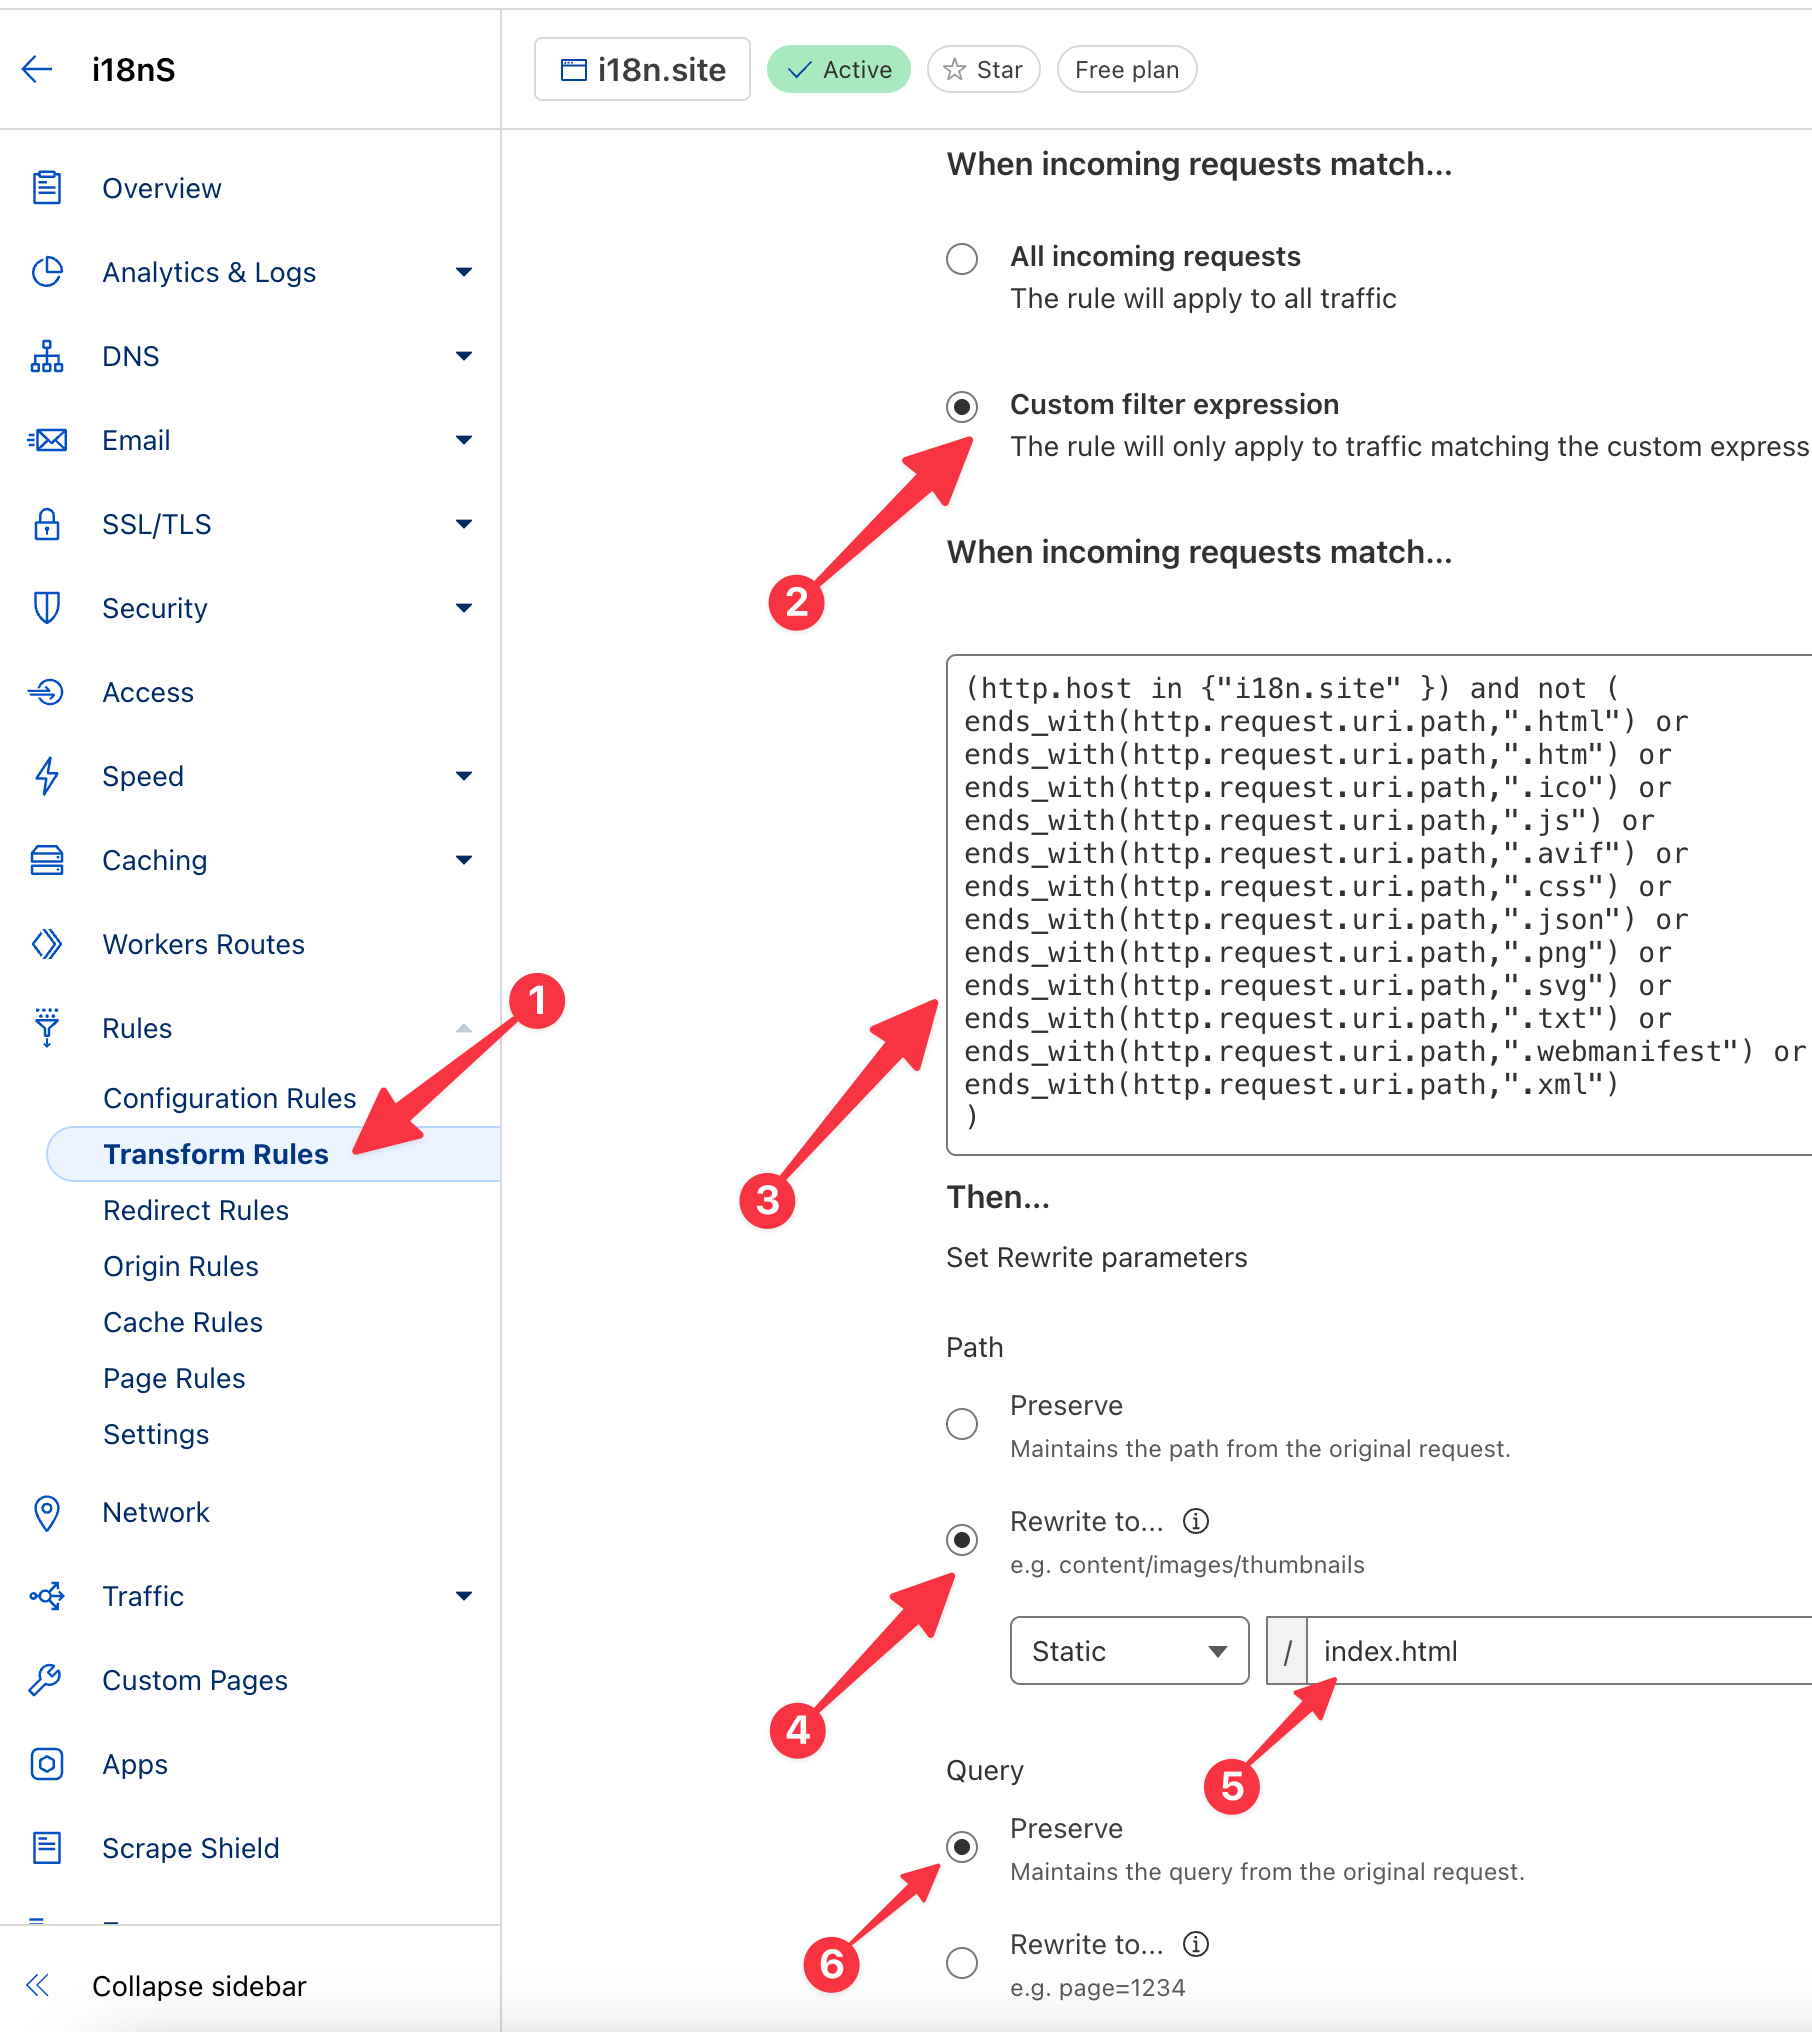
The rules in the above picture are as follows. Please replace i18n.site in the first line below with the domain name you bound.
(http.host in {"i18n.site"}) and not (
substring(http.request.uri.path,-3) in {".js" ".gz"} or
substring(http.request.uri.path,-4) in {".htm" ".rss" ".css" ".svg" ".ico" ".png" ".xml" ".txt"} or
substring(http.request.uri.path,-5) in {".html" ".avif" ".json"} or
ends_with(http.request.uri.path,".webmanifest")
)
In addition, please configure the cache rules, as shown below, and set the cache duration to one month.
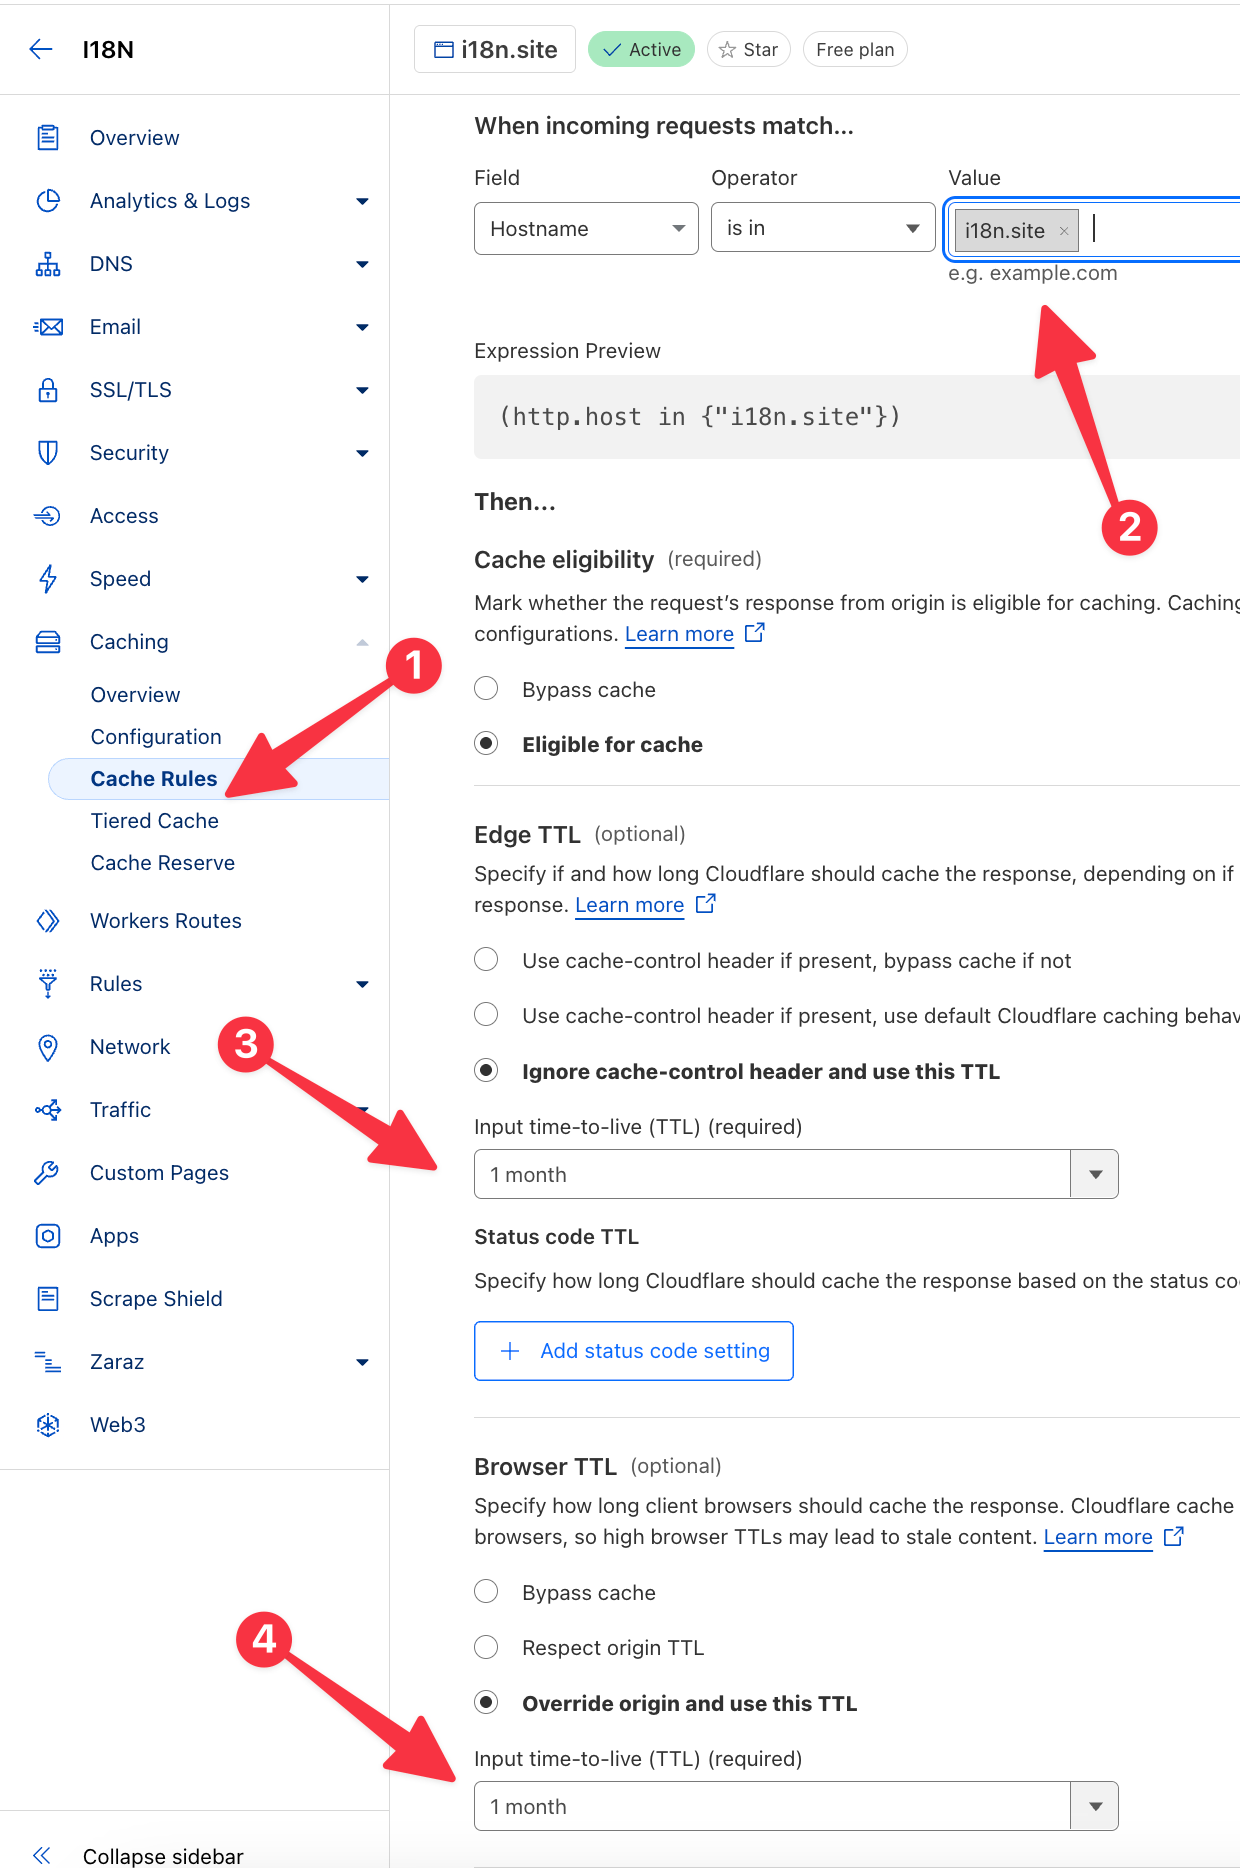
Please change the domain name matching in the second step in the picture above to the domain name you bound.
Optimizing Website Deployment in Mainland China
If you want to obtain better accessibility performance in the network environment of mainland China, please register a domain name first.
Then, use the object storage of cloud vendors in mainland China + CDN to deploy the content under out/main/htm.
You can use edge computing to rewrite the path to adapt to single-page applications. For example, Baidu Smart Cloud CDN can be configured like this:
const uri = r.uri, p = uri.lastIndexOf(".");
if (
  p < 0 ||
  !"|js|css|htm|html|md|avif|json|ico|xml|rss|gz|mp4|png|svg|txt|webmanifest|".includes(
    "|" + uri.slice(p + 1) + "|",
  )
) {
  const ua = r.headersIn["User-Agent"].toLowerCase()
  if (/facebookexternalhit|slurp|bot|spider|curl/.test(ua)) {
    r.return(
      302,
      (/baidu|yisou|sogou|360|byte/.test(ua) ? "/zh" : "/en") + r.uri + ".htm",
    )
  } else {
    r.uri = "/index.html"
  }
}

r.respHeader(() => {
  const t = [], out = r.headersOut;
  ["Content-MD5", "Age", "Expires", "Last-Modified"].forEach(
    i => delete out[i]
  )
  r.rawHeadersOut.forEach(i => {
    const key = i[0].toLowerCase()
    if (key.startsWith("x-") || key.startsWith("ohc-")) {
      delete out[key]
    }
  })
  out["Cache-Control"] = "max-age=" + 9e5
  // You can set the response header to debug the output, such as out.XXX = 'MSG';
})
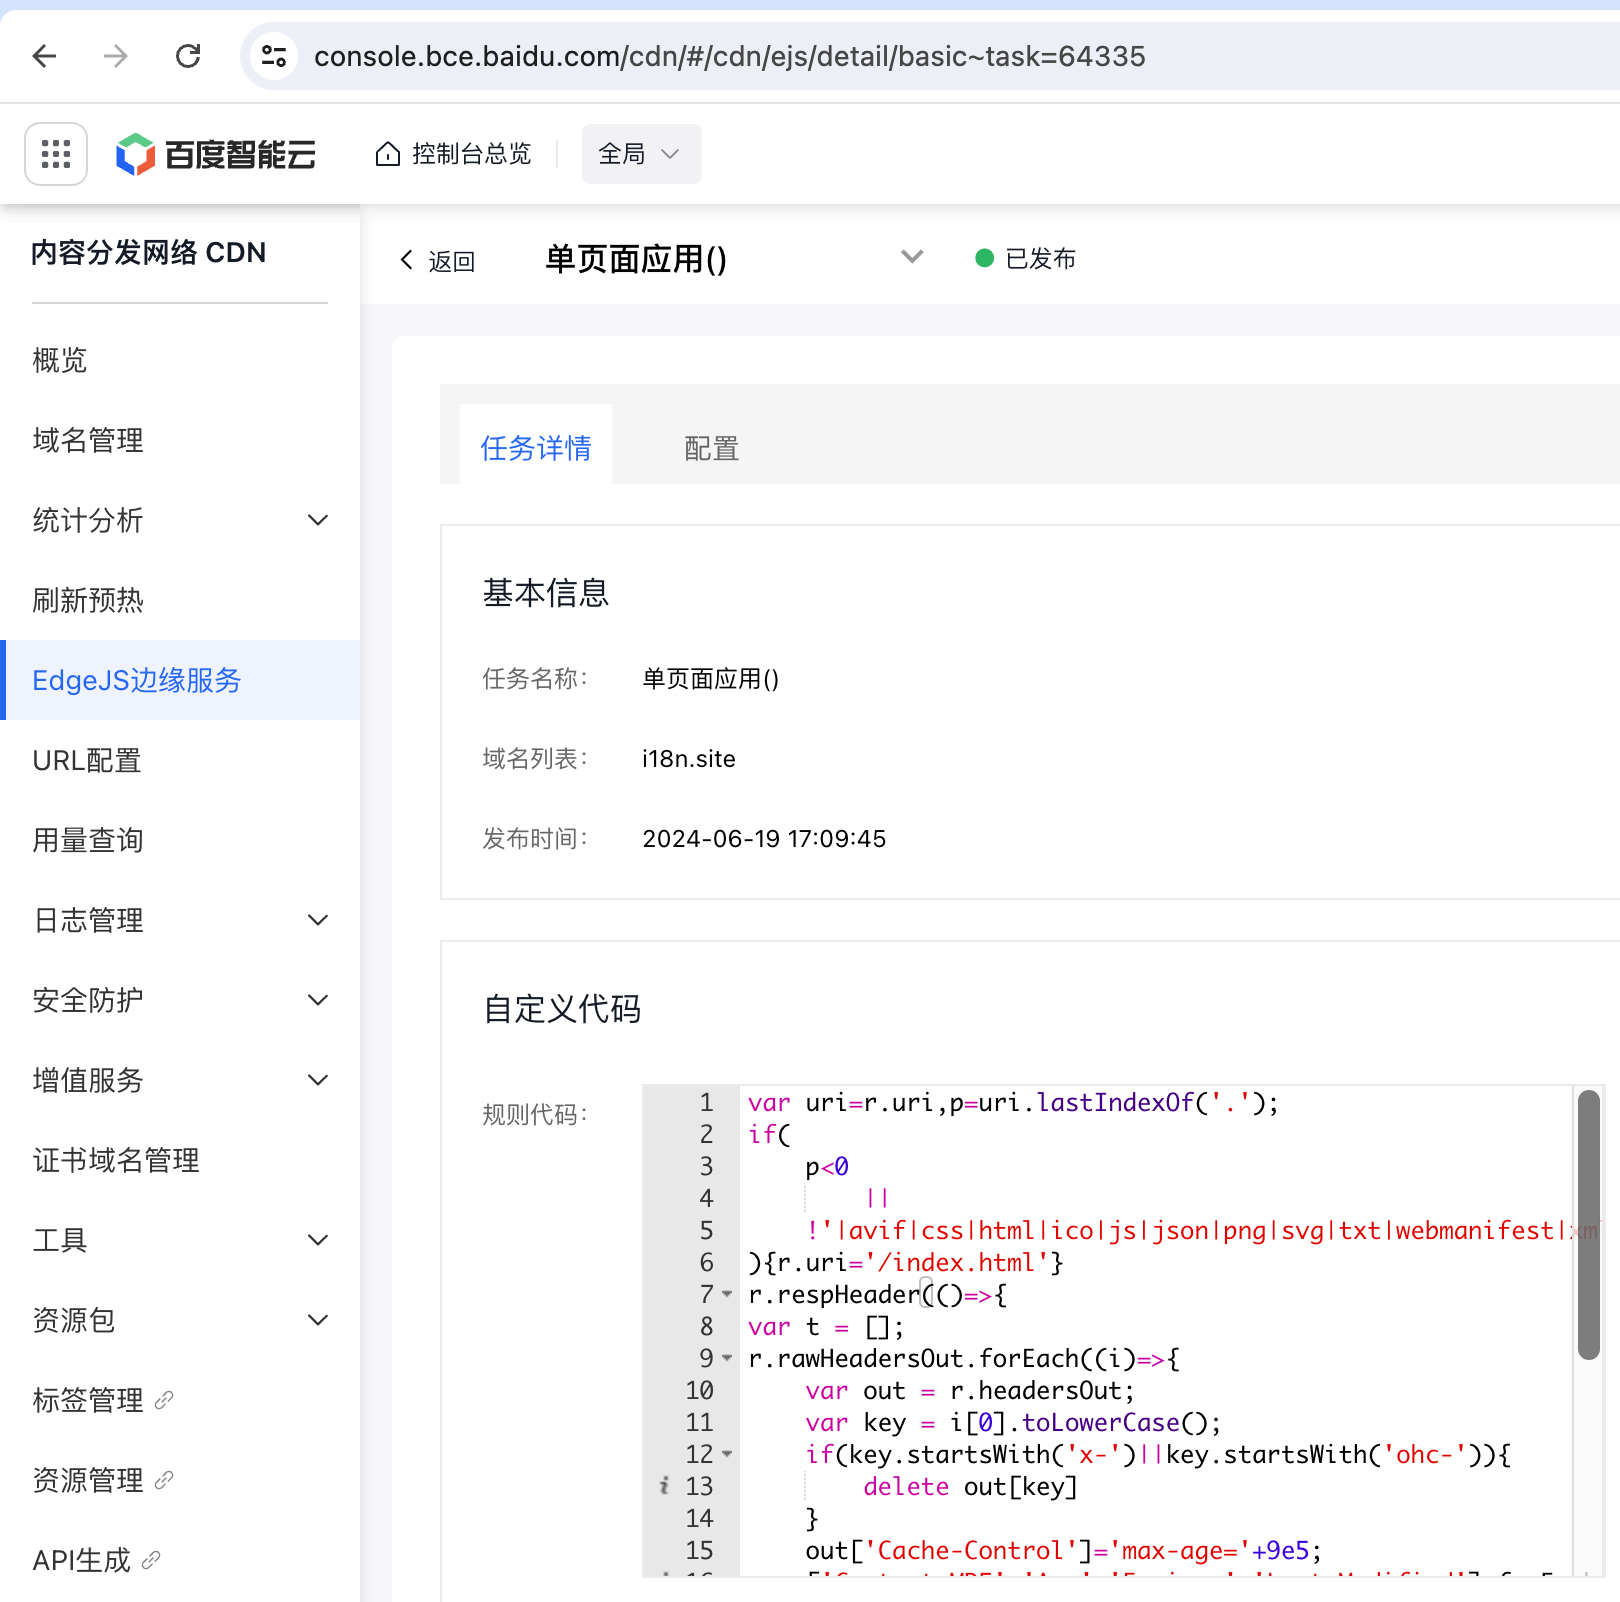
Since MX records and CNAME records cannot coexist, if you want to receive emails for the domain, you need to use the cname_flatten script to flatten the CNAME record into an A record.
Additionally, because the cost of overseas traffic from cloud providers in mainland China is relatively high, to optimize costs, you can use Huawei Cloud DNS's free geographical resolution and Cloudflare for SaaS custom domains (as shown below) to achieve traffic diversion—traffic from mainland China can go through Baidu Cloud CDN, while international traffic can go through Cloudflare.
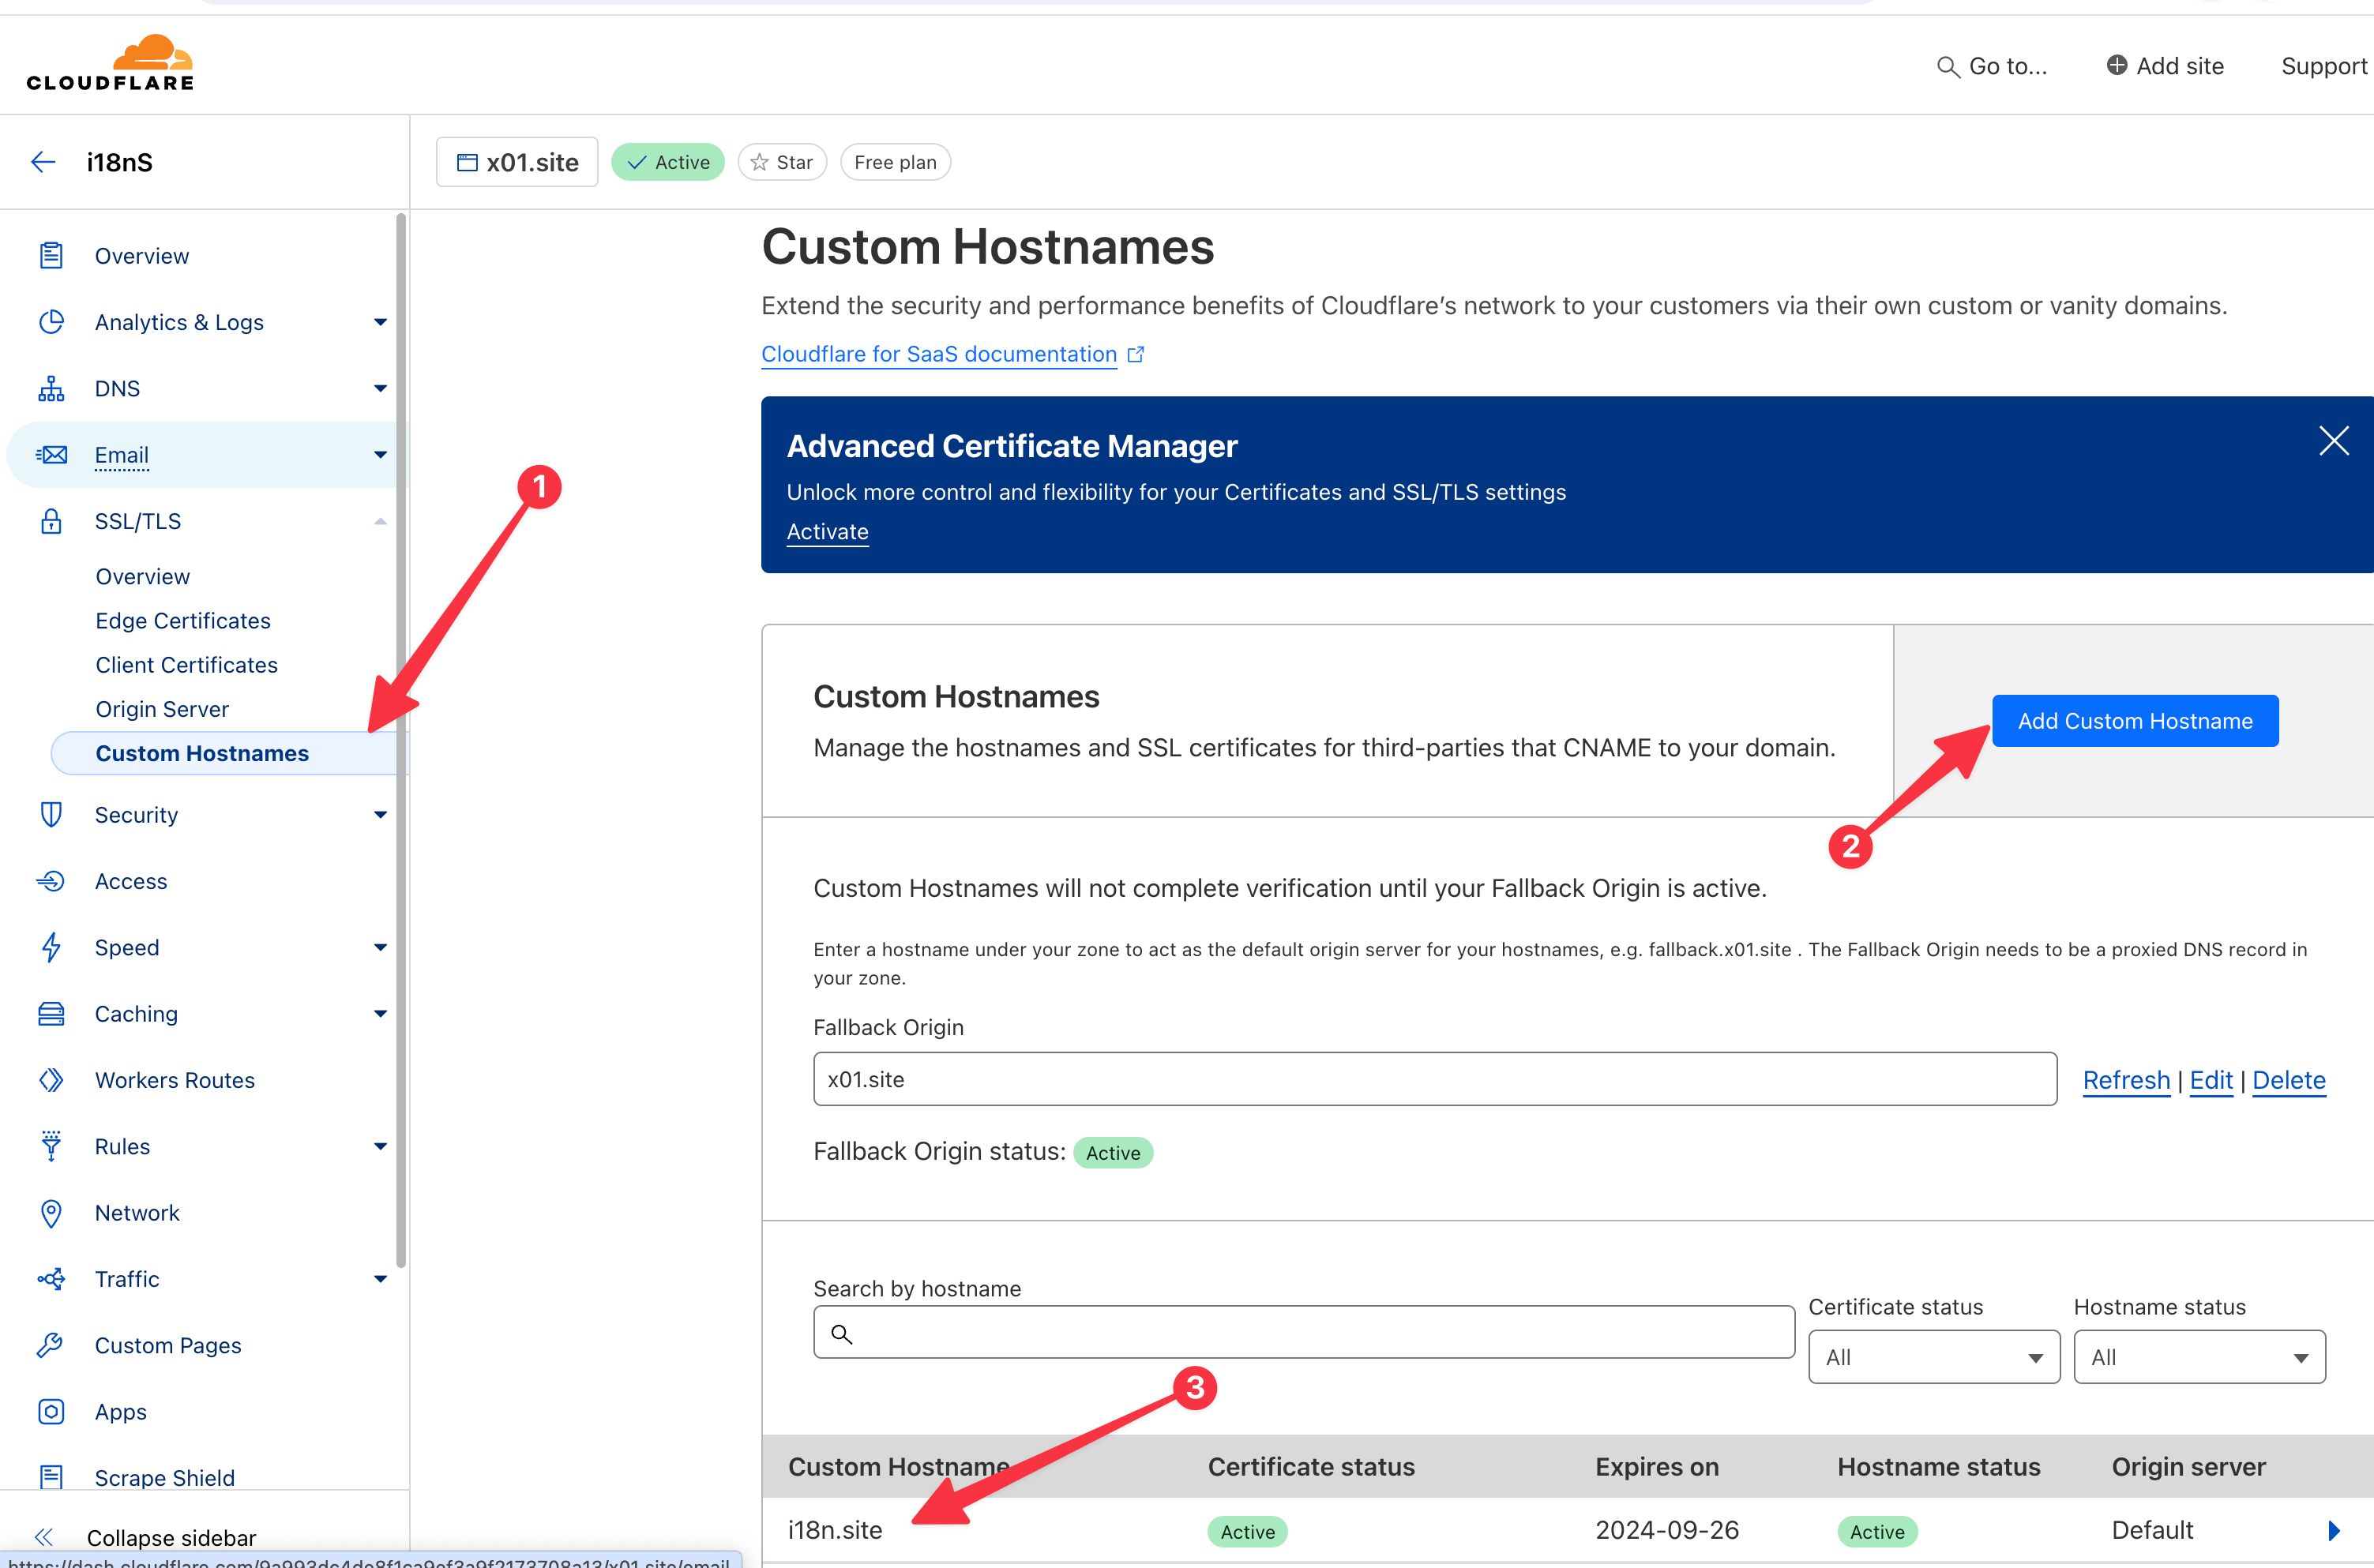
These deployment optimization solutions are more complex and will be introduced in separate chapters in the future.
Wildcard Domain Redirection
If you use i18n.site to generate a website as your main website, you usually need to configure wildcard domain redirection, that is, redirect access to *.xxx.com (including www.xxx.com) to xxx.com.
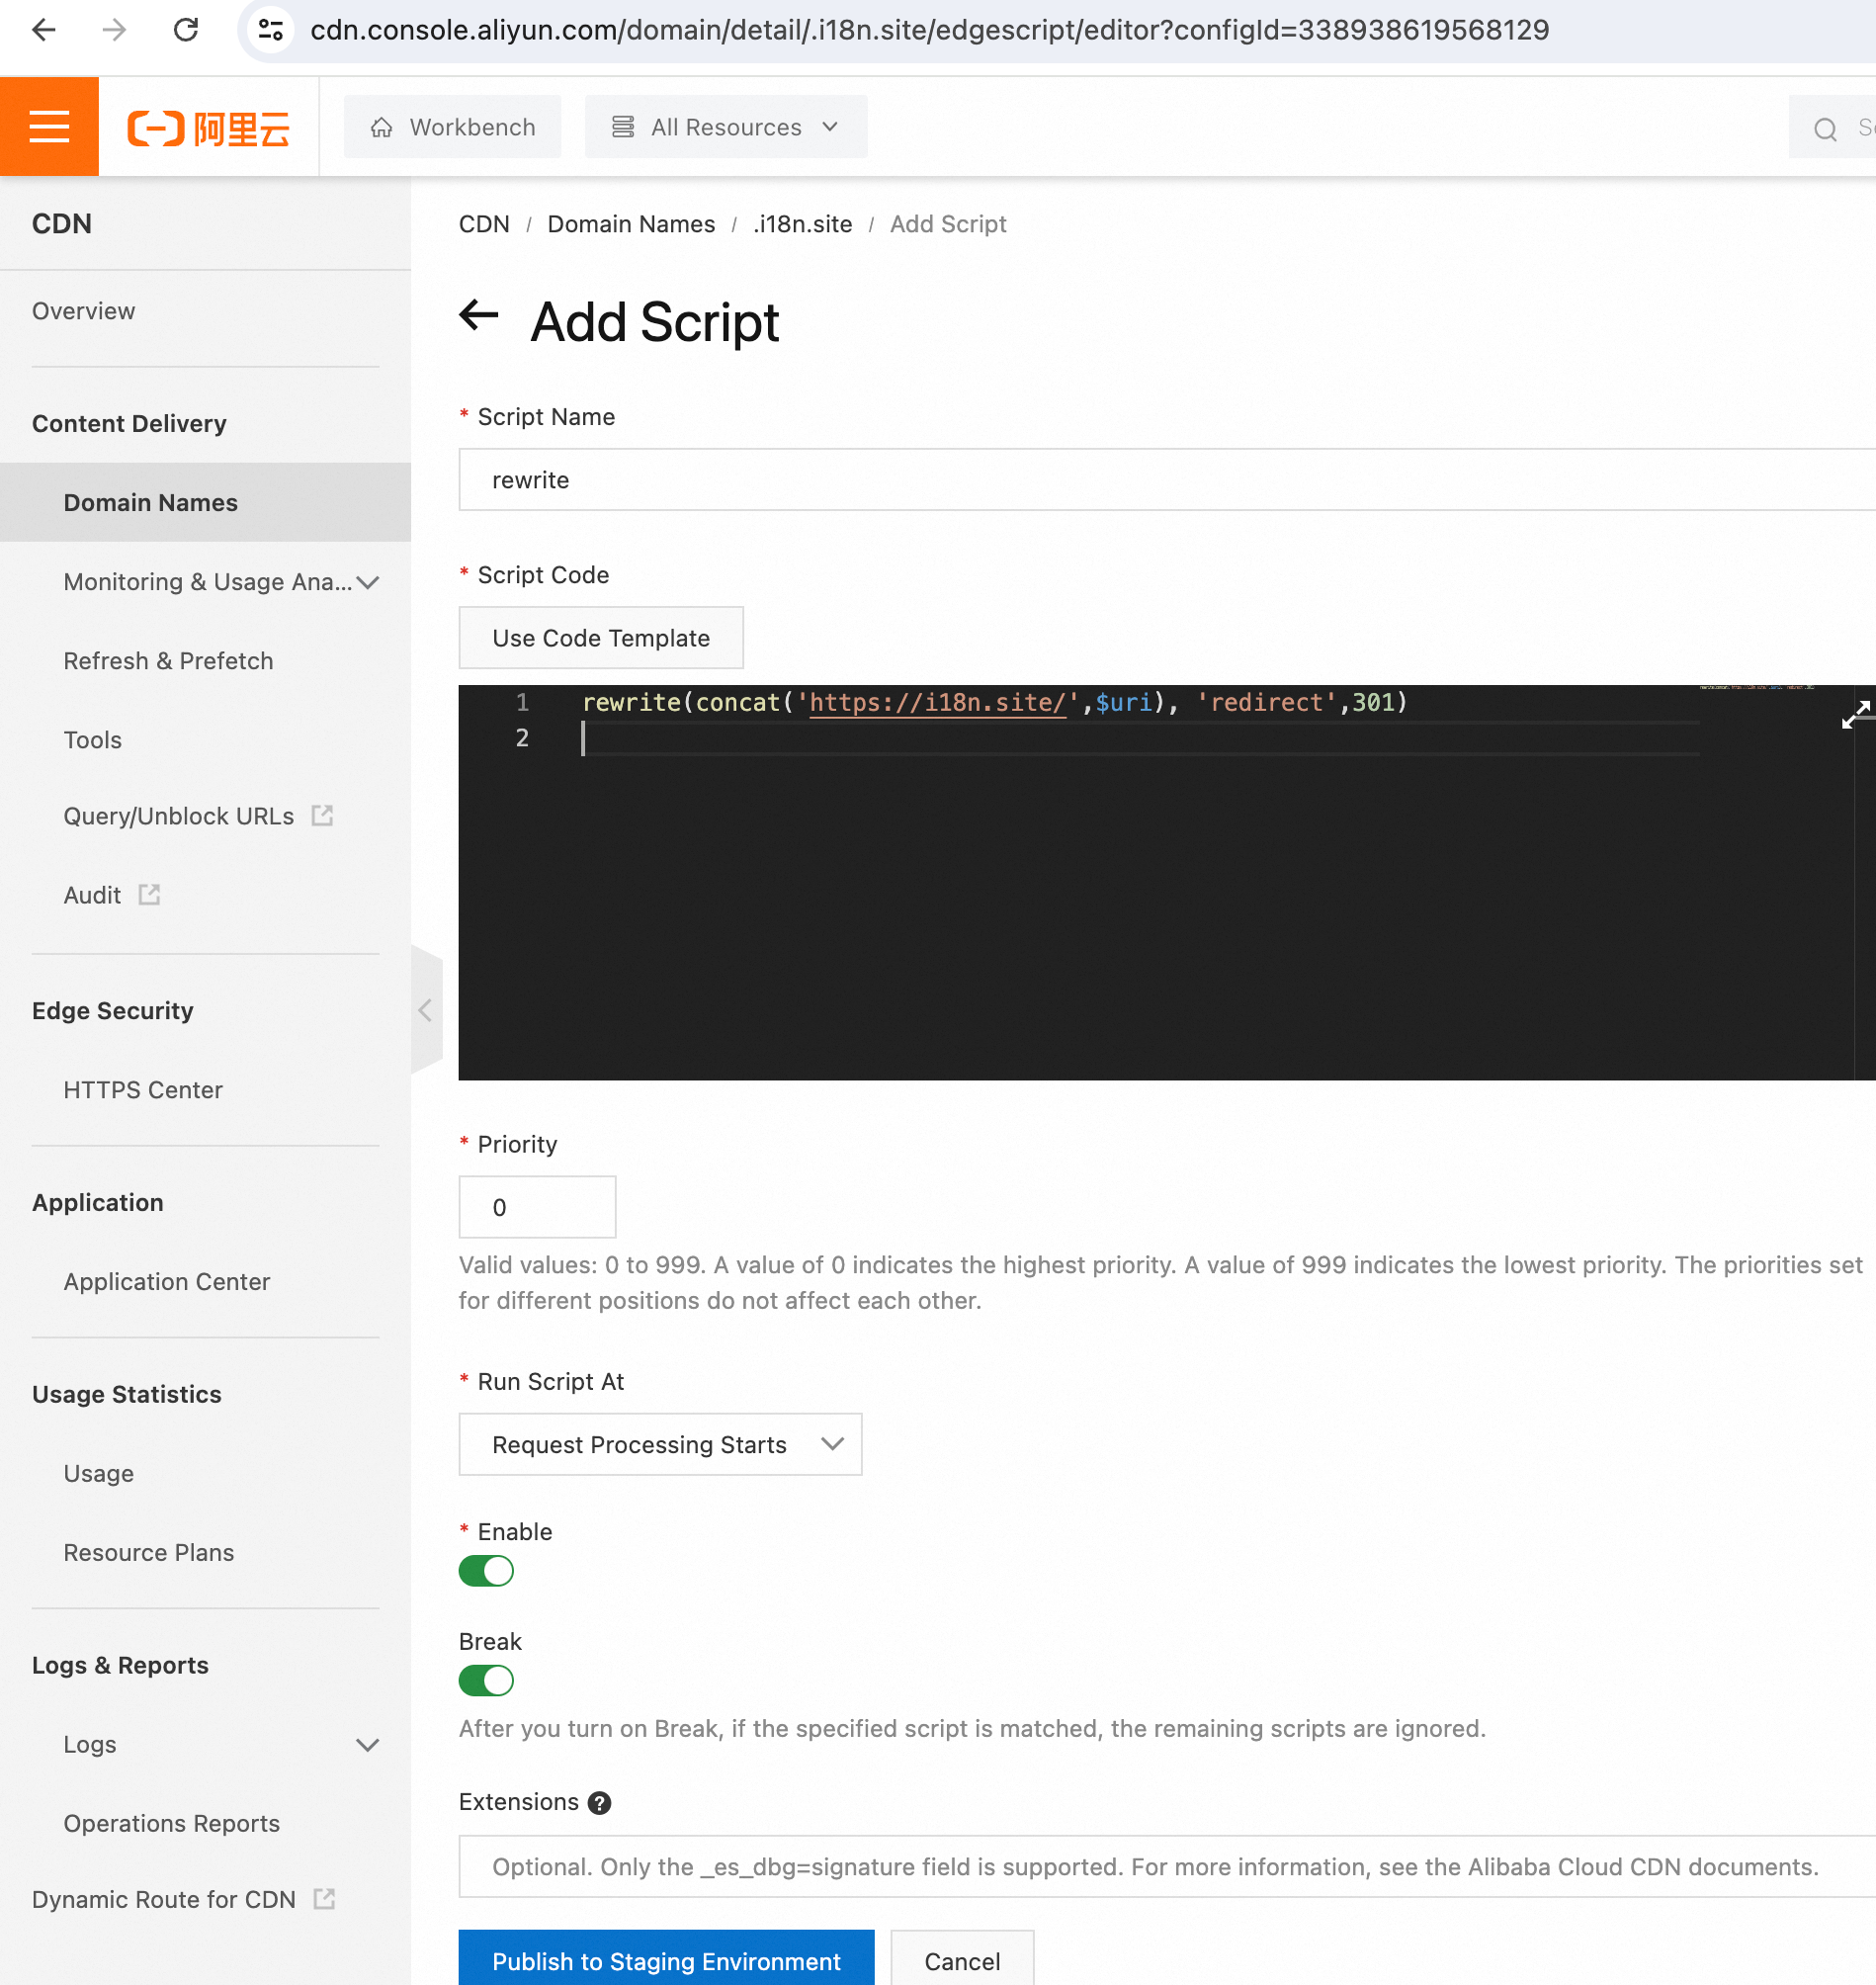
This requirement can be achieved with the help of Alibaba Cloud CDN's EdgeScript ( English documentation / Chinese documentation )
Add the domain name in Alibaba Cloud CDN and point the domain *.xxx.com to the CNAME in Alibaba Cloud CDN.
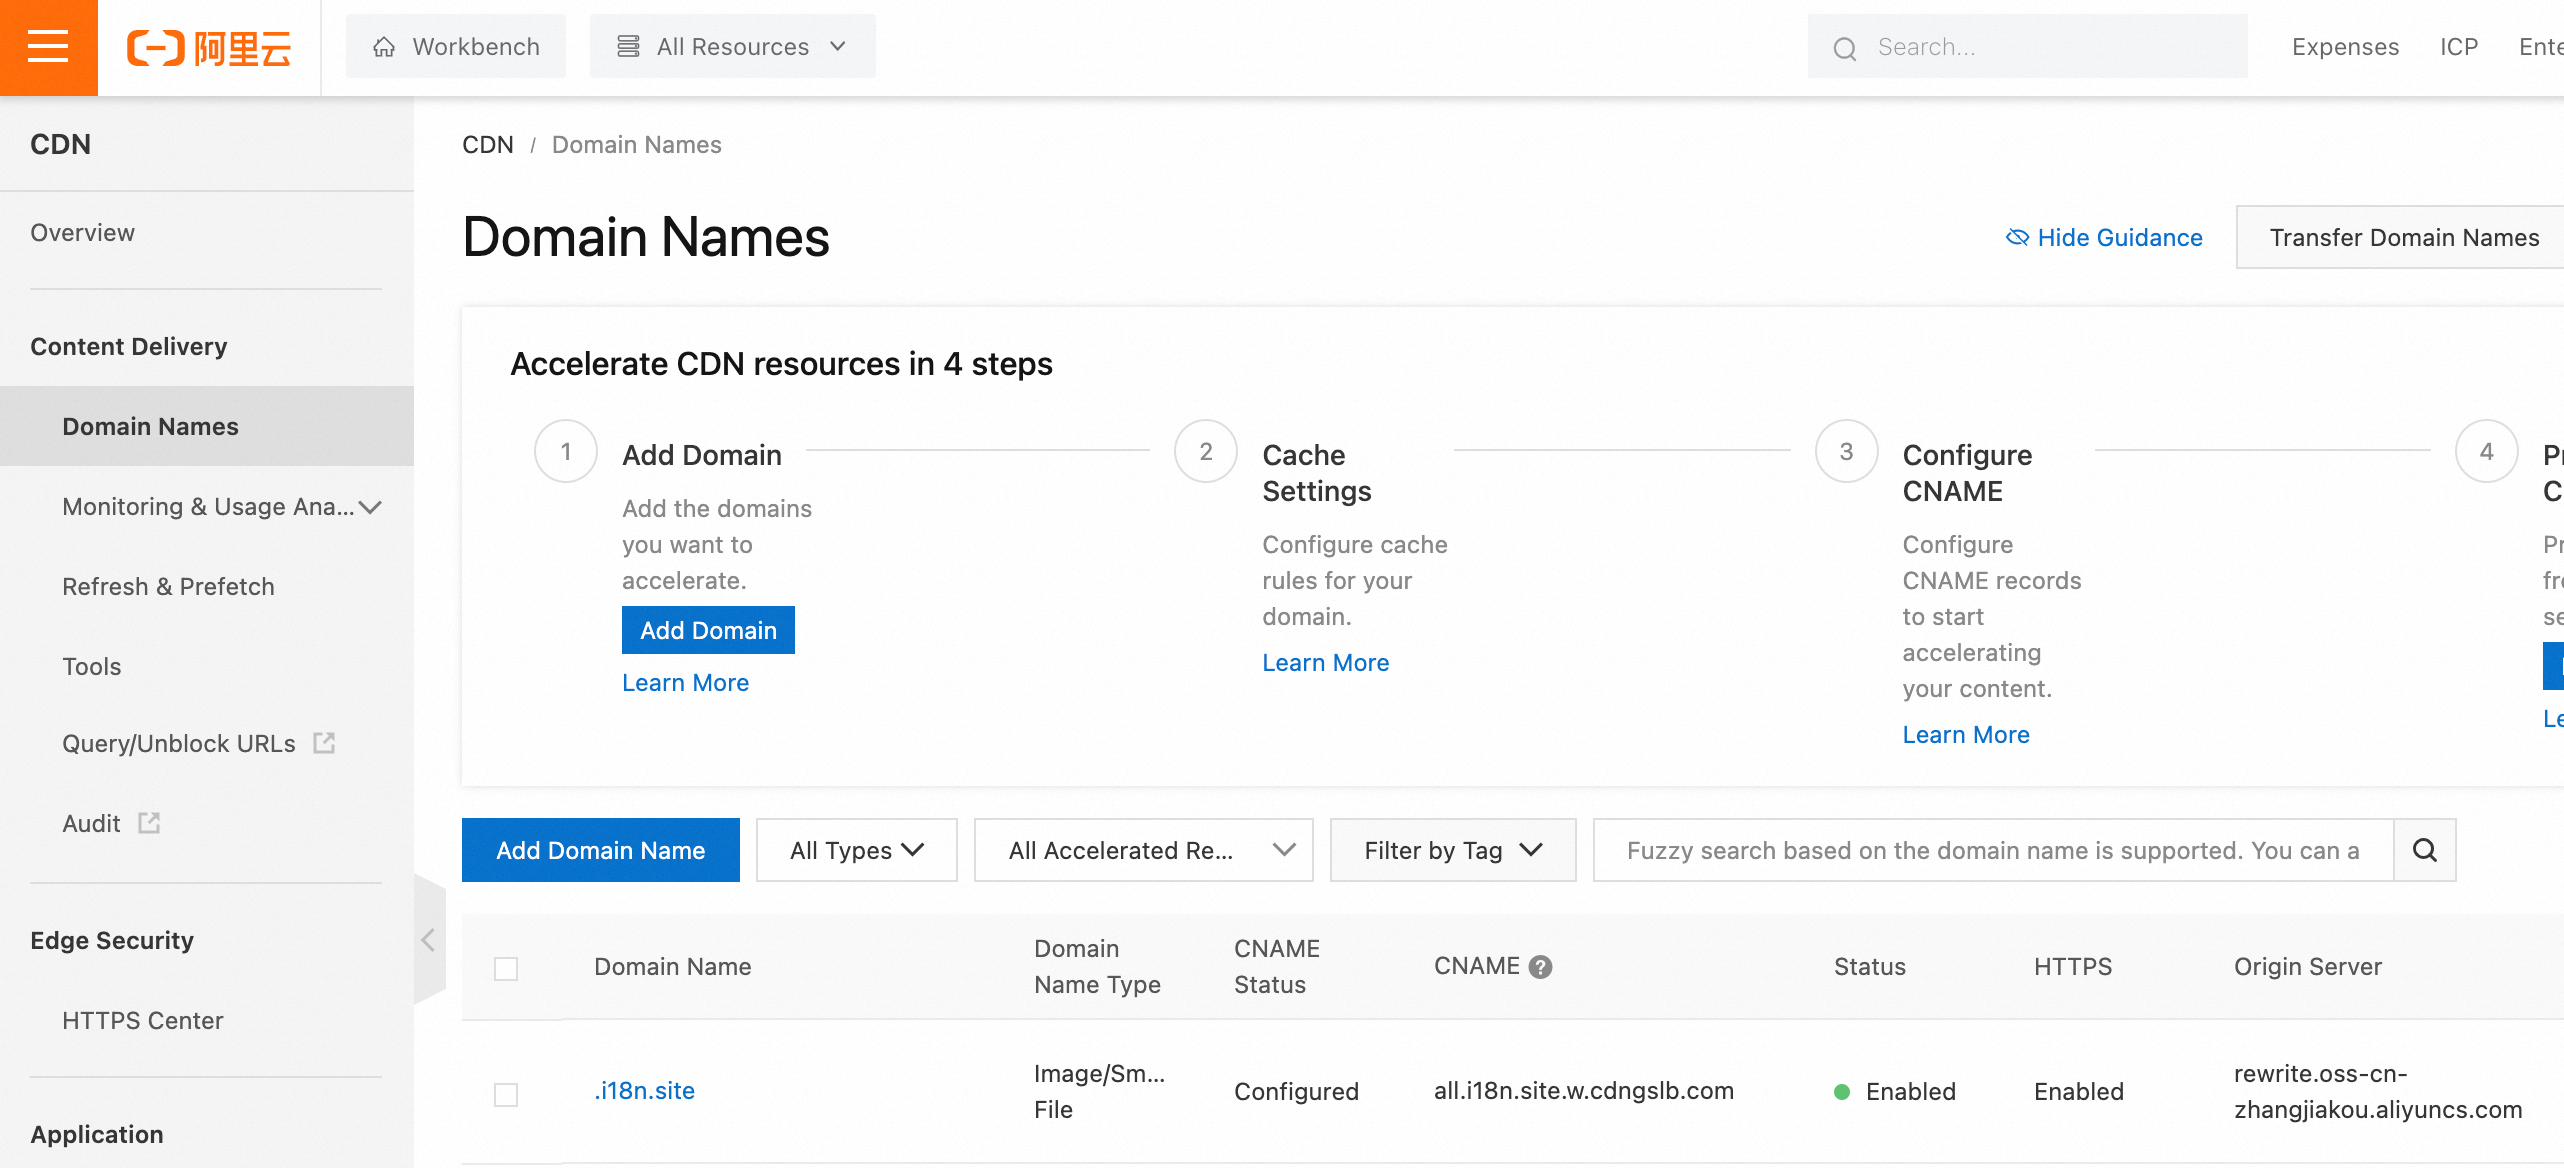
For example, the wildcard domain redirection configuration of *.i18n.site in the picture above is as follows:
rewrite(concat('https://i18n.site',$uri), 'redirect',301)
Deploy with Nginx
Please add a configuration similar to the following in the server block of Nginx. Please change /root/i18n/md/out/main/htm to the path of your own project out/main/htm:
location / {
  root  /root/i18n/md/out/main/htm;
  add_header Cache-Control "max-age=9999999";
  if ($uri !~* \.(avif|css|html|ico|js|json|png|svg|txt|webmanifest|xml)$) {
     rewrite ^ /index.html last;
  }
}
Based on GitHub Actions for Continuous Integration
You can refer to the following to configure your GitHub Actions:
name: i18n.site

on:
  workflow_dispatch:
  push:
    branches:
      - main
      - dist

jobs:
  i18n:

    permissions:
      repository-projects: write
      contents: write

    runs-on: ubuntu-latest

    steps:
      - name: checkout
        uses: actions/checkout@v4

      - name: https://i18n.site
        uses: i18n-site/github-action-i18n.site@main
        with:
          I18N_SITE_TOKEN: ${{ secrets.I18N_SITE_TOKEN }}
          NPM_TOKEN: ${{ secrets.NPM_TOKEN }}
As can be seen in the configuration, this workflow is triggered when pushing to the main branch and the dist branch.
The workflow will use the configuration file corresponding to the branch name to publish the document. Here, .i18n/htm/main.yml and .i18n/htm/dist.yml will be used as the publishing configuration respectively.
We recommend the following best practices for the document release process:
When changes are pushed to the main branch, the document is triggered to be built and deployed to the preview site (the preview site can use GitHub Pages).
After confirming that the document is correct on the preview site, the code will be merged and pushed to the dist branch, and the official build and deployment will go online.
Of course, implementing the above process requires writing more configurations.
You can refer to the actual project github.com/fcdoc/doc for workflow scripting.
secrets.I18N_SITE_TOKEN and secrets.NPM_TOKEN in the configuration require you to configure secret variables in the code base.
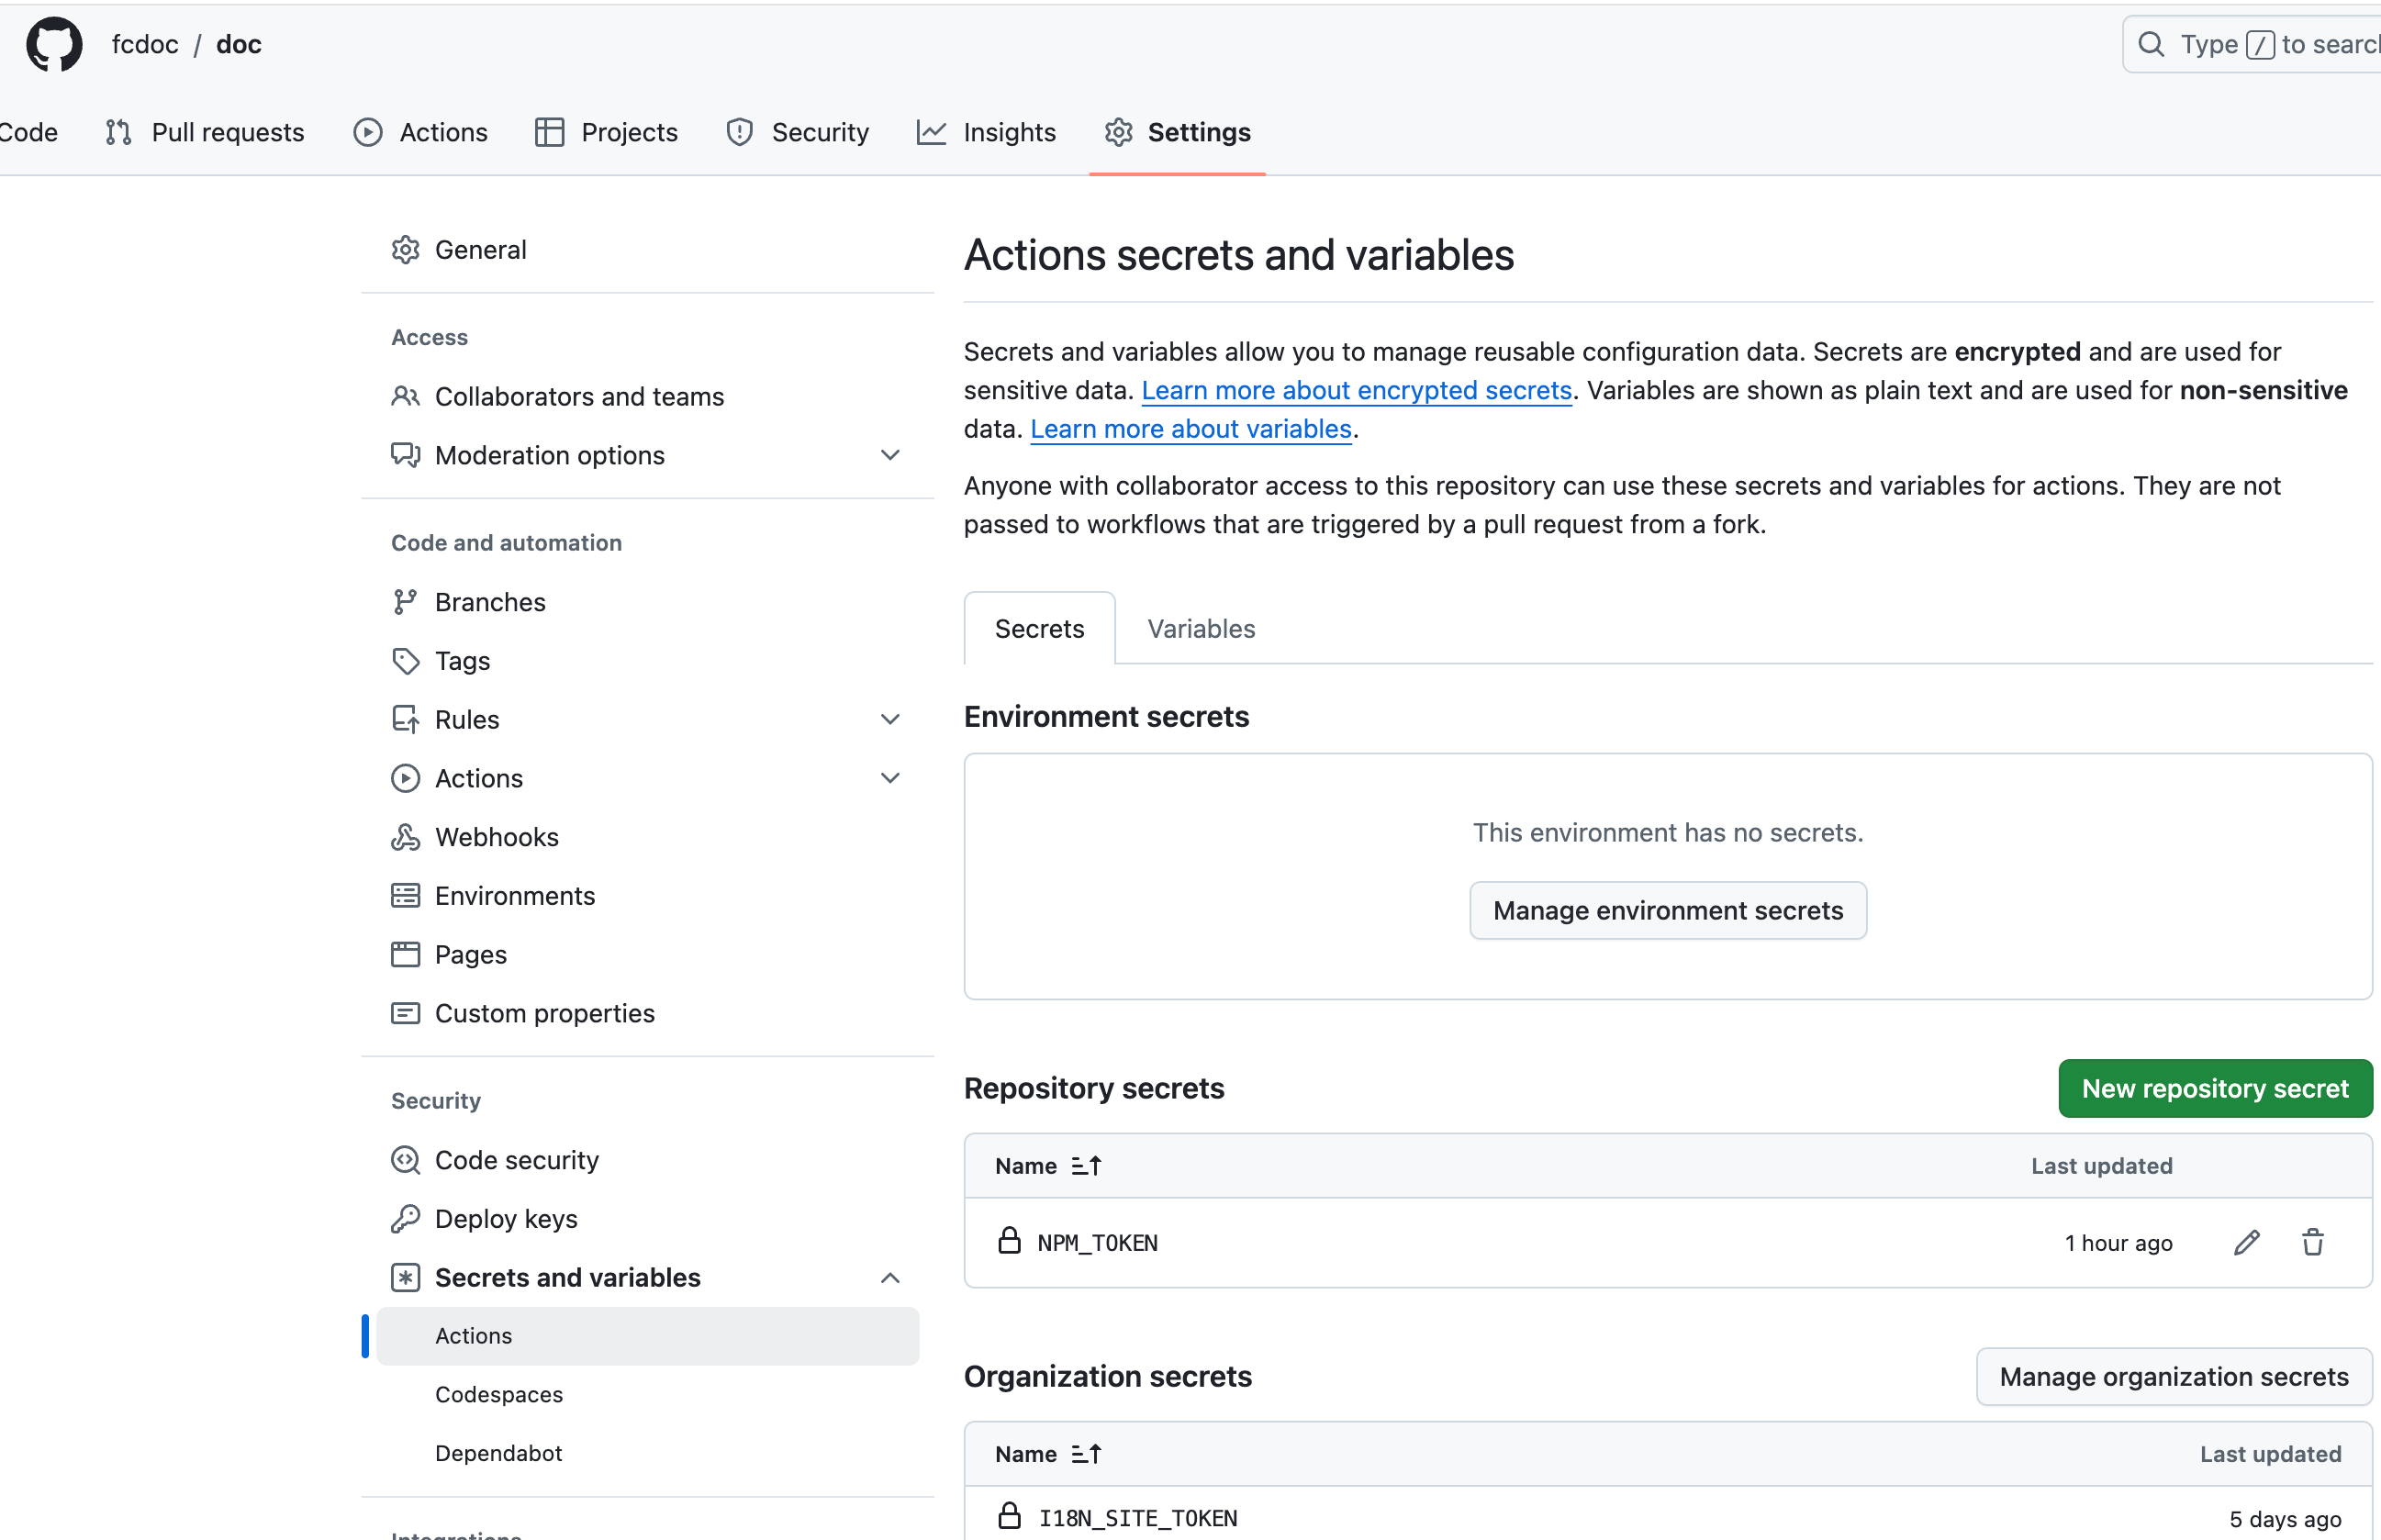
I18N_SITE_TOKEN can be obtained from i18n.site/token.
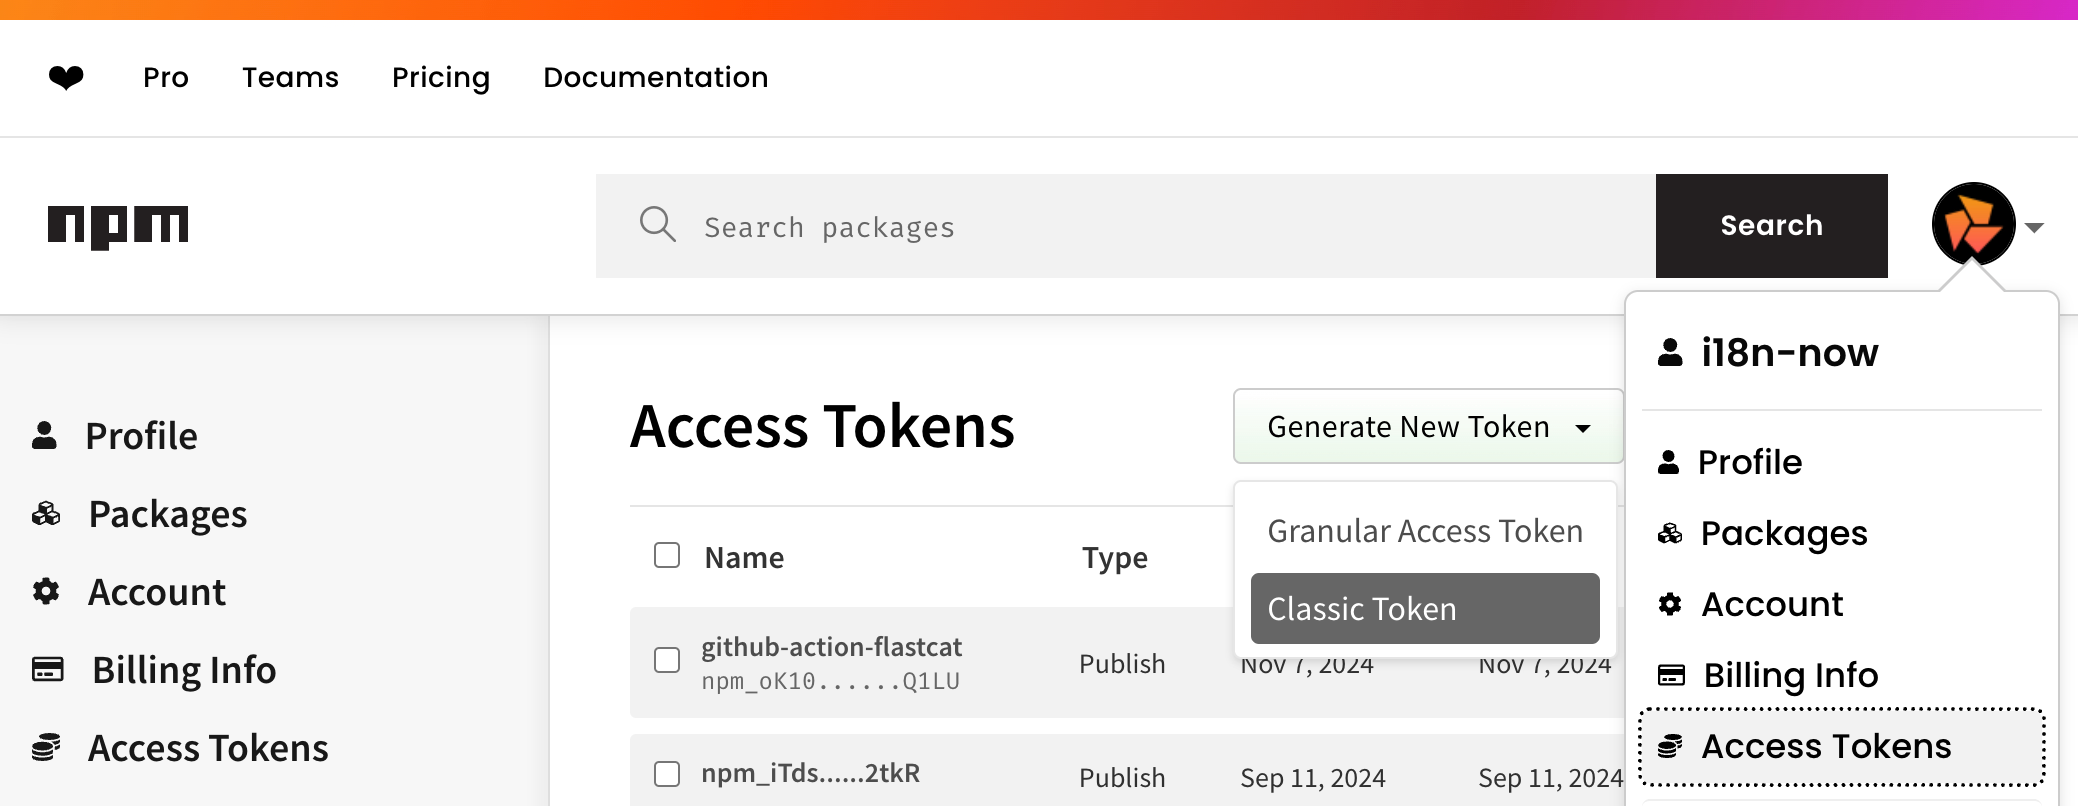
NPM_TOKEN is the publishing token of the npm package in the configuration. Visit npmjs.com and create a token with publishing permissions (as shown below).
Directory Structure
public
Static files of the website, such as favicon.ico, robots.txt, etc.
The icon files can be generated using realfavicongenerator.net.
.i18n
The .i18n directory contains the configuration files, translation cache, etc., of i18n.site. See the next chapter “Configuration” for details.
en
Source language directory, corresponding to en in the fromTo of the .i18n/conf.yml configuration file
i18n:
  fromTo:
    en: zh
The translation configuration can be found in i18.